如何在Photoshop中测量/转换CSS文本的边距/填充?

13

如何从Photoshop获得CSS文本边距/填充?

或者

如何将Photoshop中文本的距离转换为CSS边距/填充?

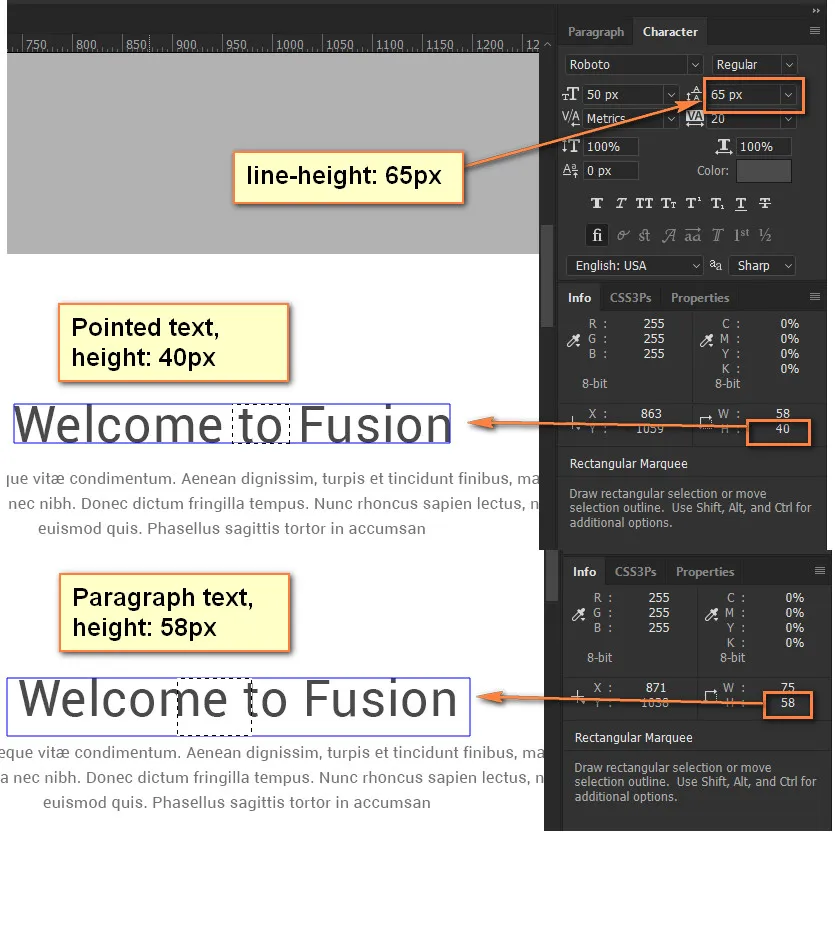
在Photoshop中,文本元素(段落)的距离与CSS中的边距/填充不对应。距离是使用智能参考线等工具测量的:

PS screenshot 0

这是因为距离计算中没有使用行高。因此,我发现的第一个建议是使用公式

margin_in_CSS = distance_in_PS - (line-height - font-size) / 2

或更短:

CSS = PS - (line-height - font-size) / 2

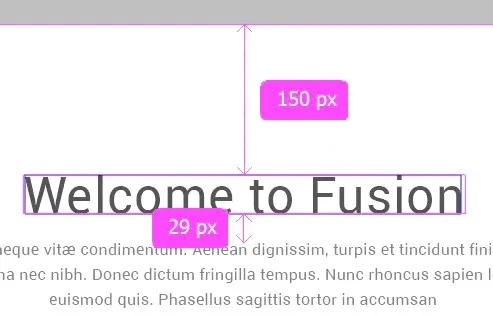
这是从某个明显的边界(线)到文本元素的距离。对于两段落之间的距离,我们分别使用:

CSS = PS - (line-height_1 - font-size_1) / 2 - (line-height_2 - font-size_2) / 2
随着字体大小的增加,很明显这个公式已经不够用了。在Photoshop中用选择工具获取到的文本行的实际高度甚至比字体大小还小

PS screenshot 1

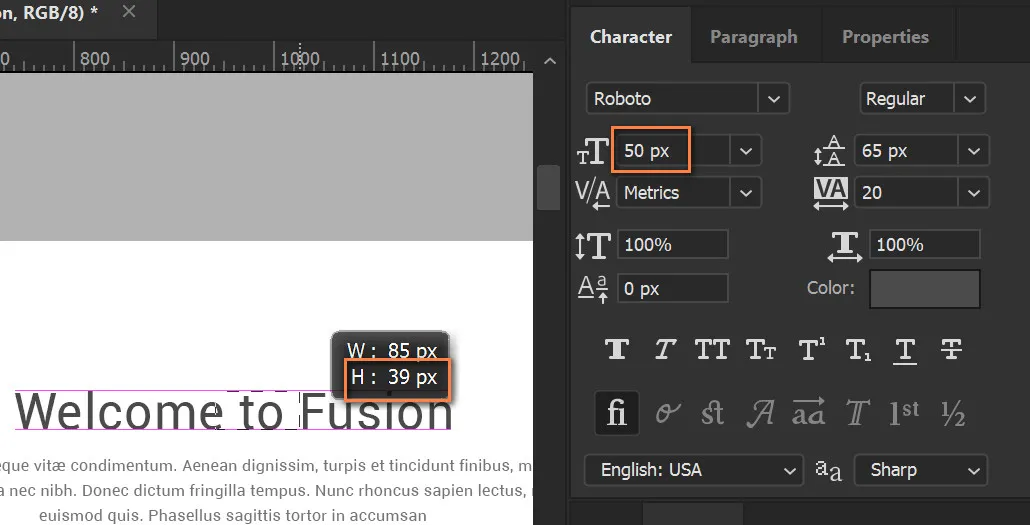
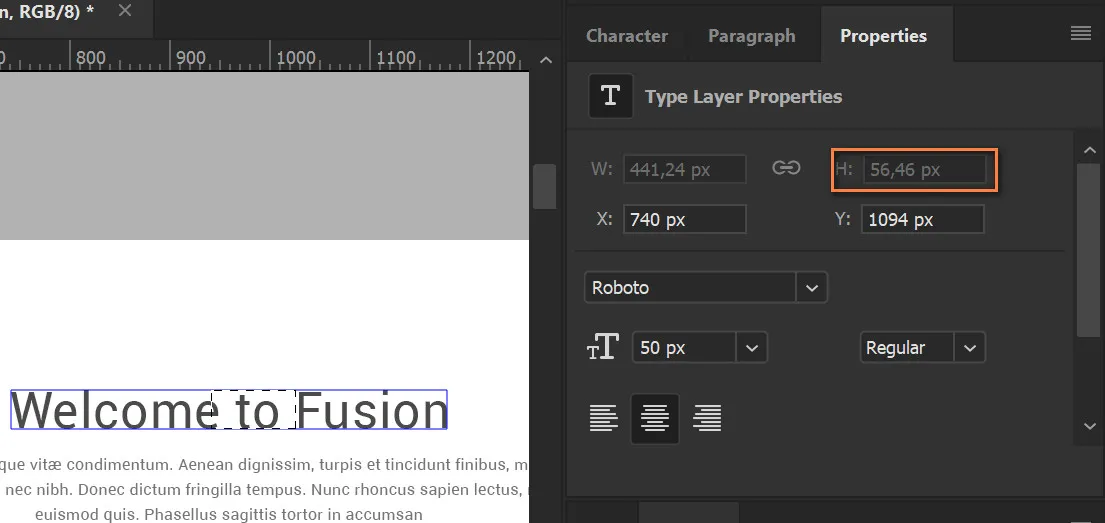
尽管Photoshop仍然认为元素的高度大约等于字体大小,但这并不影响与它的距离 :(. 例如,在属性选项卡上:

PS screenshot 2

我计算了线条实际高度和字体大小之间的差异大约为30%15%(我不是说这是100%正确的!)。现在我使用这个公式

CSS = PS - (0.15 * font-size + (line-height - font-size) / 2)

或在两段之间:

CSS = PS - (0.15 * font-size_1 + (line-height_1 - font-size_1) / 2)
         - (0.15 * font-size_2 + (line-height_2 - font-size_2) / 2)
同样地,我们不能仅仅依靠Photoshop来正确定义一个段落在多行中的高度。但这里的情况更为简单,CSS 中段落的真实高度将会是:

Similarly, we can not rely on the correct definition of the height of a paragraph in several lines by Photoshop. But here the situation is simpler, the real height of the paragraph in the CSS will be:

height = line-height * num_of_lines

问题是,是否有更简单的方法?О_о

抱歉我的英语 ^_^


更新,更短的公式:

文本 <> 边框

CSS = PS - (line-height - 0.7 * font-size) / 2

文本 <> 文本

CSS = PS - (line-height_1 - 0.7 * font-size_1) / 2
         - (line-height_2 - 0.7 * font-size_2) / 2

更新:

现在正在为Adobe论坛开发一个脚本,以正确计算距离 (链接)。目前,该脚本可以计算标准(自动)行高为120%的文本行边界框距离。


更新:

无论您使用点文字还是段落文字,结果边界框高度都不等于文本行高(行间距)。

边界框高度

3个回答

8
如何将Photoshop中的文本距离转换为CSS margin/padding?
您所得到的文本实际上会产生不同高度的字形(图像中的粉色边框):
- " - [空格] = 没有任何字形 - ... - a - A - Qq - q
边距和内边距不应该从文本本身测量,而应该从文本行的边界(或CSS中的line-height)测量。
在上面的示例中:

enter image description here

65px 是文本行的实际高度(或CSS中的line-height)(当文本换行时两个文本基线之间的距离),在计算边距/填充时使用。最终结果是无论文本元素的内容如何,其基线到其后面的元素的距离应保持相同,基于line-height,(底部)margin和(底部)padding(当然还要考虑下一个元素的顶部边距和填充)。

简而言之,PS不会对边距进行减少。只是它们不是从文本字形的包围框(可能因内容而异)计算出来的,而是从文本行的包围框计算出来的。

在将.psd转换为HTML时需要考虑的另一件事是,在HTML中您有折叠边距。简而言之,从两个垂直相邻的边距中只保留最大的边距。如果另一个是负数,则将其从正数中扣除,如果两者都是负数,则应用具有最大值的边距。


PS中的距离是从“字符的边界框”计算出来的,至少在智能参考线中是这样的-请再次检查第一张截图。这就是问题所在。而在CSS中,距离是从“文本行的边界框”计算出来的...因此问题是如何从PS中的“文本行边界框”测量它? - Yeah.not
我认为你是错误的。在 PS 中,距离也是从行框计算的。要在 PS 中获取行框,您可以将文本转换为段落文本,其框将默认为文本行。如果你所说的是真的,那么行高将因内容而异,但实际上并不是这样的。 - tao
不,我认为我是对的。请查看我最后一次更新的截图。无论您使用指向文本还是段落文本,结果边界框高度都不等于文本行高(行高=前导)。 - Yeah.not

1

最后,测量垂直距离的脚本已经完成!它可以正确计算CSS中层之间的垂直距离,其中一个或两个层都是文本层。

这是Adobe论坛上的链接 - 一个用于测量两个元素之间距离的脚本?

// version no CS6 or no effects

var old_units = app.preferences.rulerUnits;    
app.preferences.rulerUnits = Units.PIXELS;    

try { app.activeDocument.suspendHistory("Get Text Bounds", "var bounds = get_selected_layers_bounds()") } catch(e) { alert(e); }  

try { executeAction( charIDToTypeID( "undo" ), undefined, DialogModes.NO ); } catch(e) { alert(e); }  

app.preferences.rulerUnits = old_units;    

if (bounds)    
    {    
    if (bounds.length == 2)    
        {    
        var distance = 0;

        if (bounds[0].bottom <= bounds[1].top) distance = bounds[1].top - bounds[0].bottom;    
        else if (bounds[1].bottom <= bounds[0].top) distance = bounds[0].top - bounds[1].bottom;    

        else  alert("Intersecting layers")    

        var distance_in_css = distance - (bounds[0].leading - 1.2*bounds[0].size)/2 - (bounds[1].leading - 1.2*bounds[1].size)/2;

        alert("distance = " + distance + "\ndistance_in_css = " + distance_in_css);
        }    
    else    
        alert("More then 2 selected layers")     

    }    
else     
    alert("There is no selected layers")     

/////////////////////////////////////////////////////////////////////////////////////////////////    
function get_selected_layers_bounds()    
    {    
    try {    
        var ref = new ActionReference();    

        ref.putProperty( charIDToTypeID( "Prpr" ), stringIDToTypeID( "targetLayers" ) );    
        ref.putEnumerated( charIDToTypeID("Dcmn"), charIDToTypeID("Ordn"), charIDToTypeID("Trgt") );    
        var desc = executeActionGet(ref);    

        if (!desc.hasKey( stringIDToTypeID("targetLayers") ) ) return null;    

        var n = 0;    
        try { activeDocument.backgroundLayer } catch (e) { n = 1; }    

        desc = desc.getList( stringIDToTypeID("targetLayers"));    

        var len = desc.count;    

        var selected_bounds = new Array();    

        for (var i = 0; i < len; i++)    
            {    
            try     
                {    
                var r = new ActionReference();    
                r.putIndex( charIDToTypeID( "Lyr " ), desc.getReference(i).getIndex() + n);    

                var ret = executeActionGet(r);    

                var size    = 0;
                var leading = 0;

                if (ret.hasKey(stringIDToTypeID("textKey")))  
                    {  
                    var textStyleRangeList = ret.getObjectValue(stringIDToTypeID("textKey")).getList(charIDToTypeID("Txtt" ));

                    if (textStyleRangeList.count > 1) { alert("More than one textStyleRange in layer", "Oops!!"); }

                    var textStyle = textStyleRangeList.getObjectValue(0).getObjectValue(charIDToTypeID("TxtS" ));

                    var auto_leading = textStyle.getBoolean(stringIDToTypeID("autoLeading"));

                    size = textStyle.getUnitDoubleValue(stringIDToTypeID("size"));
                    leading = auto_leading?size*1.2:textStyle.getUnitDoubleValue(stringIDToTypeID("leading"));

                    var s = ret.getObjectValue(stringIDToTypeID("textKey")).getString(charIDToTypeID("Txt " ));  
                    s = s.replace(/^./gm, String.fromCharCode(0x2588));  

                    var d1 = new ActionDescriptor();  
                    d1.putReference( charIDToTypeID( "null" ), r );  

                    var d2 = new ActionDescriptor();  
                    d2.putString( charIDToTypeID( "Txt " ), s);  

                    d1.putObject( charIDToTypeID( "T   " ), charIDToTypeID( "TxLr" ), d2 );  

                    executeAction( charIDToTypeID( "setd" ), d1, DialogModes.NO );  

                    ret = executeActionGet(r);    
                    }  


                // var bounds = ret.getObjectValue(stringIDToTypeID("bounds"));  // use this in CS6 or when you want to take into account the effects    

                var bounds = ret.getObjectValue(stringIDToTypeID("boundsNoEffects")); // in CS6 does not work    

                var obj = { 
                          left   : bounds.getUnitDoubleValue(stringIDToTypeID("left")),    
                          top    : bounds.getUnitDoubleValue(stringIDToTypeID("top")),    
                          right  : bounds.getUnitDoubleValue(stringIDToTypeID("right")),    
                          bottom : bounds.getUnitDoubleValue(stringIDToTypeID("bottom")),
                          size   : size,
                          leading: leading,
                          };    

                    selected_bounds.push(obj);    
                }

                catch (e) { alert(e); return null; }    
            }    

            return selected_bounds;    
        }    

    catch (e) { alert(e); return null; }    
}

脚本应保存为*.js或*.jsx文件(例如,distance.js),放在Photoshop文件夹中 - C:\Program Files\Adobe\Adobe Photoshop CC 2017\Presets\Scripts 它将出现在Photoshop菜单中 - 文件 > 脚本 > 距离

0

这并不重要,PSD只是用来展示网站完成后的外观,你必须考虑字体大小,例如,如果段落文本在PSD中的字体大小为14pt,网格为1200px(Bootstrap),那么你必须将字体转换为浏览器的宽高比(默认情况下Bootstrap为16px),并相应地计算,例如,PSD中的14pt等于14px +(14 * 0.16%)px在浏览器中,其他所有内容也是如此,行高也是类似。 另外,如果你想将字体大小设置为与PSD相同,可以选择在HTML中选择14px,如果我们的PSD段落字体大小为14pt。


网页内容由stack overflow 提供, 点击上面的
可以查看英文原文,
原文链接