我在使用 .setDividerDrawable() 时发现只有在冰淇淋三明治以下版本中才有效。当我运行模拟器时,标签显示得很好,但没有分隔线。在模拟较低版本的Android时,没有任何问题,分隔符显示正常。
我正在使用以下代码创建TabHost。我不知道是什么原因导致ICS出现问题。
manifest.xml
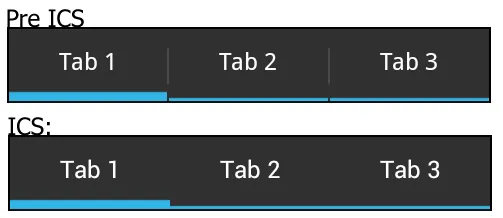
外观如何:选项卡背景是9patch背景图像。
我正在使用以下代码创建TabHost。我不知道是什么原因导致ICS出现问题。
manifest.xml
<?xml version="1.0" encoding="utf-8"?>
<manifest xmlns:android="http://schemas.android.com/apk/res/android"
    package="com.sbl.mytabapp"
    android:versionCode="1"
    android:versionName="1.0" >

    <uses-sdk android:minSdkVersion="8" />

    <application
        android:icon="@drawable/ic_launcher"
        android:label="@string/app_name"
        android:debuggable="true" >
        <activity
            android:name=".MyTabApp"
            android:label="@string/app_name"
            android:theme="@style/MyTabAppTheme" >
            <intent-filter>
                <action android:name="android.intent.action.MAIN" />
                <category android:name="android.intent.category.LAUNCHER" />
            </intent-filter>
        </activity>
        <activity android:name=".Page1"></activity>
        <activity android:name=".Page2"></activity>
        <activity android:name=".Page3"></activity>
    </application>

</manifest>
MyTabApp.java (R.drawable.divider) 引用了这张图片: ,这是一张只有1像素宽的 .jpg 文件。在 ICS 上不会显示。
public class MyTabApp extends TabActivity {
    public void onCreate(Bundle savedInstanceState) {
        super.onCreate(savedInstanceState);
        setContentView(R.layout.main);

        TabHost tabHost = getTabHost();
        TabHost.TabSpec spec;
        Intent intent;

        tabHost.getTabWidget().setDividerDrawable(R.drawable.divider);

        intent = new Intent().setClass(this, Page1.class);
        spec = tabHost.newTabSpec("page1").setIndicator(getLayoutInflater().inflate(R.layout.tab1, null))
                      .setContent(intent);
        tabHost.addTab(spec);

        intent = new Intent().setClass(this, Page2.class);
        spec = tabHost.newTabSpec("page2").setIndicator(getLayoutInflater().inflate(R.layout.tab2, null))
                      .setContent(intent);
        tabHost.addTab(spec);

        intent = new Intent().setClass(this, Page3.class);
        spec = tabHost.newTabSpec("page3").setIndicator(getLayoutInflater().inflate(R.layout.tab3, null))
                      .setContent(intent);
        tabHost.addTab(spec);

        tabHost.setCurrentTab(0);

    }
}
main.xml
<?xml version="1.0" encoding="utf-8"?>
<TabHost xmlns:android="http://schemas.android.com/apk/res/android"
    android:id="@android:id/tabhost"
    android:layout_width="match_parent"
    android:layout_height="match_parent">
    <LinearLayout
        android:orientation="vertical"
        android:layout_width="match_parent"
        android:layout_height="match_parent">
        <TabWidget
            android:id="@android:id/tabs"
            android:layout_width="match_parent"
            android:layout_height="wrap_content"/>
        <FrameLayout
            android:id="@android:id/tabcontent"
            android:layout_width="match_parent"
            android:layout_height="match_parent" />
    </LinearLayout>
</TabHost>
style.xml
<?xml version="1.0" encoding="utf-8"?>
<resources>

 <style name="MyTabAppTheme" parent="android:style/Theme">
    <item name="android:windowNoTitle">true</item>
 </style>


 <style name="tablayout" parent="android:style/Theme">
     <item name="android:layout_width">match_parent</item>
     <item name="android:layout_height">match_parent</item>
     <item name="android:height">48dp</item>
     <item name="android:gravity">center</item>
     <item name="android:textColor">@color/font</item>
     <item name="android:background">@drawable/tabselector</item>
 </style>

 <style name="contentlayout" parent="android:style/Theme">
     <item name="android:layout_width">match_parent</item>
     <item name="android:layout_height">match_parent</item>
     <item name="android:textColor">@color/font</item>
     <item name="android:background">@color/background</item>
 </style>
</resources>
tab1.xml、tab2.xml和tab3.xml都包含相同的引用样式。这是选项卡1:
<?xml version="1.0" encoding="utf-8"?>
<TextView xmlns:android="http://schemas.android.com/apk/res/android"
  android:id="@+id/tab1"
  style="@style/tablayout" />
tabselector.xml选项卡的背景是9patch背景图像。
<?xml version="1.0" encoding="utf-8"?>
<selector xmlns:android="http://schemas.android.com/apk/res/android">
    <!-- Non focused states -->
    <item android:state_focused="false" android:state_selected="false" android:state_pressed="false" android:drawable="@drawable/normal" />
    <item android:state_focused="false" android:state_selected="true" android:state_pressed="false" android:drawable="@drawable/selected" />

    <!-- Focused states -->
    <item android:state_focused="true" android:state_selected="false" android:state_pressed="false" android:drawable="@drawable/normal_focused" />
    <item android:state_focused="true" android:state_selected="true" android:state_pressed="false" android:drawable="@drawable/selected_focused" />

    <!-- Pressed -->
    <item android:state_selected="false" android:state_pressed="true" android:drawable="@drawable/normal_pressed" />
    <item android:state_selected="true" android:state_pressed="true" android:drawable="@drawable/selected_pressed" />
</selector>
外观如何:选项卡背景是9patch背景图像。