UIView绘制弧形仪表图表

5
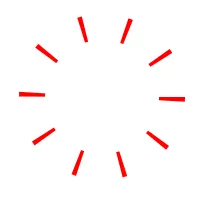
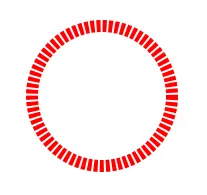
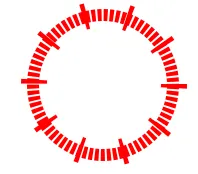
我有一个图表,它是一个有多个设计元素的仪表盘形状(见附件)。我遇到的主要问题是如何得到一个带虚线的优秀弧形。
到目前为止,我不确定我是否应该使用Core Graphics或者UIKit中的UIBezierPath。我在一个扩展UIView的类中尝试了这个方法,它给我提供了虚线,但弧线本身还不够好。
class Example: UIView {

    override func drawRect(rect: CGRect) {

        let context = UIGraphicsGetCurrentContext()
        CGContextSetLineWidth(context, 10.0)
        CGContextSetStrokeColorWithColor(context, UIColor.greenColor().CGColor)
        let dashArray:[CGFloat] = [1,10, 0, 0]
        CGContextSetLineDash(context, 2, dashArray, 4)
        CGContextMoveToPoint(context, 10, 200)
        CGContextAddQuadCurveToPoint(context, 0, 0, 100, 200)
        CGContextStrokePath(context)
    }
}

有一些其他方法可以使用UIBezierPath来实现,但我不确定如何在这里应用虚线…

得到带虚线的弧是我的主要目标 - 我相信一旦我做到了这一点,我就能够解决渐变和动画问题:)

非常感谢您的帮助:)

enter image description here

2个回答

4
你需要的是两条不同虚线宽度的贝塞尔曲线路径。你可以从这里开始:要获取更高的虚线贝塞尔曲线:

enter image description here

UIBezierPath* oval2Path = [UIBezierPath bezierPathWithOvalInRect: yourRect];
[UIColor.redColor setStroke];
oval2Path.lineWidth = 13;
CGFloat oval2Pattern[] = {2, 20};
[oval2Path setLineDash: oval2Pattern count: 2 phase: 0];
[oval2Path stroke];

要获得小的虚线贝塞尔曲线,您需要减少虚线之间的间隔:

enter image description here

UIBezierPath* ovalPath = [UIBezierPath bezierPathWithOvalInRect: yourRect];
[UIColor.redColor setStroke];
ovalPath.lineWidth = 6;
CGFloat ovalPattern[] = {2, 1};   
[ovalPath setLineDash: ovalPattern count: 2 phase: 0];
[ovalPath stroke];

现在,您可以将这两个贝塞尔路径组合在一起:

enter image description here

- (void)drawFrame: (CGRect)frame
{

    // Oval Drawing
    UIBezierPath* ovalPath = [UIBezierPath bezierPathWithOvalInRect: CGRectMake(CGRectGetMinX(frame), CGRectGetMinY(frame), 70, 70)];
    [UIColor.redColor setStroke];
    ovalPath.lineWidth = 6;
    CGFloat ovalPattern[] = {2, 1};
    [ovalPath setLineDash: ovalPattern count: 2 phase: 0];
    [ovalPath stroke];


    // Oval 2 Drawing
    UIBezierPath* oval2Path = [UIBezierPath bezierPathWithOvalInRect: CGRectMake(CGRectGetMinX(frame) + 0.5, CGRectGetMinY(frame) - 0.5, 70, 70)];
    [UIColor.redColor setStroke];
    oval2Path.lineWidth = 13;
    CGFloat oval2Pattern[] = {2, 20};
    [oval2Path setLineDash: oval2Pattern count: 2 phase: 0];
    [oval2Path stroke];
}

Swift:

func drawCanvas1(frame frame: CGRect = CGRect(x: 86, y: 26, width: 70, height: 70)) {
    let context = UIGraphicsGetCurrentContext()

    // Oval Drawing
    let ovalPath = UIBezierPath(ovalInRect: CGRect(x: frame.minX, y: frame.minY, width: 70, height: 70))
    UIColor.redColor().setStroke()
    ovalPath.lineWidth = 6
    CGContextSaveGState(context)
    CGContextSetLineDash(context, 4.5, [0, 1], 2)
    ovalPath.stroke()
    CGContextRestoreGState(context)


    // Oval 2 Drawing
    let oval2Path = UIBezierPath(ovalInRect: CGRect(x: frame.minX + 0.5, y: frame.minY - 0.5, width: 70, height: 70))
    UIColor.redColor().setStroke()
    oval2Path.lineWidth = 13
    CGContextSaveGState(context)
    CGContextSetLineDash(context, 39, [1, 10], 2)
    oval2Path.stroke()
    CGContextRestoreGState(context)
}

同样,对于弧线,您可以采用相同的方法,只需将bezierPathWithOval方法替换为bezierPathWithArcCenter方法即可。
请注意: CGFloat ovalPattern[] = {2, 1};//2是破折号宽度,1是破折号之间的间隔
您可以调整这些值以获得更高的准确性!

这实际上相当聪明。我不知道我会不会想到它。 - Glenn Howes
你可以使用Paint Code工具在贝塞尔路径上进行许多组合!你应该试一试@GlennHowes - Teja Nandamuri
哇,谢谢@TejaNandamuri - 单凭努力就给你点赞!我稍后会检查一下是否有效 :) - sukh

0

目前这是我能够将其转换为 UIBezierPath 的最佳方式。随着我发现更好的方法,我会更新我的代码。

// First Arc //
guageArcOne.path = UIBezierPath(arcCenter: centerPoint, radius: radius, startAngle: startAngle, endAngle: endAngle, clockwise: true).CGPath
guageArcOne.fillColor = UIColor.clearColor().CGColor
guageArcOne.strokeColor = UIColor.greenColor().CGColor
guageArcOne.lineWidth = 10.0
guageArcOne.strokeEnd = 1.0
guageArcOne.lineDashPattern = [1,10, 0, 0]
guageArcOne.lineDashPhase = 2.0
arcContainerView.layer.addSublayer(guageArcOne)

// Second Arc //
guageArcTwo.path = UIBezierPath(arcCenter: centerPoint, radius: radius, startAngle: startAngle, endAngle: endAngle, clockwise: true).CGPath
guageArcTwo.fillColor = UIColor.clearColor().CGColor
guageArcTwo.strokeColor = UIColor.greenColor().CGColor
guageArcTwo.lineWidth = 10.0
guageArcTwo.strokeEnd = 1.0
guageArcTwo.lineDashPattern = [1,2, 0, 0]
guageArcTwo.lineDashPhase = 2.0
arcContainerView.layer.addSublayer(guageArcTwo)

编辑:添加了第二个弧线用于较短、更频繁的短划线。


网页内容由stack overflow 提供, 点击上面的
可以查看英文原文,
原文链接