对于非自动布局的storyboard/NIB,你的代码没问题。顺便说一下,现在一般建议使用blocks来进行动画:
[UIView animateWithDuration:3.0
                 animations:^{
                     self.logo.center = CGPointMake(self.logo.center.x, self.logo.center.y - 100.0);
                 }];
或者,如果你想更加掌控选项等内容,可以使用:
[UIView animateWithDuration:3.0
                      delay:0.0
                    options:UIViewAnimationCurveEaseInOut
                 animations:^{
                     self.logo.center = CGPointMake(self.logo.center.x, self.logo.center.y - 100);
                 }
                 completion:nil];
但如果您不使用自动布局,您的代码应该可以正常工作。只是上述语法更适用于 iOS 4 及以后的版本。
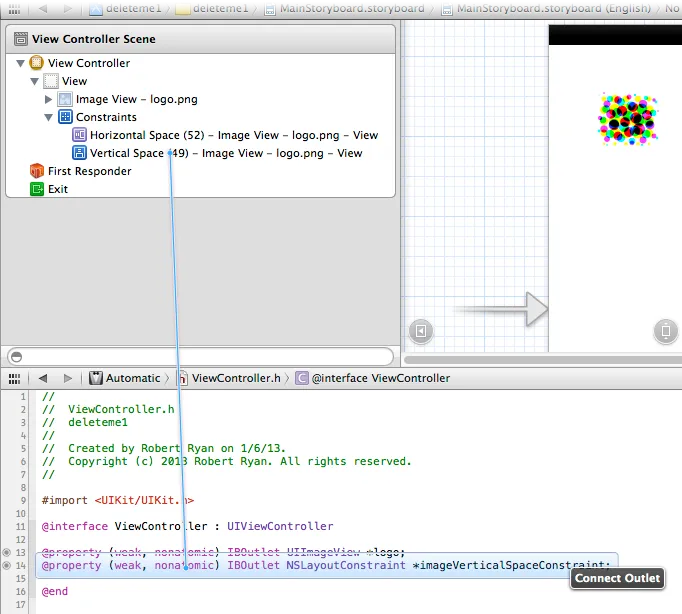
如果您正在使用自动布局,您需要 (a) 为垂直间距约束创建一个 IBOutlet(如下所示),然后 (b) 您可以执行以下操作:
- (void)viewDidAppear:(BOOL)animated {
[super viewDidAppear:animated];
static BOOL logoAlreadyMoved = NO;
if (!logoAlreadyMoved)
{
logoAlreadyMoved = YES;
self.imageVerticalSpaceConstraint.constant -= 100.0;
[UIView animateWithDuration:3.0 animations:^{
[self.view layoutIfNeeded];
}];
}
}
要为约束添加 IBOutlet,只需从约束到您的 .h 文件中助手编辑器中拖动 control-drag:
顺便提一下,如果您正在对约束进行动画处理,请注意您可能已经链接到该图像视图的任何其他约束。通常,如果您将某些内容放在图像下方,它将其约束链接到图像,因此您必须确保没有其他带有对图像的约束的控件(除非您也希望它们移动)。
您可以通过打开您的 storyboard 或 NIB,然后选择“文件检查器”(右侧最右边面板的第一个选项卡,或者按option+command+1(数字“1”)来拉起它),来判断是否使用自动布局:

请记住,如果您计划支持 iOS 6 之前的版本,请确保关闭 “autolayout”。 Autolayout 是 iOS 6 的功能,不适用于早期版本的 iOS。