有没有一种方法可以使用PHP-GD在图像上实现FishEye(或者Barrel transformation)效果呢?我找到了一些代码,但是很难将其移植到PHP中。
2个回答
6
使用GD库的PHP无法以可接受的方式完成此操作,逐像素处理图像将非常缓慢...
Imagick支持一个函数,使您能够编写自己的表达式(fximage),之后所有内容都将在Imagick内部处理。
因此,我已经找到了在Imagick中实现您要求的方法,我从"Scott builds Software" blog - fisheye effect in imagick中获取了表达式。您可以在他的博客中阅读表达式的完整说明。有关此函数的更多文档,请访问官方ImageMagick网站,您可以在那里学习如何构建自己的表达式。
请注意,PHP关于返回值的文档是错误的,我已经在那里发表了评论。该函数返回实际的Imagick对象。
所以这是您的代码:
<?php
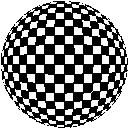
/* Create new object */
$im = new Imagick();
/* Create new checkerboard pattern */
$im->newPseudoImage(100, 100, "pattern:checkerboard");
/* Set the image format to png */
$im->setImageFormat('png');
/* Fill background area with transparent */
$trans = Imagick::VIRTUALPIXELMETHOD_TRANSPARENT;
$im->setImageVirtualPixelMethod($trans);
/* Activate matte */
$im->setImageMatte(true);
/* This is the expression that define how to do the fisheye effect */
$distort_expression =
'kk=w*0.5;
ll=h*0.5;
dx=(i-kk);
dy=(j-ll);
aa=atan2(dy,dx);
rr=hypot(dy,dx);
rs=rr*rr/hypot(kk,ll);
px=kk+rs*cos(aa);
py=ll+rs*sin(aa);
p{px,py}';
/* Perform the distortion */
$im = $im->fxImage($distort_expression);
/* Ouput the image */
header("Content-Type: image/png");
echo $im;
?>
无论如何,请记住这仍然很慢,无论您使用它做什么都要小心...
- Dvir Berebi
1
非常感谢!你是我的英雄!:D - Daantje
2
但是,相对于ImageMagick,使用GD和快速处理是可能的!
 创建一个大小为(2*SourceWidth)/PI的新图像。
遍历新图像的每个像素,并找到其与中心点的距离。 dsource=hypot(x-centerX,y-centerY)
通过ddest.=2*r*asin(dsource/r)/2找到源图像中对应的距离。
r是目标图像的一半宽度。
查看带有基准测试的示例:http://meindesign.net/picture2bubble/picture2bubble.php
创建一个大小为(2*SourceWidth)/PI的新图像。遍历新图像的每个像素,并找到其与中心点的距离。 dsource=hypot(x-centerX,y-centerY)
通过ddest.=2*r*asin(dsource/r)/2找到源图像中对应的距离。
r是目标图像的一半宽度。
查看带有基准测试的示例:http://meindesign.net/picture2bubble/picture2bubble.php
function fisheye($infilename,$outfilename){
     $im=imagecreatefrompng($infilename);
     $ux=imagesx($im);//Source imgage width(x)
     $uy=imagesy($im);//Source imgage height(y)
     $umx=$ux/2;//Source middle
     $umy=$uy/2;
     if($ux>$uy)$ow=2*$uy/pi();//Width for the destionation image
     else $ow=2*$ux/pi();
     $out=imagecreatetruecolor($ow+1,$ow+1);
     $trans=imagecolortransparent($out,ImageColorAllocate($out,0,0,0));
     imagefill($im,1,1,$trans);
     for($c=0;$c<imagecolorstotal($im);$c++){//Copy palette
        $col=imagecolorsforindex($im,$c);
        imagecolorset($out,$c,$col[red],$col[green],$col[blue]);
        }
     $om=$ow/2;//destination middle
     for($x=0;$x<=$ow;++$x){//Loop X in destination image
        for($y=0;$y<=$ow;++$y){//Loop y in destination image
           $otx=$x-$om;//X in relation to the middle
           $oty=$y-$om;//Y in relation to the middle
           $oh=hypot($otx,$oty);//distance
           $arc=(2*$om*asin($oh/$om))/(2);
           $factor=$arc/$oh;
           if($oh<=$om){//if pixle inside radius
             $color=imagecolorat($im,round($otx*$factor+$umx),round($oty*$factor+$umy));
             $r = ($color >> 16) & 0xFF;
             $g = ($color >> 8) & 0xFF;
             $b = $color & 0xFF;
             $temp=imagecolorexact($out, $r, $g, $b);
             imagesetpixel($out,$x,$y,$temp);
             }
           }
        }
     imagepng($out,$outfilename);
     }
- B.F.
网页内容由stack overflow 提供, 点击上面的可以查看英文原文,
原文链接
原文链接
exec(imagemagick)。 - mario