如何使用PIL将灰度图转换为伪彩色?

4

我似乎无法想出如何将我的灰度功能更改为虚假彩色。 我知道我需要将每种颜色(R、G、B)分成不同的范围,然后根据每个颜色的范围分配颜色。 有没有人知道这该怎么实现?

def grayscale(pic):
    (width,height) = pic.size
    for y in range (height):
        for x in range(width):
            pix = cp.getpixel((x,y))
            (r, g, b) = pix
            avg = (r + g + b)//3
            newPix = (avg, avg, avg)
            cp.putpixel((x,y),newPix)
    return cp

cp是什么?你想要什么样的效果最终呈现出来,能给个例子吗?这个链接或者链接是否相关或有帮助(即使不是Python)? - Matt Hall
1
听起来你真正想做的是将彩色图像转换为伪彩色图像(这在某种程度上涉及到找到每个像素原始颜色的三个分量的平均值)。你想使用什么伪彩色方案?描述一下rgb -> rgb颜色的映射。 - martineau
1
听起来你想为图像的每个唯一的强度赋予一个独特的颜色。实际上,你所做的只是计算每个RGB像素的粗略亮度,这并不是正确的方法。此外,你在问题陈述中描述的是均匀量化,它将具有完整色板的图像转换为较小的图像。你的问题标题和问题陈述是相互矛盾的...请考虑编辑以确保一致性。 - rayryeng
我很抱歉,这是我第一次使用这个网站。Cp = "Image".copy()。我的需求是将255分成块,并为每个块(例如:0-31 = 红色)分配一个颜色方案。因此,在该范围内的像素将变为该颜色。 - Nick Merz
好的,这是一个更好的描述。将有多少个块/颜色,并且它们将如何指定? - martineau
2个回答

6

由于您没有回答我的最后一个追问,我做了一些猜测并实现了一些东西,以说明如何仅使用PIL(或pillow)模块完成它。

简而言之,该代码将图像转换为灰度,将结果为0%至100%亮度(强度)的像素范围分成相等大小的子范围,然后为每个子范围分配来自调色板的颜色。

from PIL import Image
from PIL.ImageColor import getcolor, getrgb
from PIL.ImageOps import grayscale

try:
    xrange
except NameError:  # Python 3.
    xrange = range

def falsecolor(src, colors):
    if Image.isStringType(src):  # File path?
        src = Image.open(src)
    if src.mode not in ['L', 'RGB', 'RGBA']:
        raise TypeError('Unsupported source image mode: {}'.format(src.mode))
    src.load()

    # Create look-up-tables (luts) to map luminosity ranges to components
    # of the colors given in the color palette.
    num_colors = len(colors)
    palette = [colors[int(i/256.*num_colors)] for i in xrange(256)]
    luts = (tuple(c[0] for c in palette) +
            tuple(c[1] for c in palette) +
            tuple(c[2] for c in palette))

    # Create grayscale version of image of necessary.
    l = src if Image.getmodebands(src.mode) == 1 else grayscale(src)

    # Convert grayscale to an equivalent RGB mode image.
    if Image.getmodebands(src.mode) < 4:  # Non-alpha image?
        merge_args = ('RGB', (l, l, l))  # RGB version of grayscale.

    else:  # Include copy of src image's alpha layer.
        a = Image.new('L', src.size)
        a.putdata(src.getdata(3))
        luts += tuple(xrange(256))  # Add a 1:1 mapping for alpha values.
        merge_args = ('RGBA', (l, l, l, a))  # RGBA version of grayscale.

    # Merge all the grayscale bands back together and apply the luts to it.
    return Image.merge(*merge_args).point(luts)

if __name__ == '__main__':
    R, G, B = (255,   0,   0), (  0, 255,   0), (  0,   0, 255)
    C, M, Y = (  0, 255, 255), (255,   0, 255), (255, 255,   0)
    filename = 'test_image.png'

    # Convert image into falsecolor one with 4 colors and display it.
    falsecolor(filename, [B, R, G, Y]).show()

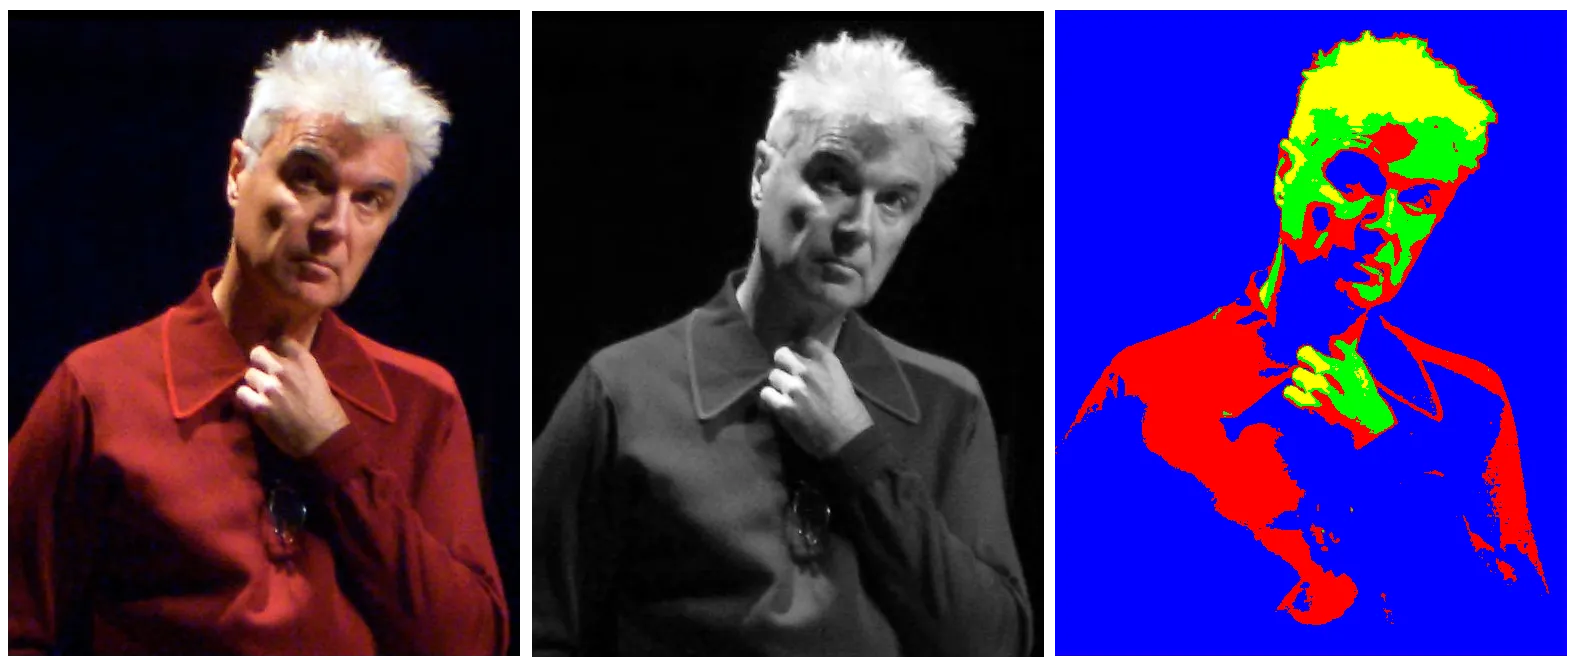
下面是一个组合图像,显示一个RGB测试图像,中间的内部256级灰度图像,以及将其转换为由四种颜色组成的伪彩色图像的最终结果(每种颜色代表64个强度级别的范围):

before, intermediate, and after images

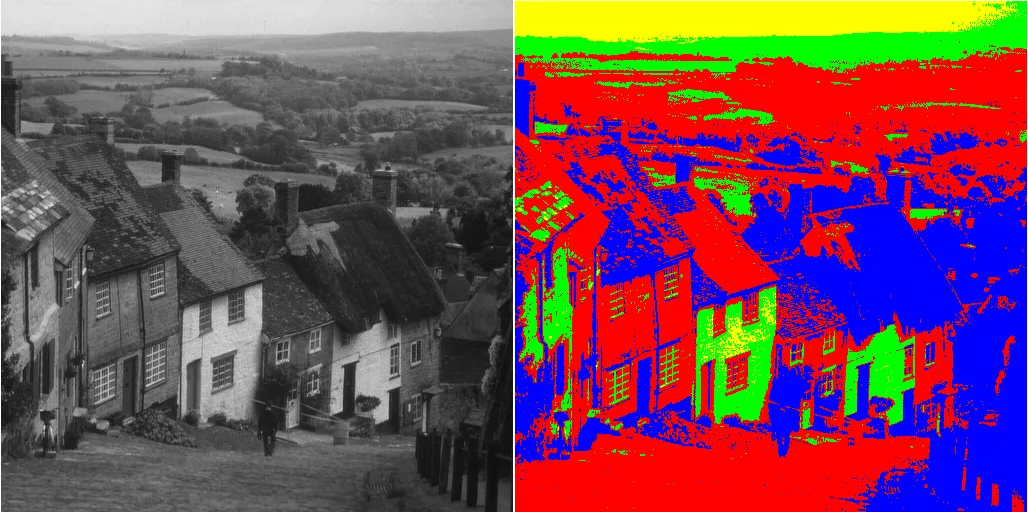
这是另一个复合图像,只不过这次展示的是将已经变成灰度的图像转换为相同的4种虚假颜色调色板。

example of grayscale to false color image conversion

像这样做是否符合您的要求?


1
似乎您只想确定每个像素的平均亮度,并使每个像素变为灰色。我建议使用本地图像功能,或者如果您想要操作单个像素,则至少使用 numpy 而不是嵌套的 for 循环。例如:
from PIL import Image, ImageDraw
import numpy as np

def makeGrey():
    W = 800
    H = 600
    img = Image.new('RGB', (W, H))
    draw = ImageDraw.Draw(img)

    draw.rectangle((0, H * 0 / 3, W, H * 1 / 3), fill=(174, 28, 40), outline=None)
    draw.rectangle((0, H * 1 / 3, W, H * 2 / 3), fill=(255, 255, 255), outline=None)
    draw.rectangle((0, H * 2 / 3, W, H * 3 / 3), fill=(33, 70, 139), outline=None)

    img.show()

    pixels = np.array(img.getdata())
    avg_pixels = np.sum(pixels, axis=1) / 3
    grey_img = avg_pixels.reshape([H, W])

    img2 = Image.fromarray(grey_img)
    img2.show()

if __name__ == '__main__':
    makeGrey()

网页内容由stack overflow 提供, 点击上面的
可以查看英文原文,
原文链接