你是否了解如何使用在今年 Google I/O 大会上宣布的 Constraint Layout 布局?
如何使用新的Android约束布局来减少视图层次结构
33
- Bogdan M.
10个回答
29
你可以打开现有布局资源文件的可视化编辑器,并在RelativeLayout(例如)上右键单击,然后点击选项将其转换为ConstraintLayout。
此外,您还需要在build.gradle文件中添加Gradle依赖项:
compile 'com.android.support.constraint:constraint-layout:1.0.0'
- Adrian Olar
4
17
来自文档
如果您正在更新现有项目,请按照以下步骤进行:
确保您拥有最新的Android Support存储库(版本32或更高版本):// 这是我缺少的部分
点击工具 > Android > SDK管理器。 单击SDK工具选项卡。 选择Android Support存储库,然后单击“确定”。
将更新后的约束布局库添加为依赖项到您的build.gradle文件中:
dependencies {
  compile 'com.android.support.constraint:constraint-layout:1.0.0'
}
要向您的项目添加新的约束布局,请执行以下操作:
- 右键单击模块的布局目录,然后单击“New > XML > Layout XML”。 为布局命名,并在Root Tag中输入“android.support.constraint.ConstraintLayout”。 单击“Finish”。
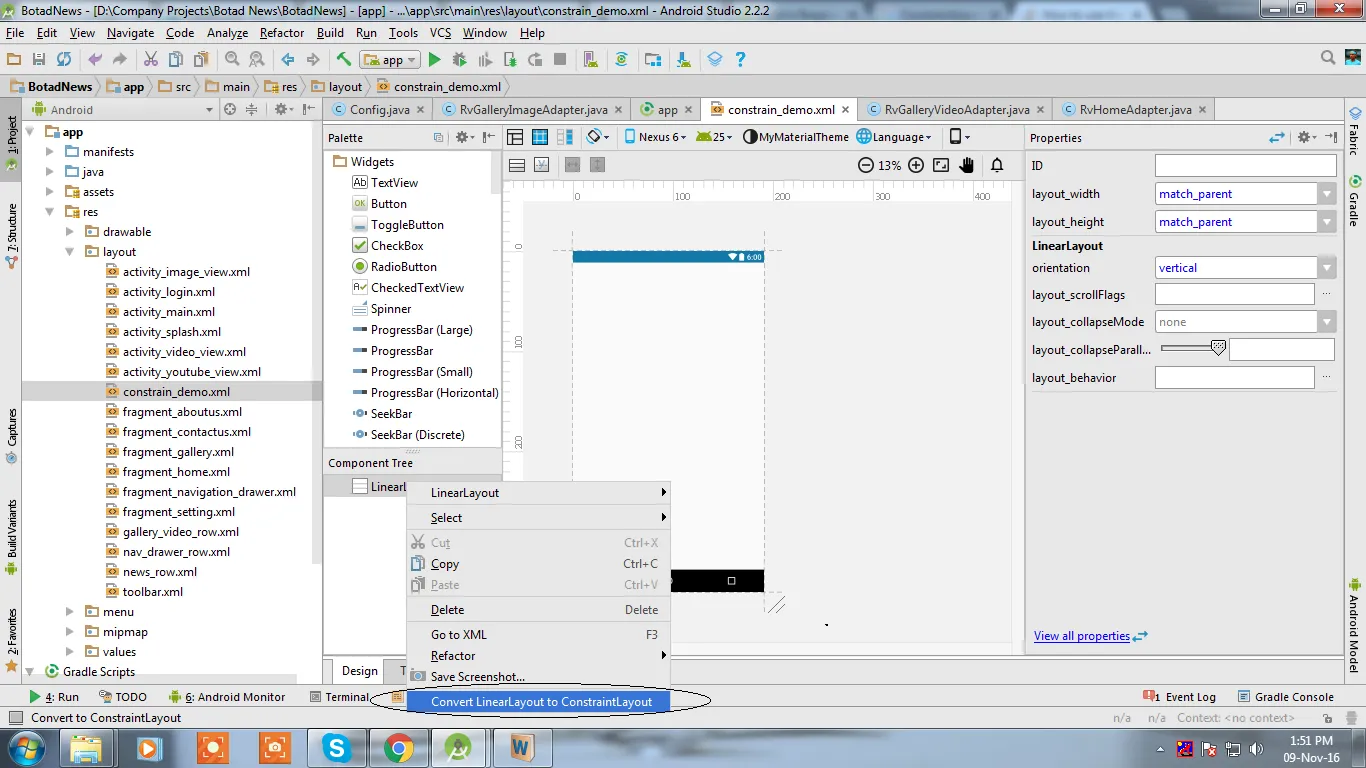
- 在Android Studio中打开现有布局,选择编辑器窗口底部的“Design”选项卡。 在组件树窗口中,右键单击布局并单击“Convert to ConstraintLayout”。
- Mikelis Kaneps
5
请查看来自Google CodeLabs的链接,了解Constraint Layout的基本概念以及如何使用不同的约束条件,例如手动约束、自动连接和推断。
此外,还有UI Builder和Inspector,这将帮助我们更快地构建用户界面。
此外,还有UI Builder和Inspector,这将帮助我们更快地构建用户界面。
- Akash Patra
4
我尝试了很多版本,但是无法解决问题!最后我让Android Studio来解决这个问题。
在XML文件中,除了错误消息,您还可以看到此选项!单击该选项以导入推荐的版本。
在XML文件中,除了错误消息,您还可以看到此选项!单击该选项以导入推荐的版本。

或者您可以在错误行上放置光标,按下alt + enter
当我按下alt + enter时,我得到了constraint-layout:1.0.0-alpha8
编译 'com.android.support.constraint:constraint-layout:1.0.0-alpha8'
- Darshn
1
我正在使用最新版本的Android Studio,但在错误消息旁边找不到选项图标。 - Johann
2
添加依赖项
compile 'com.android.support.constraint:constraint-layout:1.0.0-alpha9'
创建新的布局xml文件 --> 进入设计选项卡 --> 右键单击根布局并选择最后一个选项 将LinearLayout转换为ConstraintLayout
查看截图
- Arpit Patel
1
理解ConstraintLayout的性能优势描述了传统布局层次结构的开销。它举了一个使用嵌套布局构建此布局的例子。
这篇文章声称:
相比RelativeLayout,ConstraintLayout在测量/布局阶段的性能提高了约40%
这个Codelab项目展示了如何使用ConstraintLayout来减少View层次结构并扁平化上述布局。
- Eugene Brusov
1
你应该在模块级别的Gradle文件中添加Google Maven存储库(重要部分)。
然后在dependencies中添加以下行:
repositories {
    maven {
        url 'https://maven.google.com'
    }
}
然后在dependencies中添加以下行:
compile 'com.android.support.constraint:constraint-layout:1.0.2'
compile 'com.android.support.constraint:constraint-layout-solver:1.0.2'
- faraz khonsari
0
修改 build.gradle 文件中的依赖项。
使用 compile com.android.support.constraint:constraint-layout:1.0.0-beta1 代替。
- HaiZhong chen
0
1) 使用ConstraintLayout设计新的布局,需要在app.gradle文件中包含依赖项。
compile 'com.android.support.constraint:constraint-layout:1.0.0-alpha8'
注意:对于布局中的每个视图,您必须包括以下属性,否则视图会显示在(0,0)处。
<android.support.constraint.ConstraintLayout
    xmlns:android="http://schemas.android.com/apk/res/android"
    xmlns:app="http://schemas.android.com/apk/res-auto"
    ....>

        <View
           android:id="@+id/top_view"
           .../>

        <View
        app:layout_constraintLeft_toLeftOf="parent"
        app:layout_constraintRight_toRightOf="parent"
        app:layout_constraintTop_toBottomOf="@+id/top_view"
        app:layout_constraintBottom_toTopOf="@+id/bottom_view"
        ..../>

       <View
           android:id="@+id/bottom_view"
           .../>

</android.support.constraint.ConstraintLayout>
2) 将现有的布局文件转换为约束布局:
在Android Studio中打开您现有的布局,并选择编辑器窗口底部的设计选项卡。在组件树窗口中,右键单击根布局,然后单击“转换为ConstraintLayout”。接下来,包括上述定义的属性。
- Logo
0
Google发布了官方版本1.0的ConstraintLayout
现在可以导入非beta版本了
compile 'com.android.support.constraint:constraint-layout:1.0.0'
查看这里的信息 http://tools.android.com/recent/constraintlayout10isnowavailable
- Noorul
网页内容由stack overflow 提供, 点击上面的可以查看英文原文,
原文链接
原文链接
- 相关问题
- 10 启动布局检查器时出现“获取视图层次结构错误:意外错误:空视图层次结构”的错误。
- 17 使用自定义视图层次结构的Android + ListFragment
- 12 约束布局如何获取另一个视图的高度(Android)
- 4 Android调试监视器层次结构视图不显示
- 3 运行时检查 Android Activity 的视图层次结构
- 3 Android棋盘式布局层次结构
- 42 无法启动Android Studio布局检查器: "意外错误:空视图层次结构"
- 10 Android: 视图层次结构中存在重复的id
- 7 使用Android Espresso查找层次结构中的视图
- 24 如何使用约束布局1.1中的新特性?
com.android.support.constraint:constraint-layout:1.0.2。 - MANISH PATHAK