移动UIImageView中的UIImage

5
我有一个
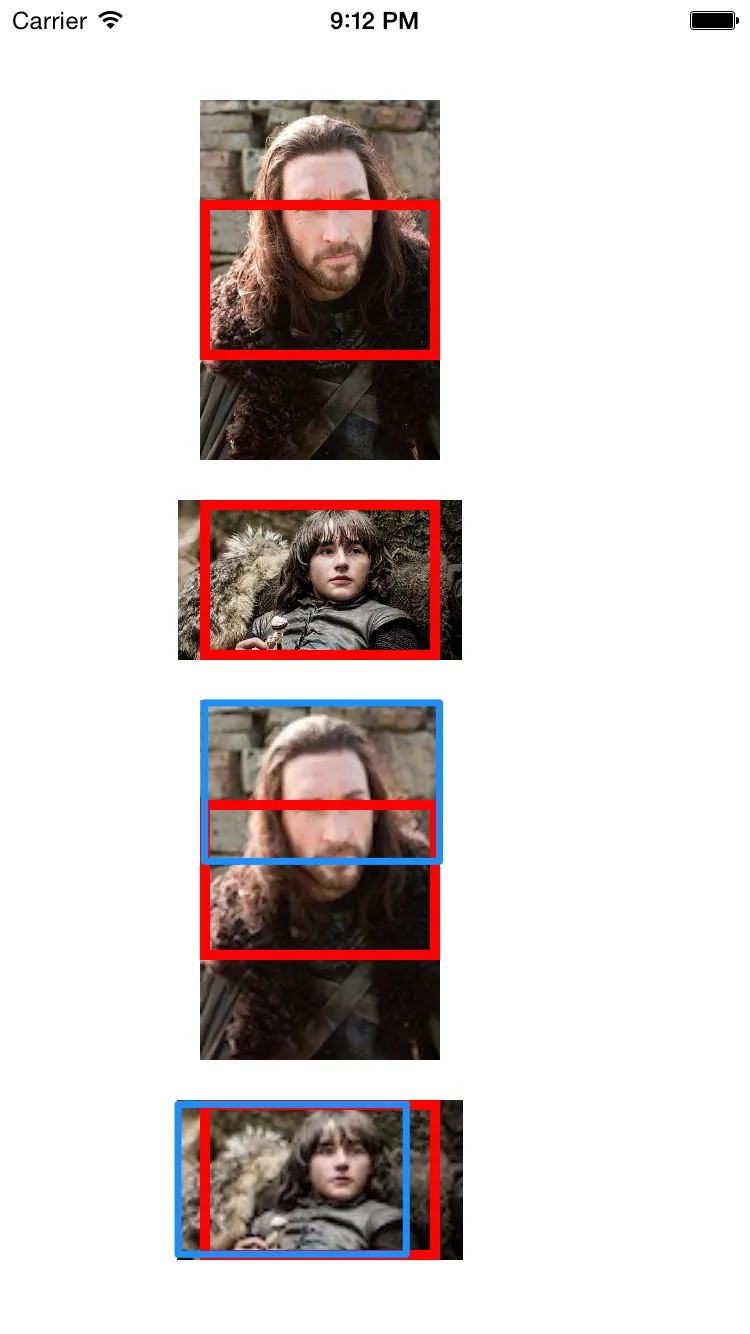
UIImageView(红色方框)用于显示必须缩放的UIImage(我可以接收大于或小于UIImageView 的图像)。 缩放后,显示的部分是其中心的UIImage
我的需求是显示蓝色方框中的图像部分,如何实现?
我只能获取图像的大小(高度和宽度),但显示原始大小时,它应该是缩放的大小。
self.viewIm = [[UIImageView alloc] initWithFrame:CGRectMake(100, 100, 120, 80)];
self.viewIm.backgroundColor = [UIColor greenColor];
self.viewIm.layer.borderColor = [UIColor redColor].CGColor;
self.viewIm.layer.borderWidth = 5.0;
UIImage *im = [UIImage imageNamed:@"benjen"];
self.viewIm.image = im;
self.viewIm.contentMode = UIViewContentModeScaleAspectFill;
//    self.viewim.clipsToBounds = YES;
[self.view addSubview:self.viewIm];

enter image description here


尝试使用UIViewContentModeTop? - Mornirch
UIViewContentModeTop 不会缩放,因此没有选项。 - jherran
使用UIGraphicsContext创建一个自定义大小的新图像? - Mornirch
4个回答

3
为了完成你想要做的事情,我建议你研究一下CALayercontentsRect属性。
自从看到你的答案以来,我一直在努力寻找正确的解决方案,但是由于contentsRect:的x和y参数似乎有点神秘,数学难倒了我...但是这里有一些代码可能会指引你朝着正确的方向前进...
float imageAspect = self.imageView.image.size.width/self.imageView.image.size.height;
float imageViewAspect = self.imageView.frame.size.width/self.imageView.frame.size.height;

if (imageAspect > imageViewAspect) {
    float scaledImageWidth = self.imageView.frame.size.height * imageAspect;
    float offsetWidth = -((scaledImageWidth-self.imageView.frame.size.width)/2);
    self.imageView.layer.contentsRect = CGRectMake(offsetWidth/self.imageView.frame.size.width, 0.0, 1.0, 1.0);
} else if (imageAspect < imageViewAspect) {
    float scaledImageHeight = self.imageView.frame.size.width * imageAspect;
    float offsetHeight = ((scaledImageHeight-self.imageView.frame.size.height)/2);
    self.imageView.layer.contentsRect = CGRectMake(0.0, offsetHeight/self.imageView.frame.size.height, 1.0, 1.0);
}

1
试着像这样做:
CGRect cropRect = CGRectMake(0,0,200,200);
CGImageRef imageRef = CGImageCreateWithImageInRect([ImageToCrop CGImage],cropRect);
UIImage *image = [UIImage imageWithCGImage:imageRef]; 
CGImageRelease(imageRef);

您的解决方案未对图像进行缩放。 - jherran

1

我在这个答案上找到了一个非常好的近似方法。其中,该类别调整图像大小,并使用中心点进行裁剪。我对其进行了改编,以使用(0,0)作为原点进行裁剪。由于我并不真正需要分类,因此我将其用作单个方法。

- (UIImage *)imageByScalingAndCropping:(UIImage *)image forSize:(CGSize)targetSize {
    UIImage *sourceImage = image;
    UIImage *newImage = nil;
    CGFloat scaleFactor = 0.0;
    CGFloat scaledWidth = targetSize.width;
    CGFloat scaledHeight = targetSize.height;

    if (CGSizeEqualToSize(image.size, targetSize) == NO) {
        if ((targetSize.width / image.size.width) > (targetSize.height / image.size.height)) {
            scaleFactor = targetSize.width / image.size.width; // scale to fit height
        } else {
            scaleFactor = targetSize.height / image.size.height; // scale to fit width
        }

        scaledWidth  = image.size.width * scaleFactor;
        scaledHeight = image.size.height * scaleFactor;
    }

    UIGraphicsBeginImageContext(targetSize); // this will crop

    CGRect thumbnailRect = CGRectZero;
    thumbnailRect.origin = CGPointZero;
    thumbnailRect.size.width  = scaledWidth;
    thumbnailRect.size.height = scaledHeight;

    [sourceImage drawInRect:thumbnailRect];

    newImage = UIGraphicsGetImageFromCurrentImageContext();

    if(newImage == nil) {
        NSLog(@"could not scale image");
    }

    //pop the context to get back to the default
    UIGraphicsEndImageContext();

    return newImage;
}

我的调用大致是这样的:
self.viewIm = [[UIImageView alloc] initWithFrame:CGRectMake(100, 100, 120, 80)];
self.viewIm.image = [self imageByScalingAndCropping:[UIImage imageNamed:@"benjen"] forSize:CGSizeMake(120, 80)];
[self.view addSubview:self.viewIm];

0

我花了一些时间,最终创建了一个基于我的另一个帖子的答案以及上面的一个答案的 Swift 3.2 解决方案。这段代码只允许对图像进行 Y 轴平移,但是通过一些调整,任何人都应该能够添加水平平移 ;)

let yOffset: CGFloat = 20
myImageView.contentMode = .scaleAspectFill

//scale image to fit the imageView's width (maintaining aspect ratio), but allow control over the image's Y position
UIGraphicsBeginImageContextWithOptions(myImageView.frame.size, myImageView.isOpaque, 0.0)
let ratio = myImage.size.width / myImage.size.height
let newHeight = myImageView.frame.width / ratio
let rect = CGRect(x: 0, y: -yOffset, width: myImageView.frame.width, height: newHeight)
myImage.draw(in: rect)
let newImage = UIGraphicsGetImageFromCurrentImageContext() ?? myImage
UIGraphicsEndImageContext()

//set the new image
myImageView.image = newImage

现在你可以通过改变 yOffset 来调整图像向下或向上的位置。

网页内容由stack overflow 提供, 点击上面的
可以查看英文原文,
原文链接