Flutter - 如何将图像与渐变色混合?

60

我正在尝试复制一个应用程序登录界面设计,我的设计师完成了这个设计。

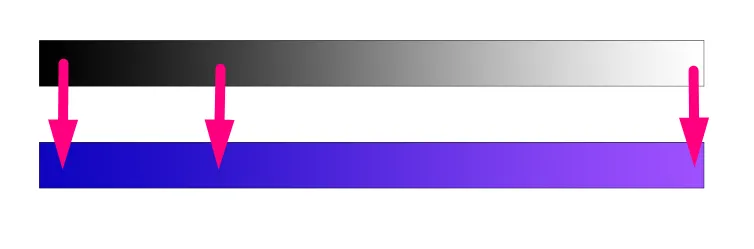
背景图片使用的是softLight混合模式,问题在于它要与渐变颜色混合。其次,实际上有两个不同的渐变层(一个紫色渐变,一个蓝色渐变)
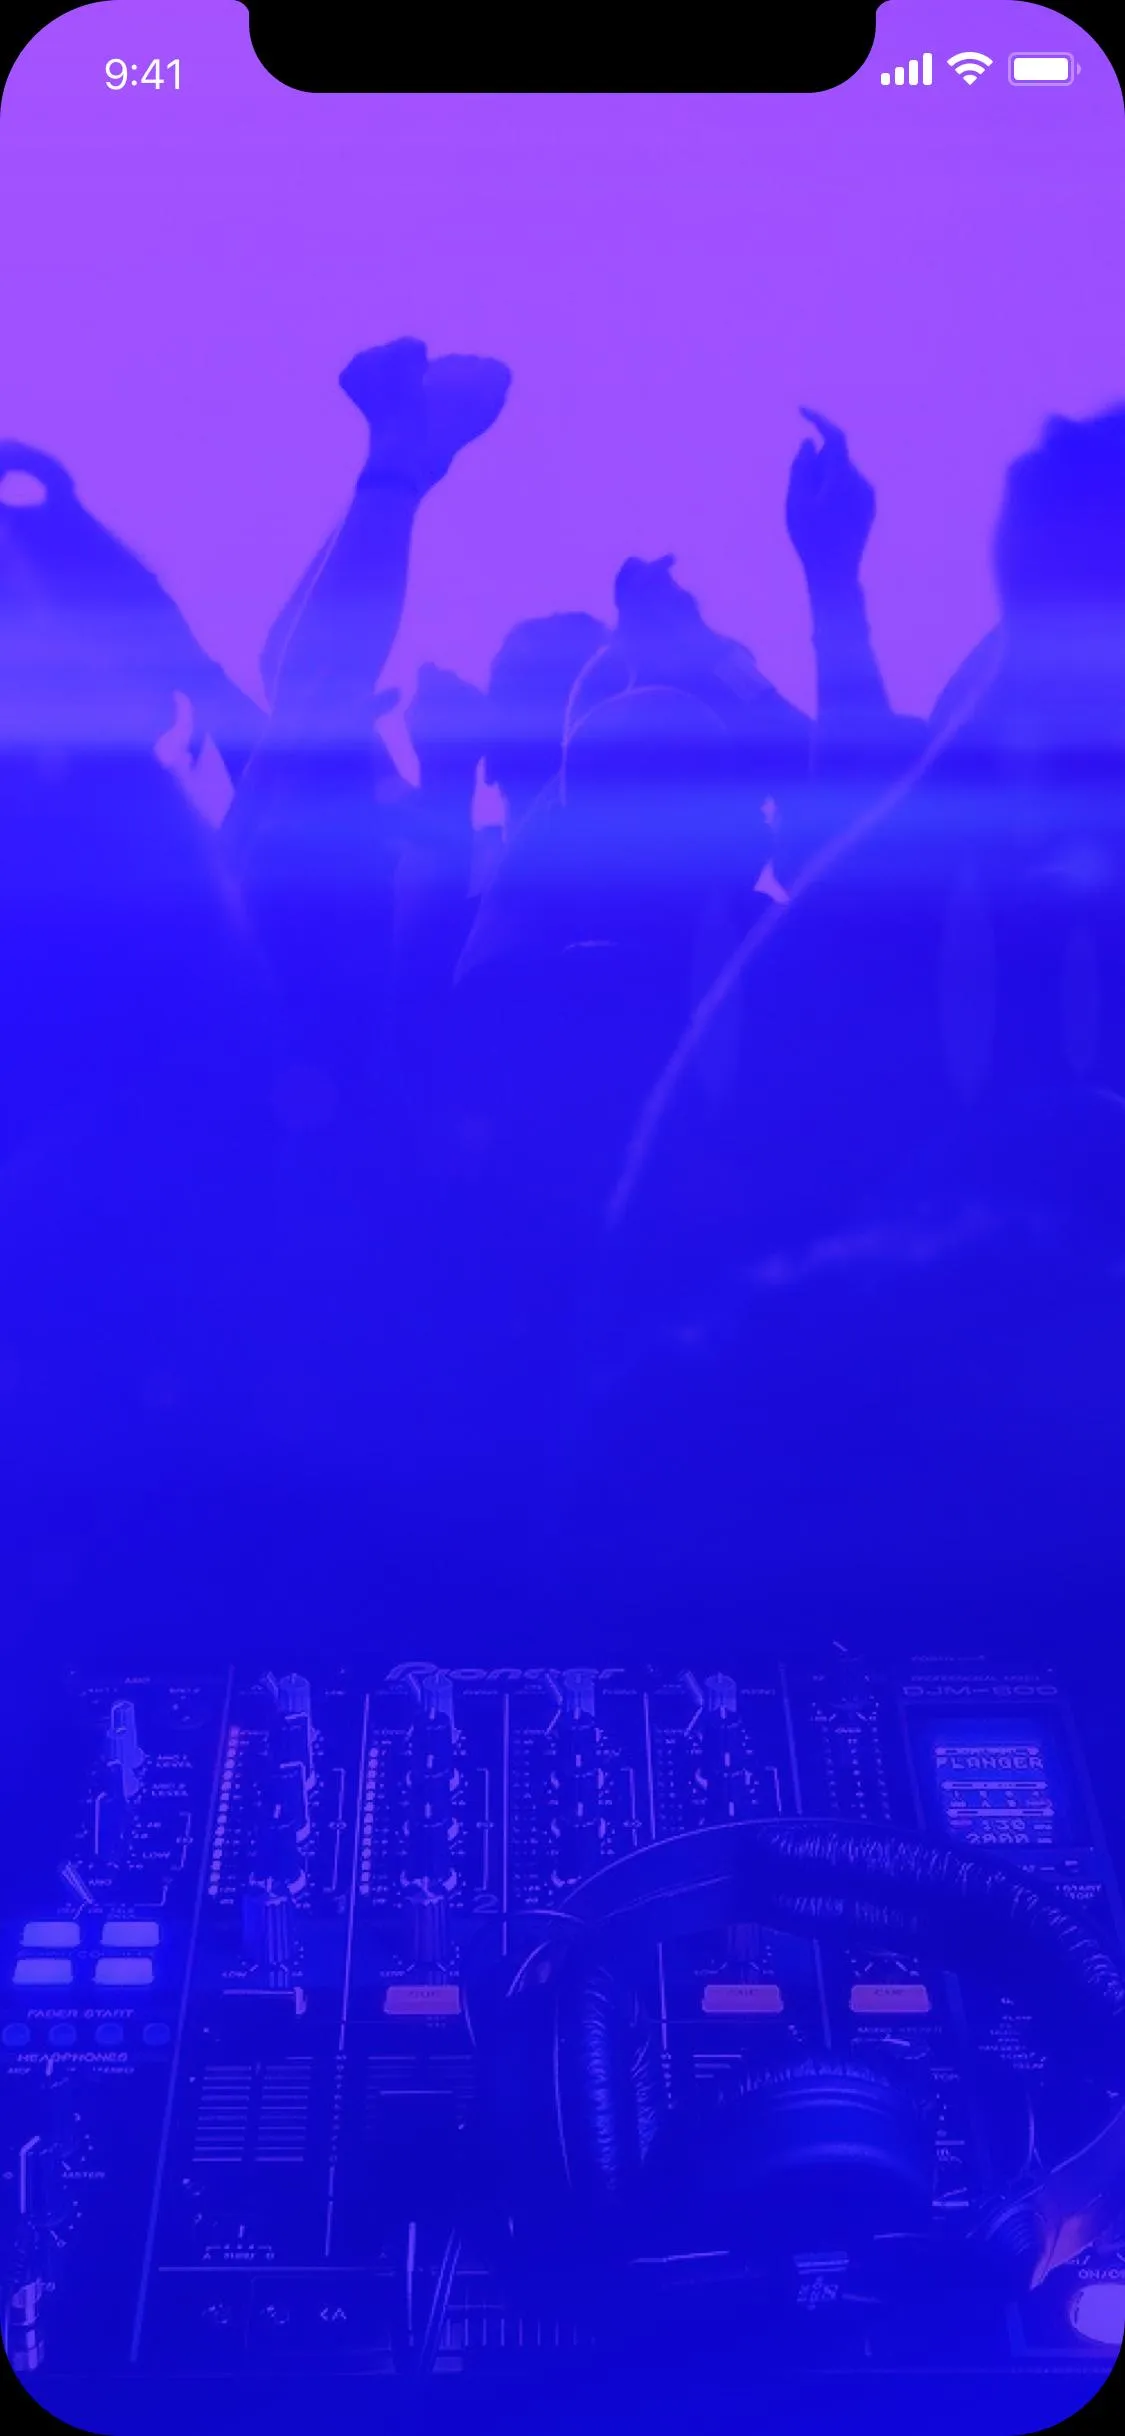
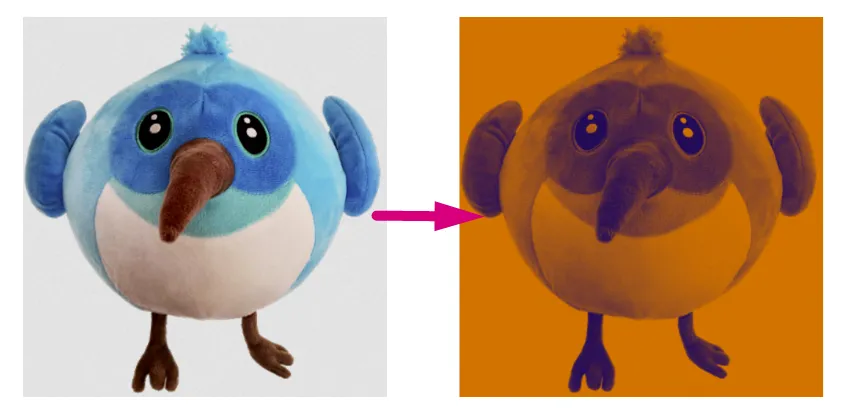
原始图片:

Original Image

最终渐变图像

Final Gradient Image

我已经尝试使用colorBlendMode,例如:

Image.asset(
      'assets/pioneer-party.jpg',
      fit: BoxFit.cover,
      color: Color(0xff0d69ff).withOpacity(1.0),
      colorBlendMode: BlendMode.softLight,
    ),

问题在于 color 属性只能接受单一颜色。

我随后尝试了 BoxDecoration,例如:

DecoratedBox(
      decoration: new BoxDecoration(
        color: const Color(0xff7c94b6),
        image: new DecorationImage(
          fit: BoxFit.cover,
          colorFilter: new ColorFilter.mode(Colors.purple.withOpacity(1.0), BlendMode.softLight),
          image: new NetworkImage(
            'http://www.allwhitebackground.com/images/2/2582-190x190.jpg',
          ),
        ),
      ),
    ),

这仍然让我面临同样的问题。然后我尝试分别堆叠每个图层,并通过渐变来调整使其看起来接近设计,例如:

Image.asset(
      'assets/pioneer-party.jpg',
      fit: BoxFit.cover,
      color: Color(0xff0d69ff).withOpacity(1.0),
      colorBlendMode: BlendMode.softLight,
    ),
    DecoratedBox(
      decoration: BoxDecoration(
        gradient: LinearGradient(
          begin: FractionalOffset.topCenter,
          end: FractionalOffset.bottomCenter,
          colors: [
            Color(0xff0d69ff).withOpacity(0.0),
            Color(0xff0069ff).withOpacity(0.8),
          ],
        ),
      ),
    ),
    DecoratedBox(
      decoration: BoxDecoration(
        gradient: LinearGradient(
          begin: FractionalOffset.topLeft,
          end: FractionalOffset.bottomRight,
          colors: [
            Color(0xff692eff).withOpacity(0.8),
            Color(0xff642cf4).withOpacity(0.8),
            Color(0xff602ae9).withOpacity(0.8),
            Color(0xff5224c8).withOpacity(0.8),
            Color(0xff5e29e5).withOpacity(0.8),
          ],
        stops: [0.0,0.25,0.5,0.75,1.0]
        ),
      ),
    ),

这让我达到了我想要的某种程度,但并非完全符合我的需求。

有人知道如何实现这一点吗?

编辑:

我也在考虑将两个图像混合在一起,但除了使用不透明度之类的东西外,还没有找到方法。理想情况下,希望它能以本地方式呈现,而不是使用“hack”来实现。


目前我无法写出完整的答案,但我建议你研究一下使用 CustomPaint 和画布。使用画布,你可以随心所欲地绘制渐变和图像,然后在合并层时应用滤镜。这将是一个有点昂贵的绘制过程,但如果一切都是静态的话应该没问题。如果有东西在移动,那么也许我可以在某个时候重新评估。但是再说一遍——如果图像是静态的,为什么不先在 Photoshop 中合并它,然后使用最终图像呢? =D - rmtmckenzie
嗨,@rmtmckenzie,感谢您的建议。图片将是静态的,但我们希望在整个应用程序中使用此效果,因此在不同的地方将应用相同的效果,但会使用不同的背景图片。否则,我肯定更愿意使用Photoshop图像,并快速完成它哈哈。 - Robert Stevens
好的,那么您应该可以使用CustomPaint来完成所需的操作。一旦您弄清楚了所需的样板代码的语法,Canvas本身的行为就非常类似于其他语言中的Canvas,因此如果您熟悉这些语言,您应该能够理解它是如何工作的。如果不熟悉,那就是我们在这里提供帮助的原因! - rmtmckenzie
这里是答案:https://dev59.com/clMI5IYBdhLWcg3w4Po_ - Sangam
8个回答

101

使用堆栈轻松实现此效果。

   Stack(children: <Widget>[
        Container(
          decoration: BoxDecoration(
            color: Colors.transparent,
            image: DecorationImage(
              fit: BoxFit.fill,
              image: AssetImage(
                'images/bg.jpg',
              ),
            ),
          ),
          height: 350.0,
        ),
        Container(
          height: 350.0,
          decoration: BoxDecoration(
              color: Colors.white,
              gradient: LinearGradient(
                  begin: FractionalOffset.topCenter,
                  end: FractionalOffset.bottomCenter,
                  colors: [
                    Colors.grey.withOpacity(0.0),
                    Colors.black,
                  ],
                  stops: [
                    0.0,
                    1.0
                  ])),
        )
      ]),  

干杯


非常好。我尝试使用ShaderMask来获得相同的结果,但是似乎ShaderMask仍然有一些意外的行为(例如请参见https://dev59.com/grroa4cB1Zd3GeqPmo6m)。这个解决方案似乎是迄今为止我见过的最好的应用渐变滤镜于图像上的方法。 - Uj Corb
我也一直在寻找这个解决方案,它适用于“图像+渐变颜色”的组合。 - sphinxlike
如果我不想固定容器的高度怎么办 :( - Aditya Prasad Dhal

21

您也可以尝试这个:

ColorFiltered(
  colorFilter: ColorFilter.mode(Colors.red.withOpacity(0.4), BlendMode.srcOver),
  child: YourWidget(),
) 

2
但这样做不会添加渐变,您只能将图像与单个颜色混合。 - Mahesh Jamdade
@maheshmnj 你可以尝试嵌套 ColorFiltered 并将 YourWidget 设为最后一个 ColorFilteredchild - CopsOnRoad
1
我尝试了colorFilter,但它降低了图像的质量。还有其他方法吗? - Mayur Chaudhary

17

我的解决方案是将图像用shaderMask包装起来,这是一个对我有效的示例

ShaderMask(
  shaderCallback: (bounds) {
    return LinearGradient(
      colors: node.badge!.colorsArray,
    ).createShader(bounds);
  },
  child: Image.asset(
    Assets.main_logo,
    height: 27.0,
    fit: BoxFit.cover,
  ),
  blendMode: BlendMode.srcATop,
),

如果您参考BlendMode文档 https://docs.flutter.io/flutter/dart-ui/BlendMode-class.html,您实际上可以找到所需的内容。一只忙碌的猫


4

ShaderMask小部件类将会很有帮助。

ShaderMask(

      // gradient layer  ----------------------------
      shaderCallback: (bound) {
        return  LinearGradient(
      end: FractionalOffset.topCenter,
      begin: FractionalOffset.bottomCenter,
      colors: [
        Colors.black.withOpacity(0.99),
        Colors.black.withOpacity(0.7),
        Colors.transparent,
      ],
      stops: [
        0.0,
        0.3,
        0.45
      ]) 
      .createShader(bound);
      },

      blendMode: BlendMode.srcOver,


      // your widget  ------------------------
      child: Container(
        height: double.infinity,
        width: double.infinity,
        child:
        Image.asset("image.png")
      ),
    );

2

编辑

const double scale = 2.04015; 只在浏览器中运行Flutter时有效。对于移动设备,请使用const double scale = 0;

=================================================

虽然有三年半的时间延迟,但我注意到没有一个答案能够理解所需的效果。因此,让我们首先分析所需的结果,然后编写代码。

渐变映射

这种效果被称为“渐变映射”,因为根据预定义的一组颜色,将单个像素值映射到渐变上。

让我们来看看。如果输入是灰度图像,Color color1 = Colors.blueColor color2 = Colors.purple,则应按以下方式转换单个像素颜色 -

Visual representation of gradient maps

其中

  • 黑色像素颜色-转换为蓝色
  • 白色像素颜色-转换为紫色
  • 介于两者之间的颜色-转换为蓝色和紫色之间的适当颜色

代码

我的初步想法是取一张图像,使用getBytes()将其解码为Uint8List,处理列表,最后将其重新编码为png。虽然这种方法可行,但对于实时用例来说远远不够高效。

因此,第二种可行的方法是使用颜色矩阵创建效果 -

class GradientMap extends StatelessWidget {

  final Color color1;
  final Color color2;
  final double contrast;
  final ImageProvider imageProvider;

  const GradientMap({
    this.color1 = Colors.white,
    this.color2 = Colors.black,
    this.contrast = 0,
    required this.imageProvider,
    Key? key
  }) : super(key: key);


  ColorFilter grayscaleMatrix() => ColorFilter.matrix([
    0.2126,       0.7152,       0.0722,       0, 0,
    0.2126,       0.7152,       0.0722,       0, 0,
    0.2126,       0.7152,       0.0722,       0, 0,
    contrast-0.4, contrast-0.4, contrast-0.4, 1, 0,
  ]);


  ColorFilter invertMatrix() => const ColorFilter.matrix([
    -1,  0,  0, 0, 255,
     0, -1,  0, 0, 255,
     0,  0, -1, 0, 255,
     0,  0,  0, 1, 0,
  ]);


  ColorFilter tintMatrix () {
    final int r = color2.red;
    final int g = color2.green;
    final int b = color2.blue;

    final double rTint = r / 255;
    final double gTint = g / 255;
    final double bTint = b / 255;

    const double scale = 2.04015; // Use 0 on mobile instead
    const double translate = 1 - scale * 0.5;

    return ColorFilter.matrix(<double>[
      (rTint * scale), (rTint * scale), (rTint * scale), (0), (r * translate),
      (gTint * scale), (gTint * scale), (gTint * scale), (0), (g * translate),
      (bTint * scale), (bTint * scale), (bTint * scale), (0), (b * translate),
      (0            ), (0            ), (0            ), (1), (0            ),
    ]);
  }


  @override
  Widget build(BuildContext context) {
    return Container(
      color: color1,
      child: ColorFiltered(
        colorFilter: tintMatrix(),
        child: ColorFiltered(
          colorFilter: invertMatrix(),
          child: ColorFiltered(
            colorFilter: grayscaleMatrix(),
            child: Image(image: imageProvider)),
        ),
      ),
    );
  }
}

或者,您可以将grayscaleMatrix()invertMatrix()组合成一个单独的矩阵,以消除需要第三个ColorFiltered()小部件。

该小部件以以下方式作为输入

  • color1 - 较浅的Color
  • color2 - 较暗的Color
  • contrast - double融合颜色1和颜色2之间的对比度
  • imageProvider - ImageProvider,例如AssetImage()NetworkImage()

并显示转换后的图像。 enter image description here

用法

只需以以下方式使用此小部件包装您的ImageProvider即可-

GradientMap(
  color1: Color.fromRGBO(158, 80, 254, 1),
  color2: Color.fromRGBO(15, 4, 192, 1),
  contrast: 0,
  imageProvider: NetworkImage("https://i.imgur.com/C5xknx8.png"),
)

缺点

虽然这种方法性能优越,但用户无法控制两个输入颜色之间的混合算法。 此外,该小部件只接受两种颜色作为输入。这消除了使用多彩渐变的可能性。


1
Container(
                  height: 35.h,
                  decoration: BoxDecoration(
                      borderRadius: BorderRadius.all(Radius.circular(6)),
                      image: DecorationImage(
                        image: AssetImage('assets/images/event_detail.png'),
                        fit: BoxFit.fill,

                      )),
                  child: Column(...

在此输入图片描述

引用 如果你将Column包裹在Container中,它会像这样

Container(
                  height: 35.h,
                  decoration: BoxDecoration(
                      borderRadius: BorderRadius.all(Radius.circular(6)),
                      image: DecorationImage(
                        image: AssetImage('assets/images/event_detail.png'),
                        fit: BoxFit.fill,

                      )),
                  child: Container( //This is our new Container
                    decoration: BoxDecoration(
                      gradient: LinearGradient(
                        begin: Alignment.bottomLeft,
                        end: Alignment.topRight,
                        colors: [
                          Colors.red.withOpacity(0.8),
                          Colors.red.withOpacity(0.1),
                        ],
                      )
                    ),
                    child: Column(...

在此输入图片描述


0
   return Scaffold(
      body: Container(
        width: double.infinity,
        decoration: BoxDecoration(
            image: DecorationImage(
                fit: BoxFit.cover,
                image: AssetImage('assets/images/example.png')
            )
        ),
        child: OverflowBox(
          child: Container(
            decoration: BoxDecoration(
              gradient: LinearGradient(
                  begin: begin,
                  end: end,
                  colors: [
                    Color(0xFF000000),
                    Color(0x2d2d2d00)
                  ]
              ),
            ),
          ),
        ),
      ),
    );


0
你可以将容器放在另一个容器里面。这段代码对我来说是有效的:
Container(
      decoration: const BoxDecoration(
        image: DecorationImage(
            fit: BoxFit.cover,
            image: AssetImage('assets/images/background.jpg')),
      ),
      child: Container(
        padding: const EdgeInsets.fromLTRB(12, 40, 12, 0),
        width: double.infinity,
        decoration: BoxDecoration(
          gradient: LinearGradient(
              begin: Alignment.topCenter,
              end: Alignment.bottomCenter,
              colors: [Colors.black.withOpacity(0), Colors.black]),
        ),
        child: <YOUR WIDGET>

网页内容由stack overflow 提供, 点击上面的
可以查看英文原文,
原文链接