如何获取UIBezierPath的反向路径

14
self.myPath=[UIBezierPath bezierPathWithArcCenter:center 
                                           radius:200 
                                       startAngle:0 
                                         endAngle:180 
                                        clockwise:YES];

我通过一些网络搜索完成了这部分内容。

现在我有这条路径。 现在我想填充这条路径的反面,使得这一部分保持不变,并且填充所有其他部分。 我该如何完成编码? 我没有太多关于这个的信息。

问题

enter image description here

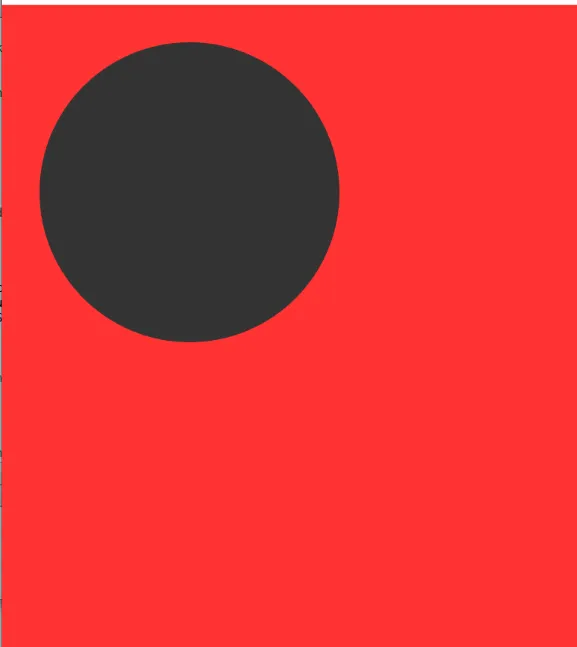
使用Cemal Answer之后,它所显示的区域之前只显示带有红色描边的圆形。

编辑

- (id)initWithFrame:(CGRect)frame
{
    self = [super initWithFrame:frame];
    if (self) {
        self.backgroundColor = [UIColor whiteColor];
        self.punchedOutPath =  
         [UIBezierPath bezierPathWithOvalInRect:CGRectMake(50, 50, 400, 400)];
        self.fillColor = [UIColor redColor];
        self.alpha = 0.8;
    }
    return self;
}

- (void)drawRect:(CGRect)rect
{
    [[self fillColor] set];
    UIRectFill(rect);

    CGContextRef ctx = UIGraphicsGetCurrentContext();
    CGContextSetBlendMode(ctx, kCGBlendModeDestinationOut);

    [[self punchedOutPath] fill];

    CGContextSetBlendMode(ctx, kCGBlendModeNormal);
}

在此输入图片描述


这个形状是一个完整的圆形还是开放式的圆形?此外,你能提供一张你期望的图像吗?它不需要太漂亮,但它将极大地帮助人们理解你试图做什么,以便他们可以帮助你。 - David Rönnqvist
完成了..我一直在努力提供它,因为我发起了悬赏。 - Shubhank
4个回答

21

使用bezierPathByReversingPath方法。从文档中(仅适用于iOS 6.0 +):

创建并返回具有当前路径反转内容的新贝塞尔路径对象。

因此,要反转路径,只需执行以下操作:

UIBezierPath* aPath = [UIBezierPath bezierPathWithArcCenter:center
                                                     radius:200
                                                 startAngle:0
                                                   endAngle:180
                                                  clockwise:YES];
self.myPath = [aPath bezierPathByReversingPath];

或者只需在Swift中使用reversing() - d4Rk

13

这里有一个不需要反转路径的替代方法。

你想要“剪切出”视图的一部分:

clipped out

假设你希望白色区域使用75%透明度的[UIColor whiteColor],以下是快速完成此操作的方法:

  • 创建一个新的UIView子类。
  • 此视图具有两个属性:

    @property (retain) UIColor *fillColor;
    @property (retain) UIBezierPath *punchedOutPath;
    
    你需要重写-drawRect:方法来实现这个功能:
  • - (void)drawRect:(CGRect)rect {
      [[self fillColor] set];
      UIRectFill(rect);
    
      CGContextRef ctx = UIGraphicsGetCurrentContext();
      CGContextSetBlendMode(ctx, kCGBlendModeDestinationOut);
    
      [[self punchedOutPath] fill];
    
      CGContextSetBlendMode(ctx, kCGBlendModeNormal);
    }
    
    这里有一个附带条件: 视图的 `fillColor` 不能包含 alpha 组件。所以在您的情况下,您只需要将其设置为 `[UIColor whiteColor]`。接下来,通过调用 `[myView setAlpha:0.75]` 来自行应用 alpha 部分。
    这里发生了什么:使用了一种称为“Destination Out”的混合模式。在数学上,它被定义为 `R = D * (1 - Sa)`,但是通俗地讲,它意味着“目标图像(即上下文中已经存在的东西)在目标图像不透明而源图像透明的地方,其他部分保持透明”。
    因此,在新的东西透明的地方(即 bezier 路径的外部),它将使用目标(即上下文中已经存在的东西),然后在 bezier 路径本应不透明的地方,那些区域会变成透明的。但是,目标材料必须已经是不透明的。如果不是不透明的,则混合不会产生您想要的效果。这就是为什么您必须提供一个不透明的 `UIColor`,然后直接使用视图进行任何透明度处理的原因。
    我自己运行了这个代码,并尝试了以下情况:
    • 窗口的背景是 ` [UIColor greenColor]`
    • `fillColor` 是白色的
    • `punchedOutPath` 是一个与视图边缘相距 10 点的椭圆形
    • 视图的 `alpha` 为 `0.75`
    使用上述代码,我得到了以下结果:

    enter image description here

    内部是纯绿色的,外面有半透明的覆盖层。
    更新 如果您的覆盖是一张图片,则需要创建一个新图片。但原理是相同的:
    UIImage* ImageByPunchingPathOutOfImage(UIImage *image, UIBezierPath *path) {
      UIGraphicsBeginImageContextWithOptions([image size], YES, [image scale]);
    
      [image drawAtPoint:CGPointZero];
    
      CGContextRef ctx = UIGraphicsGetCurrentContext();
      CGContextSetBlendMode(ctx, kCGBlendModeDestinationOut);
      [path fill];
    
    
      UIImage *final = UIGraphicsGetImageFromCurrentImageContext();
      UIGraphicsEndImageContext();
      return final;
    }
    

    接着,您会将此函数的结果放入UIImageView中。


@shubhank,答案中的代码描述了你所需的一切。 - Dave DeLong
嗨,你能帮我检查一下我对问题的新编辑吗?我尝试了你的方法,将我的视图背景设置为白色,但是椭圆却是黑色的。你能帮我解决这个问题吗?它应该是白色的...谢谢。 - Shubhank
@Shubhank 这种方法对于 UIViewbackgroundColor 是行不通的。你看到的黑色是被打洞视图后面的视图颜色(可能是窗口)。 - Dave DeLong
我本来想将图像添加到视图中,并在其上方实现上述功能...如果这无法使用 UIView 实现..那么我该如何裁剪图像..?请给予建议..你已经帮了我很多,如果你能帮我解决这个问题就太好了..非常感谢。 - Shubhank
我遇到了与@Shubank相同的黑色问题,但是通过在界面构建器中将覆盖UIView的 opaque 布尔值设置为NO,我成功让这段代码运行起来了。我想它在程序上也能够工作。 - bitwit
显示剩余2条评论

3
您可以将此代码放入单屏幕应用程序的视图控制器中:它将创建一个黄色背景视图和一个在其上方的蓝色图层,该图层通过遮罩裁剪成椭圆形区域。
- (void)viewDidLoad
{
    [super viewDidLoad];
    // Do any additional setup after loading the view, typically from a nib.

    // create a yellow background
    UIView *bg = [[UIView alloc] initWithFrame:self.view.bounds];
    bg.backgroundColor = [UIColor yellowColor];
    [self.view addSubview:bg];    

    // create the mask that will be applied to the layer on top of the 
    // yellow background
    CAShapeLayer *maskLayer = [CAShapeLayer layer];
    maskLayer.fillRule = kCAFillRuleEvenOdd;
    maskLayer.frame = self.view.frame;

    // create the paths that define the mask
    UIBezierPath *maskLayerPath = [UIBezierPath bezierPath];
    [maskLayerPath appendPath:[UIBezierPath bezierPathWithRect:CGRectInset(self.view.bounds, 20, 20)]];
    // here you can play around with paths :)
//    [maskLayerPath appendPath:[UIBezierPath bezierPathWithOvalInRect:(CGRect){{80, 80}, {140, 190}}]];
    [maskLayerPath appendPath:[UIBezierPath bezierPathWithOvalInRect:(CGRect){{100, 100}, {100, 150}}]];
    maskLayer.path = maskLayerPath.CGPath;

    // create the layer on top of the yellow background
    CALayer *imageLayer = [CALayer layer];
    imageLayer.frame = self.view.layer.bounds;
    imageLayer.backgroundColor = [[UIColor blueColor] CGColor];

    // apply the mask to the layer
    imageLayer.mask = maskLayer;
    [self.view.layer addSublayer:imageLayer];

}

这也许同样可以回答你的问题:UIBezierPath 减去路径


你能解释一下你在做什么以及为什么吗?这样问问题的人和其他寻找答案的人才能理解你的回答。 - Manuel
奇怪,为什么[UIBezierPath bezierPathWithOvalInRect:]不能画出椭圆形?您是否将该代码完全复制并粘贴到一个空的单屏幕项目中? - user511

2
我为您提供两种解决方案。
  1. Draw this path on a CALayer. And use that CALayer as a mask layer for you actual CALayer.

  2. Draw a rectangle with the sizes of you frame before adding arc.

    UIBezierPath *path = [UIBezierPath bezierPathWithRect:view.frame];
    [path addArcWithCenter:center 
                    radius:200 
                startAngle:0 
                  endAngle:2*M_PI 
                 clockwise:YES];
    
我会使用第二种解决方案。 :)

2
第二个解决方案更好,除非需要添加逆时针的弧线,这样所围成的区域将被排除在非零环绕数规则之外(矩形是以顺时针方向添加的)。 - Nicolas Bachschmidt
这对我不起作用,我得到了非常奇怪的结果...我已经在问题中添加了它,请看一下...谢谢。 - Shubhank
1
endAngle 需要是弧度(而不是角度)。你想要一个 360° 的圆,所以这是 2pi 或 6.283。你可以写成 2*M_PI - Andreas Ley

网页内容由stack overflow 提供, 点击上面的
可以查看英文原文,
原文链接