Jetpack Compose,如何在没有字体间距的情况下居中文本?

22

我正在努力在Jetpack Compose版本alpha-11中垂直居中文本。看起来我的字体有很多填充,我找不到任何方法来禁用它。据我所知,这只在SO上出现过一次,在这里,但他们使用限制布局的答案似乎表明他们只是绝对定位了它,这不完全是一个解决方案,而是一个权宜之计,而我想避免这样做。

您可以在下面的截图中清楚地看到它。

enter image description here

那段代码看起来像这样:

                   Column(verticalArrangement = Arrangement.Center) {
                        Text(
                            text = "Let's Go",
                            color = Color.White,
                            fontSize = 120.sp,
                            fontFamily = oswaldLightFontFamily(),
                            textAlign = TextAlign.Center,
                            modifier = Modifier.background(Color.Blue)
                        )
                    }

您期望用于定位的参数--verticalArrangementtextAlign--在此处没有任何作用,但我包含它们是为了展示我尝试过的内容。

到目前为止,我的解决方法是使用Modifier.graphicsLayer(translationY = -25f)将其向上移动,但看起来这似乎是一个很糟糕的hack,因为对于应该直截了当的事情,需要这样做。在传统的Android布局中,可以设置android:includeFontPadding="false",这将绕过此行为,但在Jetpack Compose中似乎没有类似的选项。

有人遇到过这种情况吗?


-25f在所有设备上对于这种字体是否工作良好,或者需要将数字乘以密度系数才能使其在所有设备上“类似”地工作? - Rahul Sainani
说实话,我还没有在其他设备上尝试过,因为我只需要针对特定分辨率的一个特定设备进行目标定位,所以有些宠坏了。但是我预计需要调整它,以便在其他设备上正确运行。不过,我在Android方面经验不足,无法提供建议,这只是我在CSS中处理此类问题的方式。另外请注意,-25f通常只是一个起点,我一直在根据需要进行微调。我也希望其他字体能够不同。这一切都感觉很hacky,希望很快会有更好的解决方案! - subvertallchris
2
https://issuetracker.google.com/issues/171394808 - Gabriele Mariotti
那个解决方法相当不错。 - Guanaco Devs
6个回答

9
这是由于https://fonts.google.com/specimen/Oswald上的字体填充不均匀,再加上您使用的小写文本使得差异更加明显。
正如@Siyamed在下面提到的那样,在Compose 1.2 beta中发布了关闭默认includeFontPadding行为的API,并且您可以像这样使用它:
Text(
...
   textStyle = TextStyle(
      platformStyle = PlatformTextStyle(
     includeFontPadding = false
   ),
)

https://android-developers.googleblog.com/2022/05/whats-new-in-jetpack-compose.html

试一试,可能会有帮助?顺便说一下,如果你注意到 PlatformTextStyle 被标记为“已弃用”,这只是想告知它是一个兼容性 API。我们在更近期的 Compose 版本中移除了弃用警告,从 1.5 版本及以上开始。

8
根据https://issuetracker.google.com/issues/171394808,看起来这是当前JetPack Compose的一个限制之一。
对于我的应用程序来说,这也是一个致命问题,因为所使用的字体严重依赖于includeFontPadding。为了解决目前的问题,我创建了一个包装TextView的CoreText。
以下是我的包装器示例,它不完美,但适用于我的当前用例:
@Composable
fun CoreText(
    text: String,
    modifier: Modifier = Modifier,
    color: Color = Color.Unspecified,
    textDecoration: TextDecoration? = null,
    textAlign: TextAlign? = null,
    overflow: TextOverflow = TextOverflow.Clip,
    maxLines: Int = Int.MAX_VALUE,
    style: TextStyle = Typography.body2,
    onClick: (() -> Unit)? = null,
) {
    AndroidView(
        modifier = modifier,
        factory = { context ->
            TextView(context)
        },
        update = {
            if (Build.VERSION.SDK_INT >= Build.VERSION_CODES.M) {
                it.setTextAppearance(style.fontWeight.toStyle())
            } else {
                it.setTextAppearance(it.context, style.fontWeight.toStyle())
            }

            if (overflow == TextOverflow.Ellipsis) {
                it.ellipsize = TextUtils.TruncateAt.END
            }

            if (textDecoration != null) {
                it.paintFlags = when (textDecoration) {
                    TextDecoration.Underline -> {
                        Paint.UNDERLINE_TEXT_FLAG
                    }
                    TextDecoration.LineThrough -> {
                        Paint.STRIKE_THRU_TEXT_FLAG
                    }
                    else -> 0
                }
            }

            if (onClick != null) {
                it.setOnClickListener { onClick.invoke() }
            }

            if (color != Color.Unspecified || style.color != Color.Unspecified) {
                it.setTextColor(if (color == Color.Unspecified) style.color.toArgb() else color.toArgb())
            }

            it.textSize = style.fontSize.value
            it.text = text
            it.background = ColorDrawable(style.background.toArgb())
            it.maxLines = maxLines
            it.includeFontPadding = false
            it.textAlignment = textAlign?.toStyle() ?: style.textAlign.toStyle()
        }
    )
}

// Replace with your style
fun FontWeight?.toStyle(): Int {
    return when (this) {
        FontWeight.Bold -> R.style.TextStyle_Bold
        FontWeight.Normal -> R.style.TextStyle_Regular
        FontWeight.Medium, FontWeight.SemiBold -> R.style.TextStyle_Medium
        else -> -1
    }
}

fun TextAlign?.toStyle(): Int {
    return when (this) {
        TextAlign.Left -> TEXT_ALIGNMENT_TEXT_START
        TextAlign.Right -> TEXT_ALIGNMENT_TEXT_END
        TextAlign.Center -> TEXT_ALIGNMENT_CENTER
        TextAlign.Start -> TEXT_ALIGNMENT_TEXT_START
        TextAlign.End -> TEXT_ALIGNMENT_TEXT_END
        else -> -1
    }
}

1
这个问题在Compose 1.2.0-alpha05中已经修复!请参见https://developer.android.com/jetpack/androidx/releases/compose-ui#1.2.0-alpha05下的最后一个项目。 - Tony Wickham

1
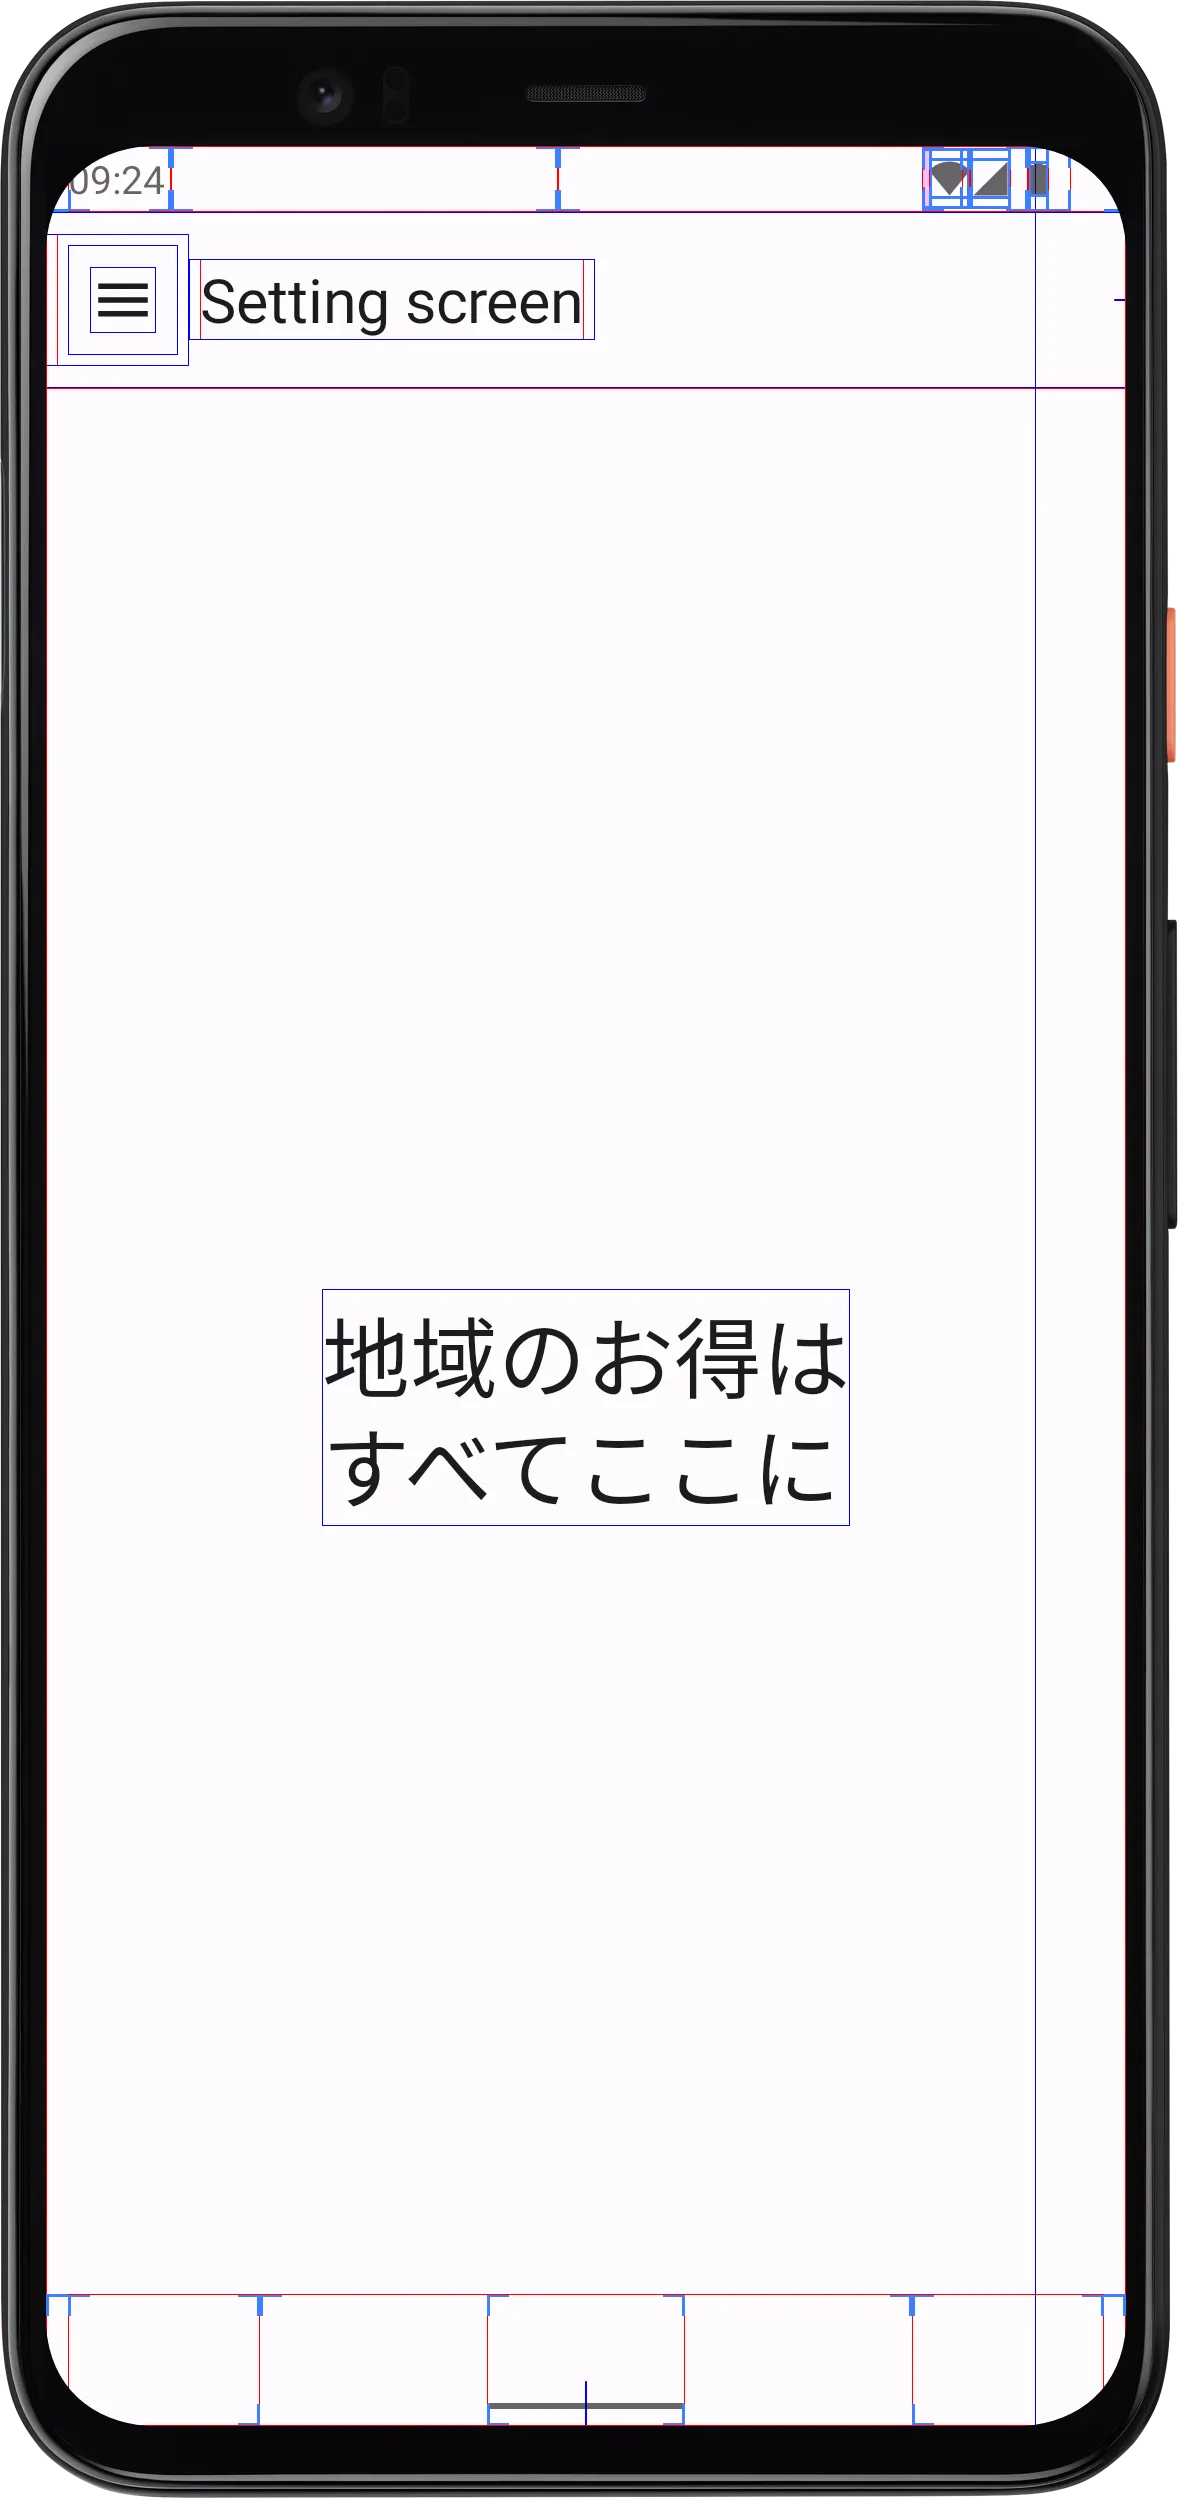
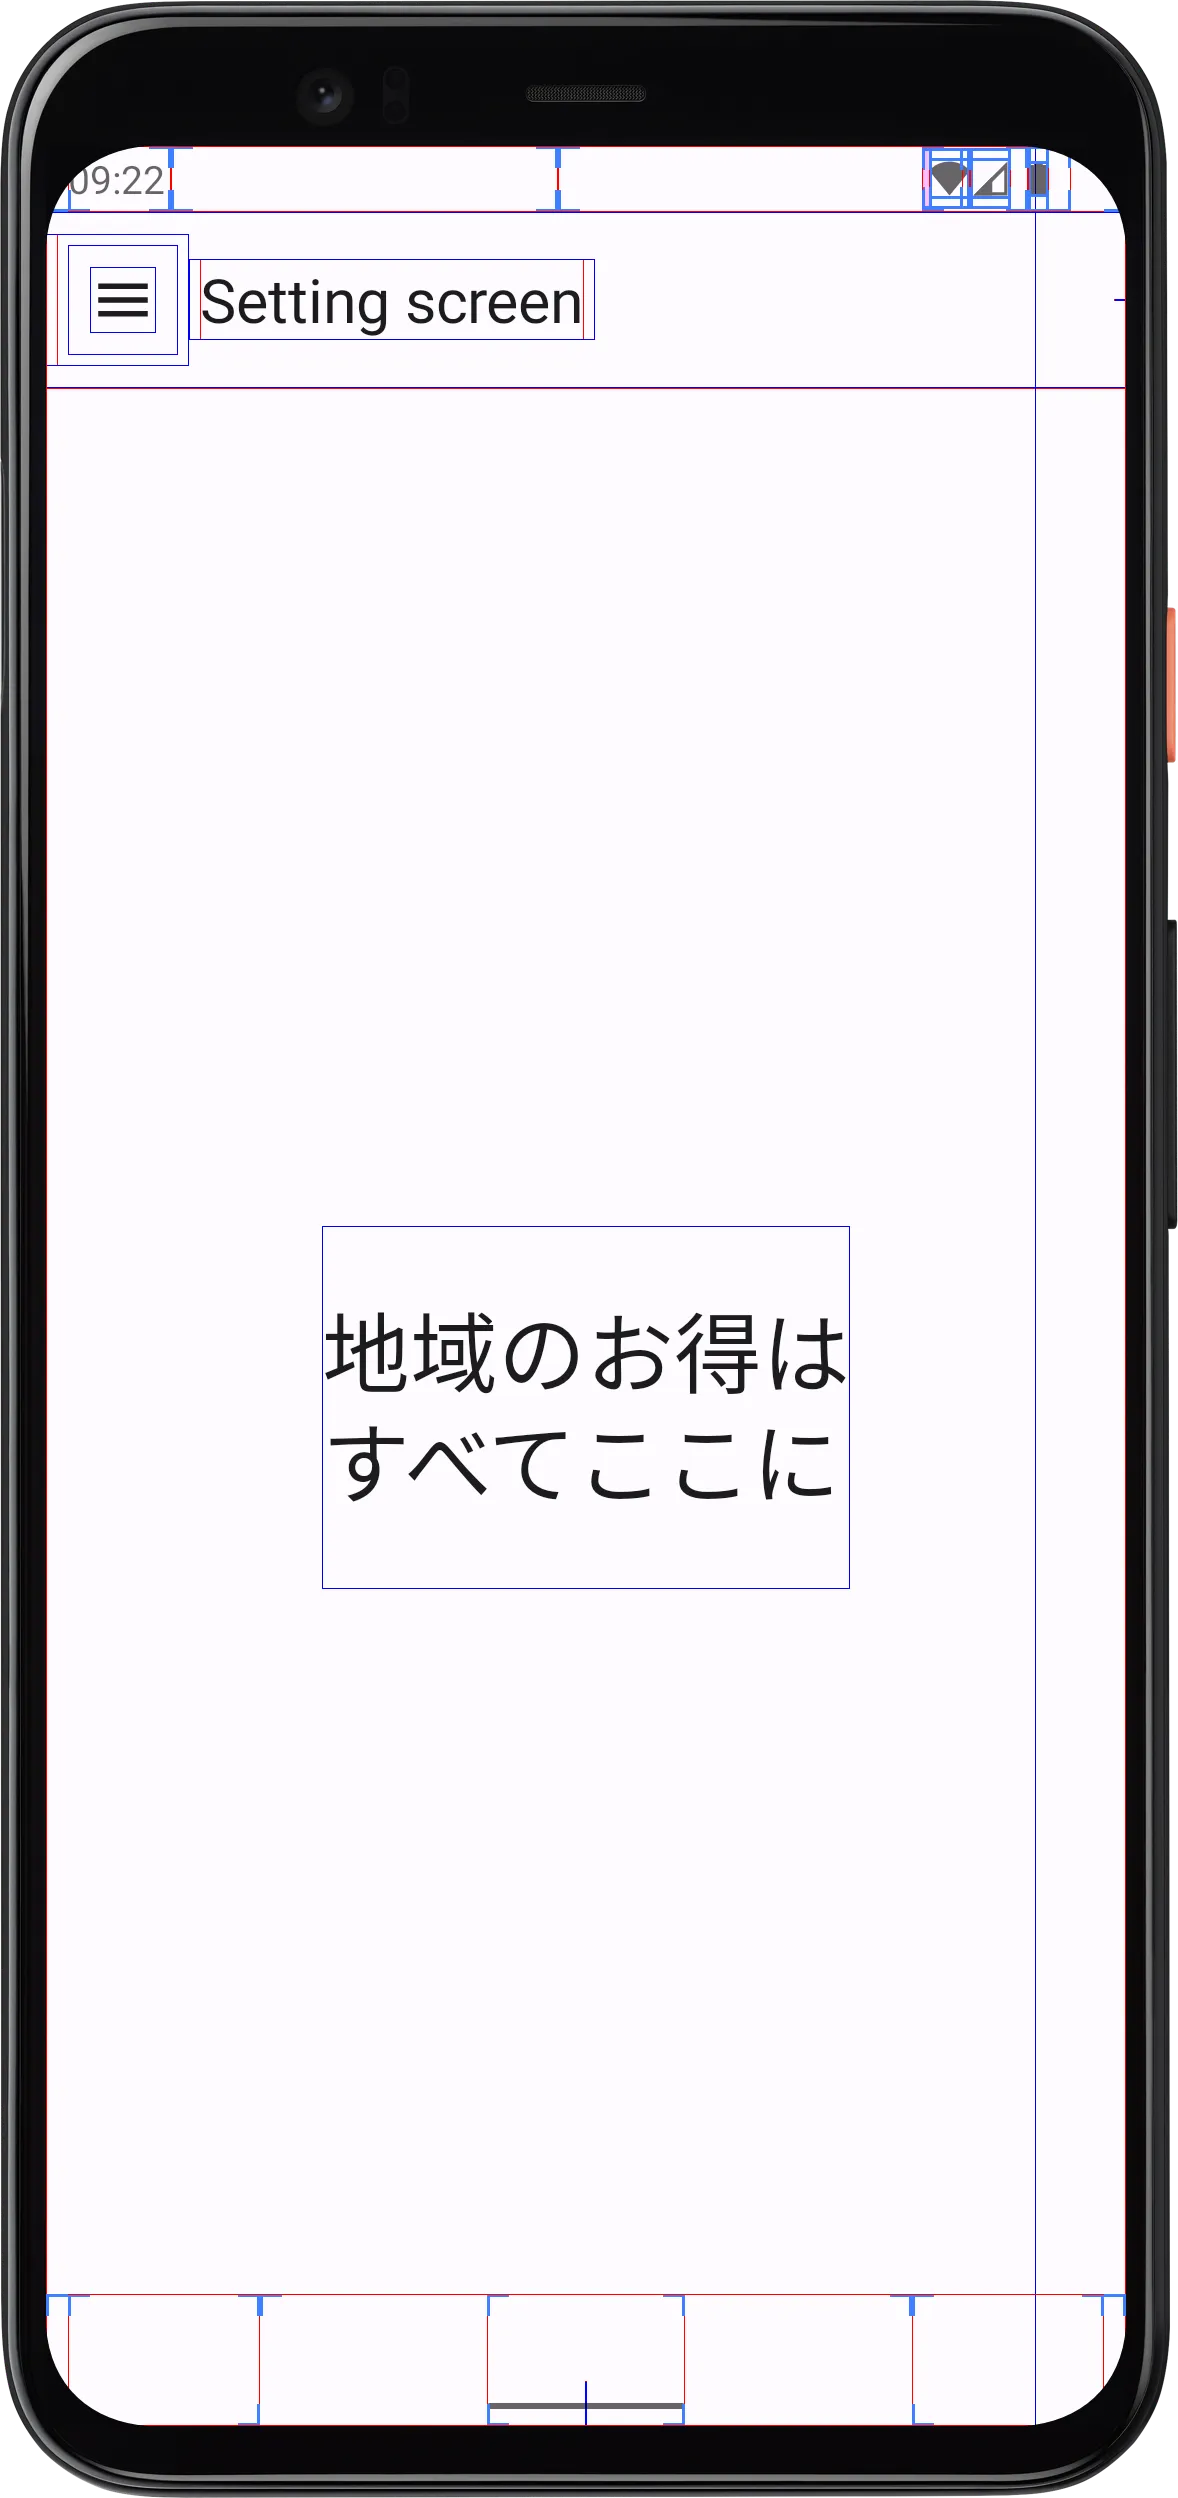
通过使用Compose 1.2.0-alpha07及以上版本,您可以使用PlatformTextStyle API来设置includeFontPadding。尝试下面的代码:
private val NotoSans = FontFamily(
    Font(R.font.noto_san_jp_black, FontWeight.Black),
    Font(R.font.noto_san_jp_light, FontWeight.Light),
    Font(R.font.noto_san_jp_bold, FontWeight.Bold),
    Font(R.font.noto_san_jp_thin, FontWeight.Thin),
    Font(R.font.noto_san_jp_medium, FontWeight.Medium),
    Font(R.font.noto_san_jp_regular, FontWeight.Normal),
)

val Typography = Typography(
    headlineLarge = Typography().headlineLarge.copy(
        fontFamily = NotoSans,
    )
)

@OptIn(ExperimentalTextApi::class)
/* ... */

Text(
    text = "地域のお得は\nすべてここに",
    style = MaterialTheme.typography.headlineLarge.copy(
        platformStyle = PlatformTextStyle(
            includeFontPadding = false
        )
    /* ... */
    )
)

includeFontPadding = false 时的结果:

includeFontPadding = false

includeFontPadding = true 或不使用它时的结果:

includeFontPadding = true or not using

更多信息:

修复Compose文本中的字体填充 - Medium


1

Compose现在有一个TextStyle.platformStyle.incudeFontPadding属性,版本1.2默认设置为true,您可以在自己的TextStyle中将其设置为false。

在v1.3或更高版本中,Compose希望将默认值设置为false。


0

(临时)定制解决方案:

fun Modifier.baselinePadding(
    firstBaselineToTop: Dp,
    lastBaselineToBottom: Dp
) = layout { measurable, constraints ->
    val placeable = measurable.measure(constraints)

    check(placeable[FirstBaseline] != AlignmentLine.Unspecified)
    val firstBaseline = placeable[FirstBaseline]

    check(placeable[LastBaseline] != AlignmentLine.Unspecified)
    val lastBaseline = placeable[LastBaseline]

    val lastBaselineToBottomHeight = placeable.height - lastBaseline

    val lastBaselineToBottomDelta = lastBaselineToBottom.roundToPx() - lastBaselineToBottomHeight

    val totalHeight = placeable.height +
            (firstBaselineToTop.roundToPx() - firstBaseline)

    val placeableY = totalHeight - placeable.height
    layout(placeable.width, totalHeight + lastBaselineToBottomDelta) {
        placeable.placeRelative(0, placeableY)
    }
}

这个怎么让你居中文本?看起来只是让你设置顶部/底部基线的填充,但没有办法知道要使用多少填充来在视觉上居中文本。 - Tony Wickham

-1

刚刚解决了这个问题。

Box(contentAlignment = Alignment.Center){
       Text(
                text = "OK"
                textAlign = TextAlign.Center
        )
}

网页内容由stack overflow 提供, 点击上面的
可以查看英文原文,
原文链接