这是关于OpenGL的答案。对于Quartz过程将非常不同。
实际的代码很简单,但要确保完全正确就比较棘手。我正在使用一个具有1024X1024大小和原点在左下角的GL上下文。我不会发布我的代码,因为它使用了OpenGL|ES中不可用的即时模式。如果您需要我的绘图代码,请让我知道,我会更新我的答案。
1. 使用禁用混合的方法绘制蒙版。
2. 启用混合,设置GLBlendFunc(GL_DST_COLOR, GL_ZERO),并绘制渗透纹理。我的蒙版在应该渗透的地方是白色的。在你的问题中,它是黑色的。
3. 现在要绘制背景,将混合函数设置为glBlendFunc(GL_ONE_MINUS_DST_COLOR, GL_DST_COLOR),并绘制背景纹理。
编辑 这里是我上面描述的代码。请注意,这不会在iOS上工作,因为那里没有即时模式,但您应该能够在Macintosh项目中使其正常工作。一旦这样做正常,您可以将其转换为在iOS项目中兼容的代码,并将该代码移动到您的iOS项目中。
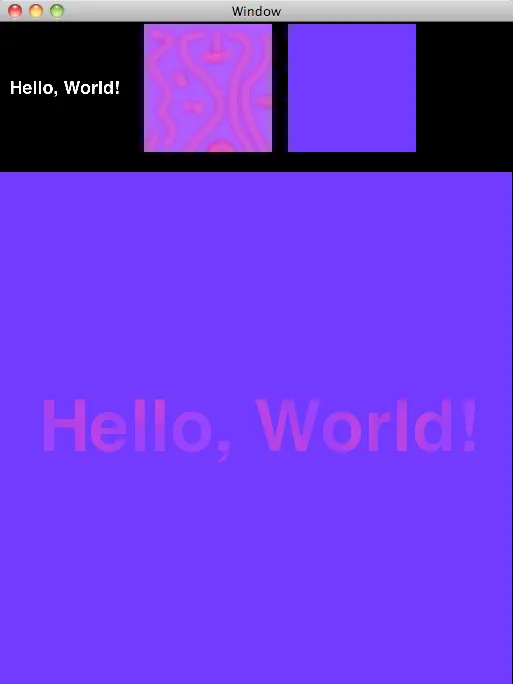
renderMask()调用是最有趣的部分。renderTextures()在顶行绘制示例纹理。
static GLuint color_texture;
static GLuint mask_texture;
static GLuint background_texture;
static float window_size[2];
void renderMask()
{
float texture_x=0, texture_y=0;
float x=0, y=0;
{
glBindTexture(GL_TEXTURE_2D, mask_texture);
glDisable(GL_BLEND);
glBegin(GL_QUADS);
glTexCoord2f(texture_x,texture_y);
glVertex2f(x,y);
glTexCoord2f(texture_x+1.0,texture_y);
glVertex2f(x+512.0,y);
glTexCoord2f(texture_x+1.0,texture_y+1.0);
glVertex2f(x+512.0,y+512.0);
glTexCoord2f(texture_x,texture_y+1.0);
glVertex2f(x,y+512.0);
glEnd();
}
{
glBindTexture(GL_TEXTURE_2D, color_texture);
glEnable(GL_BLEND);
glBlendFunc(GL_DST_COLOR, GL_ZERO);
glBegin(GL_QUADS);
glTexCoord2f(texture_x,texture_y);
glVertex2f(x,y);
glTexCoord2f(texture_x+1.0,texture_y);
glVertex2f(x+512.0,y);
glTexCoord2f(texture_x+1.0,texture_y+1.0);
glVertex2f(x+512.0,y+512.0);
glTexCoord2f(texture_x,texture_y+1.0);
glVertex2f(x,y+512.0);
glEnd();
}
{
glBindTexture(GL_TEXTURE_2D, background_texture);
glEnable(GL_BLEND);
glBlendFunc(GL_ONE_MINUS_DST_COLOR, GL_DST_COLOR);
glBegin(GL_QUADS);
glTexCoord2f(texture_x,texture_y);
glVertex2f(x,y);
glTexCoord2f(texture_x+1.0,texture_y);
glVertex2f(x+512.0,y);
glTexCoord2f(texture_x+1.0,texture_y+1.0);
glVertex2f(x+512.0,y+512.0);
glTexCoord2f(texture_x,texture_y+1.0);
glVertex2f(x,y+512.0);
glEnd();
}
}
void renderTextures()
{
float texture_x=0, texture_y=0;
float x=0, y=532.0;
float size = 128;
{
glBindTexture(GL_TEXTURE_2D, mask_texture);
glDisable(GL_BLEND);
glBegin(GL_QUADS);
glTexCoord2f(texture_x,texture_y);
glVertex2f(x,y);
glTexCoord2f(texture_x+1.0,texture_y);
glVertex2f(x+size,y);
glTexCoord2f(texture_x+1.0,texture_y+1.0);
glVertex2f(x+size,y+size);
glTexCoord2f(texture_x,texture_y+1.0);
glVertex2f(x,y+size);
glEnd();
}
{
glBindTexture(GL_TEXTURE_2D, color_texture);
x = size + 16;
glBegin(GL_QUADS);
glTexCoord2f(texture_x,texture_y);
glVertex2f(x,y);
glTexCoord2f(texture_x+1.0,texture_y);
glVertex2f(x+size,y);
glTexCoord2f(texture_x+1.0,texture_y+1.0);
glVertex2f(x+size,y+size);
glTexCoord2f(texture_x,texture_y+1.0);
glVertex2f(x,y+size);
glEnd();
}
{
glBindTexture(GL_TEXTURE_2D, background_texture);
x = size*2 + 16*2;
glBegin(GL_QUADS);
glTexCoord2f(texture_x,texture_y);
glVertex2f(x,y);
glTexCoord2f(texture_x+1.0,texture_y);
glVertex2f(x+size,y);
glTexCoord2f(texture_x+1.0,texture_y+1.0);
glVertex2f(x+size,y+size);
glTexCoord2f(texture_x,texture_y+1.0);
glVertex2f(x,y+size);
glEnd();
}
}
void init()
{
GLdouble bounds[4];
glGetDoublev(GL_VIEWPORT, bounds);
window_size[0] = bounds[2];
window_size[1] = bounds[3];
glClearColor(0.0, 0.0, 0.0, 1.0);
glShadeModel(GL_SMOOTH);
color_texture = [[NSImage imageNamed:@"colors"] texture];
mask_texture = [[NSImage imageNamed:@"mask"] texture];
background_texture = [[NSImage imageNamed:@"background"] texture];
glEnable(GL_BLEND);
glEnable(GL_TEXTURE_2D);
}
void draw()
{
glClear(GL_COLOR_BUFFER_BIT | GL_DEPTH_BUFFER_BIT);
glColor3f(1.0, 1.0, 1.0);
renderMask();
renderTextures();
}
void reshape(int width, int height)
{
glViewport(0, 0, width, height);
glMatrixMode(GL_PROJECTION);
glLoadIdentity();
gluOrtho2D(0.0, width, 0.0, height);
glMatrixMode(GL_MODELVIEW);
window_size[0] = width;
window_size[1] = height;
}
这里展示了我正常绘制的三个纹理(裁剪、透出和背景),然后在下方组合在一起。