如何使用Python中的OpenCV处理图像?

5

我希望使用OpenCV库中的边缘检测算法。下面是一段Python代码:

from opencv.cv import *
from opencv.highgui import *

img = cvLoadImage ('xxx.jpg')
cvNamedWindow ('img')
cvShowImage ('img', img)
cvWaitKey ()

canny = cvCreateImage (cvSize (img.width, img.height), 8, 3)
cvCanny (img, canny, 50, 200)

harris = cvCreateImage (cvSize (img.width, img.height), 8, 3)
cvCornerHarris (img, harris, 5, 5, 0.1)

加载和显示图像正常,但canny和harris变换失败。
cvCanny 的报错信息为:

RuntimeError:  openCV Error:
    Status=Unsupported format or combination of formats
    function name=cvCanny
    error message=
    file_name=cv/cvcanny.cpp
    line=72

使用cvCornerHarris时,出现以下错误:

RuntimeError:  openCV Error:
    Status=Assertion failed
    function name=cvCornerHarris
    error message=src.size() == dst.size() && dst.type() == CV_32FC1
    file_name=cv/cvcorner.cpp
    line=370

根据这些信息,我可以推断出加载的图像格式无效。但我不知道如何进行转换。
以下是一些img字段的值:

img.type = 1111638032
img.nChannels = 3
img.depth = 8
1
你使用的API版本是什么?你的代码似乎与旧版API一致,可能会让新用户感到困惑:你应该使用“import cv”等。如果你愿意,我很乐意为你翻译代码。 - meduz
@meduz,这是python-opencv_2.0.0-3ubuntu2版本。我是从Ubuntu 10.04的软件库中安装的。 - max taldykin
3个回答

8

对于其他对同类型问题感兴趣的人,我建议查看http://simplecv.org

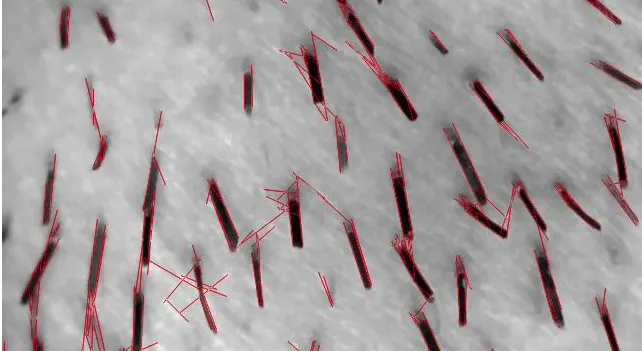
这里是我编写的一段代码,它可以在从网络摄像头获取的图像上进行直线检测。它甚至可以通过http显示图像。beard detection

import SimpleCV
import time

c = SimpleCV.Camera(1)
js = SimpleCV.JpegStreamer() 

while(1):
  img = c.getImage()
  img = img.smooth()
  lines = img.findLines(threshold=25,minlinelength=20,maxlinegap=20)
  [line.draw(color=(255,0,0)) for line in lines]
  #find the avg length of the lines
  sum = 0
  for line in lines:
      sum = line.length() + sum
  if sum:
      print sum / len(lines)
  else:
      print "No lines found!"
  img.save(js.framebuffer)
  time.sleep(0.1)

请查看我为此制作的项目,网址为http://labs.radiantmachines.com/beard/,它可以检测您的胡颈毛有多长 :)


1
这真是太棒了。我给你加1分! - Blender

6

这里是修正过的代码。请查看内联注释。简而言之,您的数据类型是错误的。请阅读API

try:
    from opencv.cv import *
    from opencv.highgui import *
except:
    #
    # Different OpenCV installs name their packages differently.
    #
    from cv import *

if __name__ == '__main__':
    import sys
    #
    # 1 = Force the image to be loaded as RGB
    #
    img = LoadImage (sys.argv[1], 1)
    NamedWindow ('img')
    ShowImage ('img', img)
    WaitKey ()

    #
    # Canny and Harris expect grayscale  (8-bit) input.
    # Convert the image to grayscale.  This is a two-step process:
    #   1.  Convert to 3-channel YCbCr image
    #   2.  Throw away the chroma (Cb, Cr) and keep the luma (Y)
    #
    yuv = CreateImage(GetSize(img), 8, 3)
    gray = CreateImage(GetSize(img), 8, 1)
    CvtColor(img, yuv, CV_BGR2YCrCb)
    Split(yuv, gray, None, None, None)

    canny = CreateImage(GetSize(img), 8, 1)
    Canny(gray, canny, 50, 200)
    NamedWindow ('canny')
    ShowImage ('canny', canny)
    WaitKey()

    #
    # The Harris output must be 32-bit float.
    #
    harris = CreateImage (GetSize(img), IPL_DEPTH_32F, 1)
    CornerHarris(gray, harris, 5, 5, 0.1)

谢谢!我已经阅读了API,但不清楚每个转换期望哪种图像格式。 - max taldykin
顺便说一下,我的Ubuntu 10.04上导入的两个库(openhighgucv)都无法使用。 - max taldykin
如果它们不起作用,那您是如何运行代码的?这通常意味着未安装OpenCV的Python封装程序。 - mpenkov
它们在我的源文件中的运作方式是相同的,也就是说所有东西都导入了 cv 前缀。 - max taldykin
1
哦,抱歉。这意味着我的代码中有一个打字错误——我在尝试让它在我的系统上工作时可能已经更改了它。我现在会去编辑它。 - mpenkov

2

您可以一步完成图像转灰度,而不是两步:

gray = cv.CreateMat(img.height, img.width, cv.CV_8UC1)
cv.CvtColor(img, gray, cv.CV_BGR2GRAY)

网页内容由stack overflow 提供, 点击上面的
可以查看英文原文,
原文链接