我是一个程序,可以在流中找到轮廓,例如:
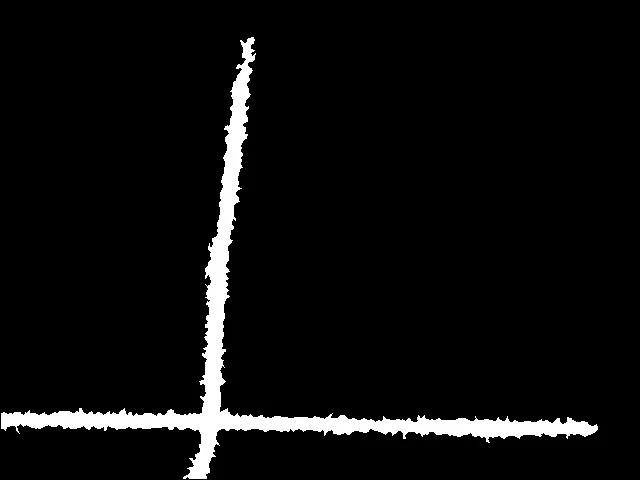
我想找到能够描述这个轮廓的“点集”,就像红线一样:
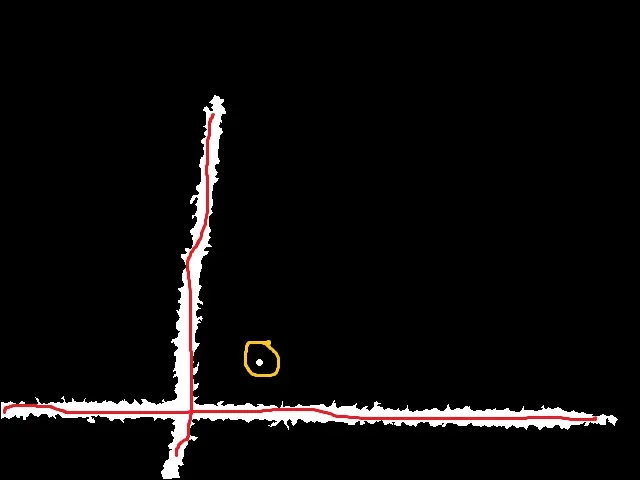
黄色部分是轮廓的矩,
我尝试使用opencv的fitLine函数,但结果很荒谬,有什么办法可以得到轮廓的中间线,以代表我的轮廓的关键方面。顺便说一句,**我不是在寻求代码! **只是提示我该怎么做?
提前感谢任何帮助。
我是一个程序,可以在流中找到轮廓,例如:
我想找到能够描述这个轮廓的“点集”,就像红线一样:
黄色部分是轮廓的矩,
我尝试使用opencv的fitLine函数,但结果很荒谬,有什么办法可以得到轮廓的中间线,以代表我的轮廓的关键方面。顺便说一句,**我不是在寻求代码! **只是提示我该怎么做?
提前感谢任何帮助。
cv::Mat input = cv::imread("fitLine.jpg");
cv::Mat gray;
cv::cvtColor(input,gray,CV_BGR2GRAY);

cv::Mat mask = gray>100;
cv::imshow("mask",mask);

cv::Mat dt;
cv::distanceTransform(mask,dt,CV_DIST_L1,CV_DIST_MASK_PRECISE);

cv::imshow("dt", dt/15.0f);
cv::imwrite("fitLineOut.png",255*dt/15.0f);


//care: this part doesn't work for diagonal lines, a ridge detection would be better!!
cv::Mat lines = cv::Mat::zeros(input.rows, input.cols, CV_8UC1);
//only take the maxDist of each row
for(unsigned int y=0; y<dt.rows; ++y)
{
    float biggestDist = 0;
    cv::Point2i biggestDistLoc(0,0);
    for(unsigned int x=0; x<dt.cols; ++x)
    {
        cv::Point2i current(x,y);
        if(dt.at<float>(current) > biggestDist)
        {
            biggestDist = dt.at<float>(current) ;
            biggestDistLoc = current;

        }
    }
    lines.at<unsigned char>(biggestDistLoc) = 255;
}

//and the maxDist of each row
for(unsigned int x=0; x<dt.cols; ++x)
{
    float biggestDist = 0;
    cv::Point2i biggestDistLoc(0,0);
    for(unsigned int y=0; y<dt.rows; ++y)
    {
        cv::Point2i current(x,y);
        if(dt.at<float>(current) > biggestDist)
        {
            biggestDist = dt.at<float>(current) ;
            biggestDistLoc = current;

        }
    }
    lines.at<unsigned char>(biggestDistLoc) = 255;
}

cv::imshow("max", lines);


cv::waitKey(-1);
 你可以看到线条中间有一个局部脊线最大值。
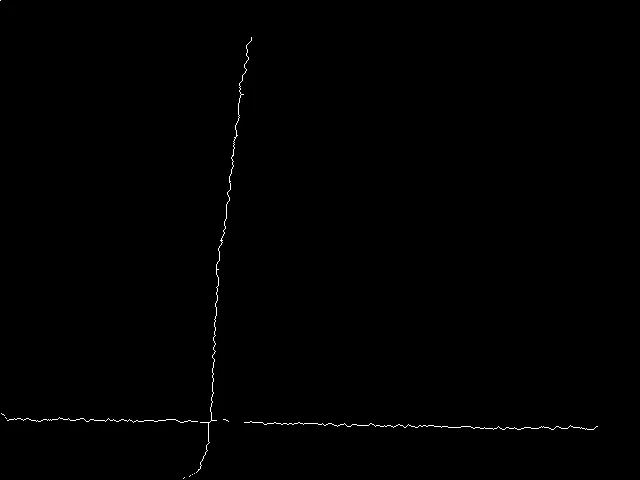
编辑: 附加说明:
这个想法是找到所有位于轮廓的“中间”的点。在数学/图形学中,介质轴是某种物体的“中心”,其定义是所有具有相同最小距离至少同时与两个轮廓点的点。
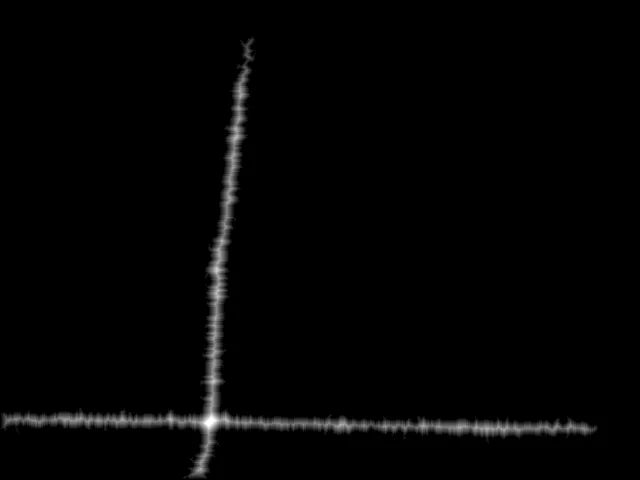
逼近媒体轴的方法是计算距离变换。距离变换是一个矩阵,为每个像素保留到下一个对象点(例如对象的轮廓)的距离(也可以参见http://en.wikipedia.org/wiki/Distance_transform)。这是第一张图片。在那里,您可以看到在线的中间点比靠近边界的点亮一些,这意味着沿着线最亮的点可以解释为介质轴(近似),因为如果您远离它(垂直于线方向),距离会变小,因此峰值是距离两个边缘接近平等的点。
如果您能在距离变换中找到那些“脊”,那么您就完成了。脊检测通常由哈里斯算子完成(参见http://en.wikipedia.org/wiki/Ridge_detection)。for loops。imshow 的,因为浮点矩阵会被解释为 0 = 黑色和 1 = 白色。因此,在缩放后,显示的像素(第一张图像)是黑色(零),并逐渐增加强度直到白色(15)。进一步的计算是在原始距离值上进行的。 - Micka有趣的任务 :) 这是我的解决方案:
下面是代码:
#include <iostream>
#include <vector>
#include <stdio.h>
#include <stdarg.h>
#include <set>
#include "opencv2/opencv.hpp"
#include "fstream"
#include "iostream"
using namespace std;
using namespace cv;


int Thinning(unsigned char * ucBinedImg, unsigned char * ucThinnedImage, long lWidth, long lHeight, long lIterativeLimit)
{
    if(ucBinedImg == NULL)
        return -1;

    if(ucThinnedImage == NULL)
        return -2;

    if(lIterativeLimit == -1)
        lIterativeLimit = 60000;

    unsigned char x1, x2, x3, x4, x5, x6, x7, x8, xp;
    unsigned char g1, g2, g3, g4;
    unsigned char b1, b2, b3, b4;
    unsigned char np1, np2, npm;
    unsigned char *pUp, *pDown, *pImg;
    long    lDeletedPoints = 0;

    // set border
    memcpy(ucThinnedImage, ucBinedImg, lWidth*lHeight);

    for(long it=0; it<lIterativeLimit; it++)
    {
        lDeletedPoints = 0;
        for(long i=1; i<lHeight-1; i++)
        {
            // init neighborhood
            pUp = ucBinedImg + (i-1)*lWidth;
            pImg = ucBinedImg + i*lWidth ;
            pDown = ucBinedImg + (i+1)*lWidth ;

            for( long j=1; j<lWidth-1; j++)
            {
                pUp++;
                pImg++;
                pDown++;

                if(!*pImg)
                    continue;

                x6 = *(pUp-1);
                x5 = *(pImg-1);
                x4 = *(pDown-1);

                x7 = *pUp;
                xp = *pImg;
                x3 = *pDown;

                x8 = *(pUp+1);
                x1 = *(pImg + 1);
                x2 = *(pDown + 1);

                b1 = !x1 && (x2 == 1 || x3 == 1);
                b2 = !x3 && (x4 == 1 || x5 == 1);
                b3 = !x5 && (x6 == 1 || x7 == 1);
                b4 = !x7 && (x8 == 1 || x1 == 1);

                g1 = (b1 + b2 + b3 + b4) == 1;

                np1 = x1|| x2;
                np1 += x3 || x4;
                np1 += x5 || x6;
                np1 += x7 || x8;
                np2 = x2|| x3;
                np2 += x4 || x5;
                np2 += x6 || x7;
                np2 += x8 || x1;

                npm = np1>np2?np2:np1;
                g2 = npm>=2 && npm<=3;

                g3 = (x1 && (x2 || x3 || !x8)) == 0;
                g4 = (x5 && (x6 || x7 || !x4)) == 0;

                // first part
                if(g1 && g2 && g3)
                {
                    // delete this point
                    ucThinnedImage[lWidth*i + j] = 0;
                    ++lDeletedPoints;
                }
            }

        }

        //syn
        memcpy(ucBinedImg, ucThinnedImage, lWidth*lHeight);

        for(long i=1; i<lHeight-1; i++)
        {
            // init neighborhood
            pUp = ucBinedImg + (i-1)*lWidth;
            pImg = ucBinedImg + i*lWidth ;
            pDown = ucBinedImg + (i+1)*lWidth ;

            for( long j=1; j<lWidth-1; j++)
            {
                pUp++;
                pImg++;
                pDown++;

                if(!*pImg)
                    continue;

                x6 = *(pUp-1);
                x5 = *(pImg-1);
                x4 = *(pDown-1);

                x7 = *pUp;
                xp = *pImg;
                x3 = *pDown;

                x8 = *(pUp+1);
                x1 = *(pImg + 1);
                x2 = *(pDown + 1);

                b1 = !x1 && (x2 == 1 || x3 == 1);
                b2 = !x3 && (x4 == 1 || x5 == 1);
                b3 = !x5 && (x6 == 1 || x7 == 1);
                b4 = !x7 && (x8 == 1 || x1 == 1);

                g1 = (b1 + b2 + b3 + b4) == 1;

                np1 = x1|| x2;
                np1 += x3 || x4;
                np1 += x5 || x6;
                np1 += x7 || x8;
                np2 = x2|| x3;
                np2 += x4 || x5;
                np2 += x6 || x7;
                np2 += x8 || x1;

                npm = np1>np2?np2:np1;
                g2 = npm>=2 && npm<=3;

                g3 = (x1 && (x2 || x3 || !x8)) == 0;
                g4 = (x5 && (x6 || x7 || !x4)) == 0;

                // second part
                if(g1 && g2 && g4)
                {
                    // delete this point
                    ucThinnedImage[lWidth*i + j] = 0;
                    ++lDeletedPoints;
                }

            }

        }
        //syn
        memcpy(ucBinedImg, ucThinnedImage, lWidth*lHeight);

        // if no points to be deleted
        if(lDeletedPoints == 0)
            break;

    }

    // clear edge bar
    for(long i=0; i<lHeight; i++)
    {
        for(long j=0; j<lWidth; j++)
        {
            if(i<16)
                ucThinnedImage[i*lWidth+j] = 0;
            else if(i>=lHeight-16)
                ucThinnedImage[i*lWidth+j] = 0;
            else if(j<16)
                ucThinnedImage[i*lWidth+j] = 0;
            else if(j>=lWidth-16)
                ucThinnedImage[i*lWidth+j] = 0;
        }
    }

    return 0;
}

void Thinning(Mat& src,Mat& dst,long IterativeLimit=-1)
{
    Mat bin_img=src&1;
    if(!dst.empty()){dst.release();}
    dst=Mat::zeros(src.size(),CV_8UC1);
    Thinning(bin_img.data,dst.data,bin_img.cols,bin_img.rows,IterativeLimit);
    dst*=255;
}

int main(int argc, char* argv[])
{
    namedWindow("source");
    namedWindow("result");

    Mat img=imread("raw_image.jpg",0);
    cv::threshold(img,img,128,255,cv::THRESH_BINARY);

    int erosion_size=5;
    Mat element = getStructuringElement( cv::MORPH_ELLIPSE,Size( 2*erosion_size + 1, 2*erosion_size+1 ),Point( erosion_size, erosion_size ) );

    cv::dilate(img,img,element);

    Mat thinned;
    Thinning(img,thinned);

    vector<Vec2f> lines;
    HoughLines(thinned, lines, 0.5, CV_PI/360, 50, 0, 0 );

    float hist_theta[2]={0,0};
    float hist_rho[2]={0,0};
    float n[2]={0,0};
    for( size_t i = 0; i < lines.size(); i++ )
    {
        float rho = lines[i][0], theta = lines[i][1];
        if(fabs(theta-CV_PI/2)<CV_PI/4)
        {
            hist_theta[0]+=theta;
            hist_rho[0]+=rho;
            n[0]+=1;
        }else
        {
            hist_theta[1]+=theta;
            hist_rho[1]+=rho;
            n[1]+=1;
        }
    }


    for( size_t i = 0; i < 2; i++ )
    {
        float rho = hist_rho[i]/n[i], theta = hist_theta[i]/n[i];
        Point pt1, pt2;
        double a = cos(theta), b = sin(theta);
        double x0 = a*rho, y0 = b*rho;
        pt1.x = cvRound(x0 + 1000*(-b));
        pt1.y = cvRound(y0 + 1000*(a));
        pt2.x = cvRound(x0 - 1000*(-b));
        pt2.y = cvRound(y0 - 1000*(a));
        line( thinned, pt1, pt2, Scalar(255,255,255), 1, CV_AA);
    }

    imshow("source",img);
    imshow("result",thinned);
    cv::waitKey(0);
}
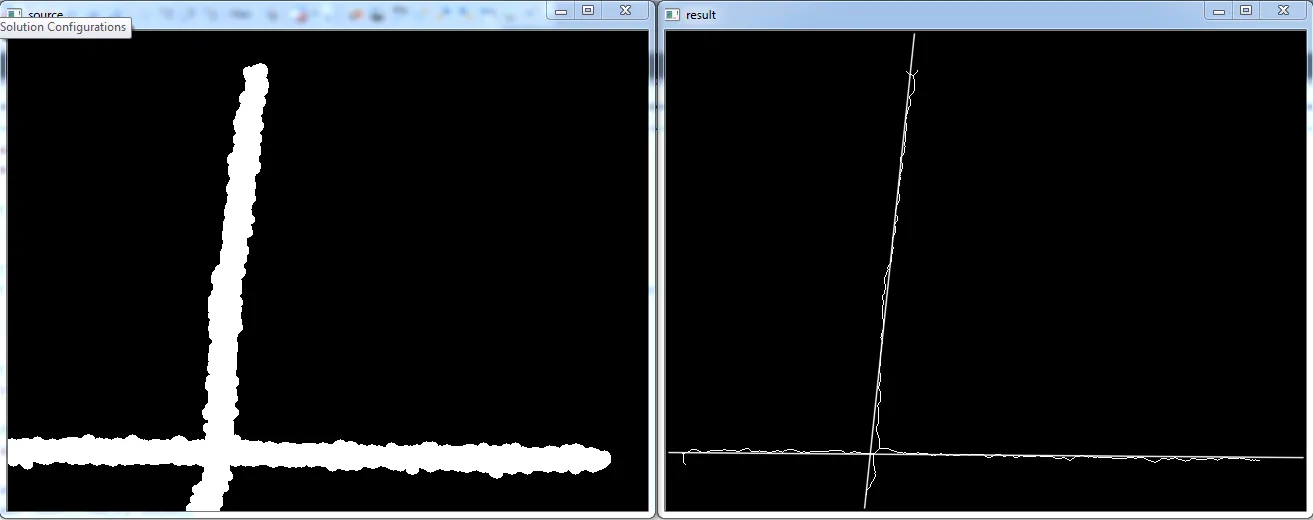
在这个源代码中,有一个技巧是使用两个一维直方图进行后处理。在实际应用中,应该使用二维直方图来进行线条的平均化处理。