在ConstraintLayout上实现负边距以实现重叠是否可能? 我想让一张图片居中在布局上,并且有一个文本视图,使其重叠x dp。我尝试了设置负边距值,但没有成功。如果有一种方法可以实现这一点,那就太好了。
如何在 Constraint Layout 上实现重叠/负边距?
159
- bond
1
1可能会有所帮助,我还没有尝试过。 - Eugen Pechanec
13个回答
294
更新 ConstraintLayout现在支持负边距,版本为2.1.0-alpha2。只需声明即可。
android:layout_marginTop="-25dp"
对于一个负的25dp的边距。(只有当视图的顶部被限制时才会生效。如果边距的一侧未被限制,则在ConstraintLayout中边距无效。)
< p > 澄清: 下面的答案仍然有效,但我想澄清一些事情。原始解决方案将在布局中以所述方式将视图放置在相对于另一个视图的事实上负偏移量,并显示为所示。
另一种解决方案是使用Amir Khorsandi here建议的translationY属性。我更喜欢这个解决方案,因为它更简单,但有一个注意点:翻译发生在后布局,因此约束到被替换视图的视图将不会跟随翻译。
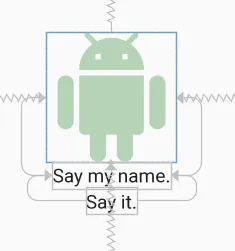
例如,以下XML显示两个TextViews直接位于图像下方。每个视图都与立即出现在其上方的视图从上到下限制。
<androidx.constraintlayout.widget.ConstraintLayout
    android:layout_width="match_parent"
    android:layout_height="match_parent">

    <ImageView
        android:id="@+id/imageView"
        android:layout_width="150dp"
        android:layout_height="150dp"
        android:tint="#388E3C"
        app:layout_constraintBottom_toBottomOf="parent"
        app:layout_constraintEnd_toEndOf="parent"
        app:layout_constraintStart_toStartOf="parent"
        app:layout_constraintTop_toTopOf="parent"
        app:srcCompat="@drawable/ic_action_droid" />

    <TextView
        android:id="@+id/sayName"
        android:layout_width="wrap_content"
        android:layout_height="wrap_content"
        android:text="Say my name."
        android:textAppearance="@style/TextAppearance.AppCompat.Large"
        app:layout_constraintTop_toBottomOf="@+id/imageView"
        app:layout_constraintEnd_toEndOf="@+id/imageView"
        app:layout_constraintStart_toStartOf="@+id/imageView" />

    <TextView
        android:id="@+id/sayIt"
        android:layout_width="wrap_content"
        android:layout_height="wrap_content"
        android:text="Say it."
        android:textAppearance="@style/TextAppearance.AppCompat.Large"
        app:layout_constraintEnd_toEndOf="@+id/sayName"
        app:layout_constraintStart_toStartOf="@+id/sayName"
        app:layout_constraintTop_toBottomOf="@id/sayName" />
</androidx.constraintlayout.widget.ConstraintLayout>
现在,我们需要将“Say my name” TextView 上移50dp,通过指定:
android:translationY="-50dp"
这将产生以下结果:
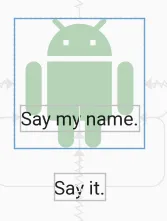
因此,在ConstraintLayout中,如果上述注意事项不影响您的布局,请使用translationX和translationY来设置负边距;否则,请按下面所述使用space小部件。
另一个注意事项:如Salma El-Banna在另一个答案的评论中所述,对于RTL布局,translationX不是一个好的解决方案,因为翻译的符号将决定移位的方向(左/右),而不管布局的RTL或LTR性质。"
原始答案
虽然似乎ConstraintLayout不支持负边距,但可以使用可用且受支持的工具来实现该效果。这是一张图像,在此图像标题从图像底部重叠22dp - 实际上是一个-22dp的边距:
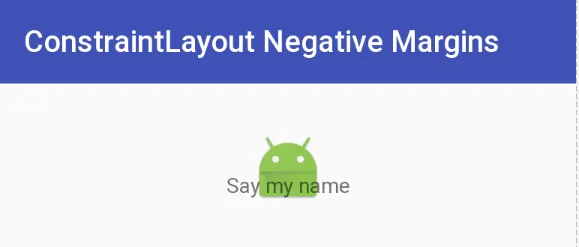
空间 小部件来完成的。然后,将 空间 小部件的底部约束到 ImageView 的底部。现在,您只需要将带有图像标题的 TextView 的顶部与 Space 小部件的底部约束即可。 TextView 将位于 Space 视图的底部,忽略了设置的边距。
以下是实现此效果的XML。我注意使用 Space ,因为它重量轻,适用于此类用途,但是我也可以使用另一种类型的 View 并将其设置为不可见(尽管您可能需要进行调整)。您还可以定义一个具有零边距和所需插入边距的高度的 View ,并将 TextView 的顶部限制为插入 View 的顶部。
另一种方法是通过将 TextView 与 ImageView 叠加在一起,通过对齐顶部/底部/左侧/右侧并适当调整边距/填充来实现。下面展示的方法的好处是可以创建负边距而不需要进行大量计算。也就是说,有几种方法可以处理这个问题。
更新:有关此技术的快速讨论和演示,请参见 Google Developers Medium 博客文章。
ConstraintLayout XML 的负边距
<android.support.constraint.ConstraintLayout
android:layout_width="match_parent"
android:layout_height="match_parent">
<ImageView
android:id="@+id/imageView"
android:layout_width="wrap_content"
android:layout_height="wrap_content"
android:layout_marginTop="32dp"
app:layout_constraintLeft_toLeftOf="parent"
app:layout_constraintRight_toRightOf="parent"
app:layout_constraintTop_toTopOf="parent"
app:srcCompat="@mipmap/ic_launcher" />
<android.support.v4.widget.Space
android:id="@+id/marginSpacer"
android:layout_width="0dp"
android:layout_height="0dp"
android:layout_marginBottom="22dp"
app:layout_constraintBottom_toBottomOf="@+id/imageView"
app:layout_constraintLeft_toLeftOf="@id/imageView"
app:layout_constraintRight_toRightOf="@id/imageView" />
<TextView
android:id="@+id/editText"
android:layout_width="wrap_content"
android:layout_height="wrap_content"
android:text="Say my name"
app:layout_constraintLeft_toLeftOf="parent"
app:layout_constraintRight_toRightOf="parent"
app:layout_constraintTop_toBottomOf="@+id/marginSpacer" />
</android.support.constraint.ConstraintLayout>
- Cheticamp
9
@kuzdu 这里的关键是将空间的底部约束在imageView的底部,边距将空间上移,然后将textView的顶部约束到空间的底部,从而创建我们试图实现的“半重叠”效果。如果您已成功实现此效果,请在此处发布答案,以便我们可以查看您在两个视图上使用的约束条件。 - Lucas P.
2更新不起作用
android:layout_marginTop="-25dp"。它没有任何效果。 - VanessaF@VanessaF 你是否正在使用ConstraintLayout版本2.1.0-alpha2或更高的版本? - Cheticamp
谢谢,这对我很有效。
如果顶部视图重叠,只需设置
android:layout_width="0dp" android:layout_height="0dp"。在我花费半天时间解决这个问题后,它对我很有效。 - AndyBoy我现在使用的是
"androidx.constraintlayout:constraintlayout:2.1.3",但建议的解决方案仍然没有任何效果。 - VanessaF显示剩余4条评论
87
另一种方法是使用translationX或translationY,像这样:
  <ImageView
                android:layout_width="wrap_content"
                android:layout_height="wrap_content"
                android:translationX="25dp"
                app:layout_constraintRight_toRightOf="parent"
                app:layout_constraintBottom_toBottomOf="parent"/>
它将像android:layout_marginRight="-25dp"一样工作
- Amir Khorsandi
3
50请注意,由于视图的实际位置保持原始位置(在翻译之前),因此它仅在视觉上进行了翻译。因此,onClick事件将只从旧位置内触发。 - goemic
@goemic的说法似乎是错误的,因为这不是一个缓动动画而是一个属性动画。(如果我错了请纠正我) - Henry
3不支持RTL布局是一种不良做法。 - Salam El-Banna
28
在RelativeLayout中,从未正式支持过负边距。在ConstraintLayout中也将不支持负边距。请参考以下问题:https://code.google.com/p/android/issues/detail?id=212499https://code.google.com/p/android/issues/detail?id=234866。-- Romain Guy, 2016年6月8日。
- Eugen Pechanec
2
1他们的想法可能是使用ConstraintLayout时不需要负边距。如果您在一个布局中拥有所有元素,则可能是正确的。但有时您希望逻辑上将元素分组,例如由按钮制成的命令条,这对于可重用性、清晰度和封装性都具有自己的优势。此时,该组将具有矩形形状,并且正是这种形状的限制使得负边距再次变得有用和必要。 - AndrewBloom
负边距模拟文本基线的概念,其中文本是矩形容器内的复杂形状。 - AndrewBloom
25
经过数小时的尝试寻找解决方案,我终于想出了以下方法。
我们考虑两个图像,image1和image2。将image2放置在image1的右下角。
重叠视图示例
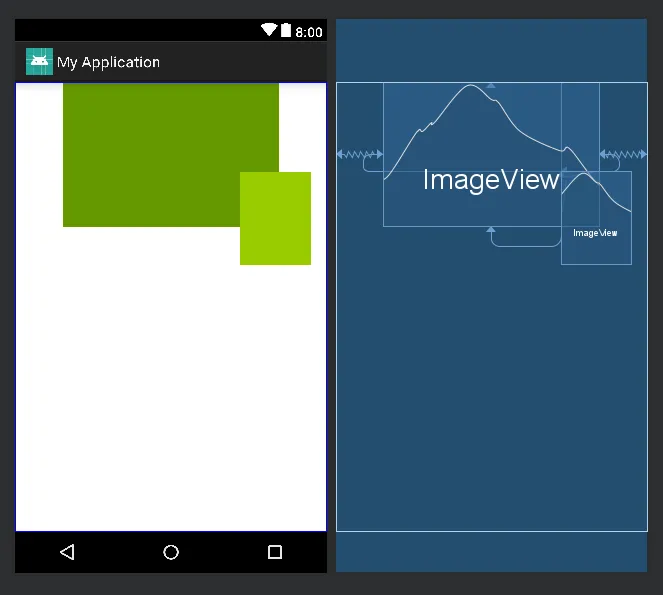
我们可以使用Space小部件来重叠视图。
将Space小部件的四个边分别与image1的四个边约束。对于这个例子,将image2的左侧与Space小部件的右侧约束,将image2的顶部与Space小部件的底部约束。这将把image2与Space小部件绑定在一起,由于Space小部件从所有边都被约束,我们可以定义所需的水平或垂直偏差来移动image2。
<?xml version="1.0" encoding="utf-8"?>
<android.support.constraint.ConstraintLayout
xmlns:android="http://schemas.android.com/apk/res/android"
xmlns:app="http://schemas.android.com/apk/res-auto"
xmlns:tools="http://schemas.android.com/tools"
android:layout_width="match_parent"
android:layout_height="match_parent"
tools:context=".Player">
 <ImageView
     android:id="@+id/image1"
     android:layout_width="250dp"
     android:layout_height="167dp"
     android:src="@android:color/holo_green_dark"
     app:layout_constraintEnd_toEndOf="parent"
     app:layout_constraintStart_toStartOf="parent"
     app:layout_constraintTop_toTopOf="parent" />
 <Space
     android:id="@+id/space"
     android:layout_width="wrap_content"
     android:layout_height="wrap_content"
     app:layout_constraintBottom_toBottomOf="@+id/image1"
     app:layout_constraintEnd_toEndOf="@+id/image1"
     app:layout_constraintHorizontal_bias="0.82"
     app:layout_constraintStart_toStartOf="@+id/image1"
     app:layout_constraintTop_toTopOf="@+id/image1"
     app:layout_constraintVertical_bias="0.62" />
 <ImageView
     android:id="@+id/image2"
     android:layout_width="82dp"
     android:layout_height="108dp"
     android:src="@android:color/holo_green_light"
     app:layout_constraintStart_toEndOf="@+id/space"
     app:layout_constraintTop_toBottomOf="@+id/space" />
 </android.support.constraint.ConstraintLayout>
此外,为了将image2定位在image1的中心底部,我们可以使用Space小部件将image2的左右两侧分别约束到Space小部件的左右侧。同样地,通过更改image2与Space小部件之间的约束,我们可以将image2放置在任何位置。
- Swati Navalkar
12
我找到了一种更简单的方法。基本上,有一个ImageView,然后在TextView上添加顶部约束以匹配图像的顶部约束,并将TextView的上边距添加到匹配以实现负边距类型的行为。
- bond
2
11除非图像高度可以变化。 - Stas Shusha
它仍然可以工作。您只需要小心选择上部小部件覆盖图像的位置,从右侧或底部设置边距可能是更好的选择,或者您可以使用偏差,所有这些都可以回答这个问题。 - Gabriel Vasconcelos
4
这将有助于许多人
在我的情况下,我希望我的设计如此:
意思是我想让我的图片展示一半的宽度,因此基本上我需要一个负的实际图像宽度的一半的边距,但我的整个布局都在约束布局中,而约束布局不允许负边距,所以我通过以下代码来实现这个目标
<androidx.constraintlayout.widget.ConstraintLayout
    android:layout_width="match_parent"
    android:layout_height="match_parent">

    <ImageView
        android:layout_width="100dp"
        android:layout_height="100dp"
        android:scaleType="centerCrop"
        android:src="@drawable/ic_launcher_background"
        app:layout_constraintBottom_toBottomOf="parent"
        app:layout_constraintEnd_toStartOf="@id/guideline"
        app:layout_constraintTop_toTopOf="parent" />

    <androidx.constraintlayout.widget.Guideline
        android:id="@+id/guideline"
        android:layout_width="wrap_content"
        android:layout_height="wrap_content"
        android:orientation="vertical"
        app:layout_constraintGuide_begin="50dp" />
</androidx.constraintlayout.widget.ConstraintLayout>
所以ImageView将以指南线的起点结束。效果与在50dp处负边距相同。
如果您的视图宽度不固定且以百分比表示,则可以使用百分比放置指南线并实现任何想要的效果
编码愉快 :)
- Vijay Makwana
1
将背景视图放置在主题视图后面
我想使用负边距在主题视图后面添加一个比主题视图比例更大的视图。我找到的解决方案是,在将其约束到主题的所有侧面时,缩放背景视图android:scaleX="1.2"和android:scaleY="1.2"。
<View
   android:id="@+id/subjectBackground"
   android:layout_width="0dp"
   android:layout_height="0dp"
   android:scaleY="1.2"
   android:scaleX="1.2"
   app:layout_constraintBottom_toBottomOf="@+id/subjectView"
   app:layout_constraintEnd_toEndOf="@+id/subjectView"
   app:layout_constraintStart_toStartOf="@+id/subjectView"
   app:layout_constraintTop_toTopOf="@+id/subjectView" />
- Neal Soni
1
你只需要在布局中使用 Space 小部件
<android.support.constraint.ConstraintLayout xmlns:android="http://schemas.android.com/apk/res/android"
xmlns:app="http://schemas.android.com/apk/res-auto"
android:layout_width="match_parent"
android:layout_height="match_parent">

<Space
    android:id="@+id/negative_margin"
    android:layout_width="16dp"
    android:layout_height="16dp"
    app:layout_constraintTop_toTopOf="parent"
    app:layout_constraintRight_toLeftOf="parent"/>

<Button
    android:id="@+id/button"
    android:layout_width="wrap_content"
    android:layout_height="wrap_content"
    android:text="Widget who needs negative margin"
    app:layout_constraintTop_toBottomOf="@+id/negative_margin"
    app:layout_constraintLeft_toLeftOf="@+id/negative_margin" />
- Hagar Magdy
0
使用 translationX 和 translationY 可能适用于您的情况。
<TextView
    android:id="@+id/tvText"
    android:layout_width="wrap_content"
    android:layout_height="wrap_content"
    android:text="text"
    android:translationX="-15dp"
    android:translationY="10dp"
    app:layout_constraintEnd_toEndOf="@+id/imageView"
    app:layout_constraintTop_toTopOf="@+id/imageView" />
- burak isik
0
这是我的解决方案
<com.oven.test.avatar
 android:id="@+id/imageview_a"
 android:layout_width="128dp"
 android:layout_height="128dp"
 android:layout_marginTop="28dp"
 app:layout_constraintStart_toStartOf="parent"
 app:layout_constraintEnd_toEndOf="parent"
 app:layout_constraintTop_toTopOf="parent"/>

<com.oven.test.smallicon
    android:id="@+id/small_icon_overlap_a"
    android:layout_width="wrap_content"
    android:layout_height="wrap_content"
    android:layout_marginTop="30dp"
    app:layout_constraintStart_toStartOf="parent"
    app:layout_constraintEnd_toEndOf="parent"
    app:layout_constraintBottom_toBottomOf="@+id/imageview_a"
    app:layout_constraintTop_toTopOf="@+id/imageview_a"
    app:layout_constraintVertical_bias="1"
    android:layout_marginBottom="20dp"/>
- Yawen Ou
网页内容由stack overflow 提供, 点击上面的可以查看英文原文,
原文链接
原文链接
- 相关问题
- 3 包含的工具栏有奇怪的边距(Android Constraint布局)
- 23 React Native Android负边距
- 14 Android - 一个 Constraint Layout 嵌套在另一个 Constraint Layout 中,背景不显示
- 4 如何在 Constraint Layout 中动态设置 ImageView 的位置
- 4 布局边距中的负像素值
- 12 安卓负边距无法生效
- 7 如何在Constraint Layout中链接组?
- 3 如何在RecyclerView中设置负边距装饰?为什么这不可能?
- 25 安卓的ConstraintLayout不允许使用负边距。
- 18 如何在Constraint Layout Compose中使用偏差(bias)