使AppBar透明并显示设置为整个屏幕的背景图像

110

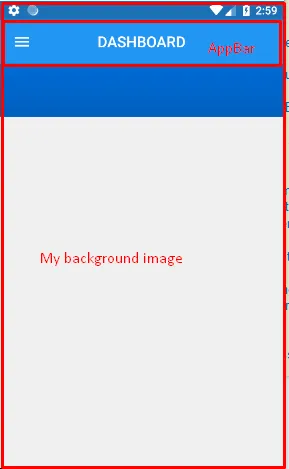
我在我的flutter应用中添加了AppBar。我的屏幕已经有一个背景图像,我不想设置AppBar颜色或将单独的背景图像设置为AppBar。

我希望显示与屏幕相同的背景图像到AppBar。

我已经尝试将AppBar颜色设置为透明,但它会显示灰色的颜色。

示例代码:

appBar: new AppBar(
        centerTitle: true,
//        backgroundColor: Color(0xFF0077ED),
        elevation: 0.0,
        title: new Text(
            "DASHBOARD",
            style: const TextStyle(
                color:  const Color(0xffffffff),
                fontWeight: FontWeight.w500,
                fontFamily: "Roboto",
                fontStyle:  FontStyle.normal,
                fontSize: 19.0
            )),
      )

在这里输入图片描述


37
因为海拔高度的原因,导致颜色变灰。您可以设置AppBar(backgroundColor:Colors.transparent,elevation:0.0,),这样应用栏就会透明。 - Andrii Turkovskyi
6
谢谢,但是它没有显示我设置为整个屏幕的背景图片,而是显示白色图层。 - Rahul Mahadik
1
不知道你是否还卡住了,但我在 https://github.com/flutter/flutter/issues/17088 找到了一个解决方法。RyanAfrish7的评论 从Scaffold的appBar插槽中删除appBar。将appBar添加到Scaffold主体中的Stack中。向Stack添加另一个Container以填充屏幕。将所有组件添加到该容器中。就这样。现在您可以为appBar添加背景模糊效果,它就像魔法一样工作。对我有用。 - GuyZ
Scaffold 现在支持 AppBar 后延伸的 Body。请查看我的答案,了解如何实现透明的 AppBar 并使其下方的 Body 延伸。 - gswierczynski
13个回答

286

现在Scaffold支持此功能(在稳定版-v1.12.13+hotfix.5中)。

  • 将Scaffold的extendBodyBehindAppBar设置为true,
  • 将AppBar的elevation设置为0以去除阴影,
  • 根据需要设置AppBar的backgroundColor透明度。
  @override
  Widget build(BuildContext context) {
    return Scaffold(
      extendBodyBehindAppBar: true,
      backgroundColor: Colors.red,
      appBar: AppBar(
//        backgroundColor: Colors.transparent,
        backgroundColor: Color(0x44000000),
        elevation: 0,
        title: Text("Title"),
      ),
      body: Center(child: Text("Content")),
    );
  }

27
如果你想知道为什么在ListView组件中使用这个方法不起作用,那是因为ListView默认有一定的内边距。你可以通过设置padding属性来调整它,例如:ListView(padding: EdgeInsets.only(top: 0), - Sven
12
如果应用了 SafeArea,它可能无法正常工作,请移除 SafeArea - Viraj Doshi
现在AppBar的项目在屏幕上漂浮不定了...(在ListView中) - Asbah Riyas
3
如果您不想改变高度,也可以将 shadowColor: Colors.transparent 设置为完全透明。 - Francesc Arolas
使用SliverAppBar能否实现这种行为? - imperial-lord

82

你可以使用 Stack widget 来实现。请按照下面的示例。

import 'package:flutter/material.dart';

void main() => runApp(new MyApp());

class MyApp extends StatelessWidget {
  @override
  Widget build(BuildContext context) {
    return new MaterialApp(
      home: new Home(),
    );
  }
}

class Home extends StatefulWidget {
  @override
  _HomeState createState() => _HomeState();
}

class _HomeState extends State<Home> {
  @override
  Widget build(BuildContext context) {
    return Scaffold(
      body: Stack(
        children: <Widget>[
          Scaffold(
            backgroundColor: Colors.transparent,
            appBar: new AppBar(
              title: new Text(
                "Hello World",
                style: TextStyle(color: Colors.amber),
              ),
              backgroundColor: Colors.transparent,
              elevation: 0.0,
            ),
            body: new Container(
              color: Colors.red,
            ),
          ),
        ],
      ),
    );
  }
}

@Aegletes 谢谢你让我知道,现在它完美地工作了。 - Viren V Varasadiya
仍然没有按预期工作,老实说我不确定发生了什么变化? - Aegletes
抱歉,显然是我背景的问题,谢谢你提供的解决方案。 - Aegletes
46
将 Scaffold 的 extendBodyBehindAppBar 属性设置为 true - Skyost
5
这里使用了嵌套的脚手架,这并不是一个好的实践方法,现在应该认为@gswierczynski的答案是正确的。 - Julio Henrique Bitencourt
将海拔高度设为0非常有用。 - Junbin Deng

82

你可以使用 Scaffold 的属性 "extendBodyBehindAppBar: true" 别忘了将 child 包裹在 SafeArea 中。

  @Override
  Widget build(BuildContext context) {
    return Scaffold(
      appBar: AppBar(
        title: Text(
          widget.title,
          style: TextStyle(color: Colors.black),
        ),
        backgroundColor: Colors.transparent,
        elevation: 0.0,
      ),
      extendBodyBehindAppBar: true,
      body: Container(
        width: double.infinity,
        height: double.infinity,
        decoration: BoxDecoration(
          image: DecorationImage(
            image: AssetImage('assets/background/home.png'),
            fit: BoxFit.cover,
          ),
        ),
        child: SafeArea(
            child: Center(
          child: Container(
            width: 300,
            height: 300,
            decoration: BoxDecoration(
              color: Colors.green,
            ),
            child: Center(child: Text('Test')),
          ),
        )),
      ),
    );
  }

输入图片描述


21

这些方法都对我没用,我的情况大概是这样的:

return Scaffold(
  extendBodyBehindAppBar: true,
  appBar: AppBar(
    backgroundColor: Colors.transparent,
    iconTheme: IconThemeData(color: Colors.white),
    elevation: 0.0,
  ),
  body: Stack(
    children: <Widget>[
      Container(
        decoration: BoxDecoration(
          image: DecorationImage(
            image: NetworkImage(
                'https://images.unsplash.com/photo-1517030330234-94c4fb948ebc?ixlib=rb-1.2.1&ixid=eyJhcHBfaWQiOjEyMDd9&auto=format&fit=crop&w=1275&q=80'),
            fit: BoxFit.cover,
          ),
        ),
        child: Padding(
          padding: const EdgeInsets.fromLTRB(0, 100, 0, 0),
          child:
          // Column of widgets here...
        ),
       ),
     ],
   ),
 );

1
我认为没有必要使用“brightness: Brightness.dark,” - Nagaraj Alagusundaram

13

输出:

enter image description here

很多答案,但没有人解释为什么extendBodyBehindAppBar会起作用? 它之所以有效,是因为当我们将extendBodyBehindAppBar分配为true时,该小部件的正文占据了AppBar的高度,我们看到一张图像覆盖了AppBar区域。

简单例子:

Size size = MediaQuery.of(context).size;
    return Scaffold(
      extendBodyBehindAppBar: true,
      body: Container(
        // height: size.height * 0.3,
        child: Image.asset(
          'shopping_assets/images/Fruits/pineapple.png',
          fit: BoxFit.cover,
          height: size.height * 0.4,
          width: size.width,
        ),
      ),
    );

12

可能会有很多情况,例如,您是否要保留AppBar,是否要使状态栏可见,为此,您可以在SafeArea中包装Scaffold.body,如果您不想让AppBar拥有任何阴影(与我在示例2中提供的红色不同),则可以将其颜色设置为Colors.transparent

  • Full image (without AppBar)

    enter image description here

    Scaffold(
      extendBodyBehindAppBar: true,
      body: SizedBox.expand(
        child: Image.network(
          'https://wallpaperaccess.com/full/3770388.jpg',
          fit: BoxFit.cover,
        ),
      ),
    )
    
  • Full image (with AppBar)

    enter image description here

    Scaffold(
      extendBodyBehindAppBar: true,
      appBar: AppBar(
        backgroundColor: Colors.transparent,
        shadowColor: Colors.red,
        title: Text('MyApp'),
      ),
      body: SizedBox.expand(
        child: Image.network(
          'https://wallpaperaccess.com/full/3770388.jpg',
          fit: BoxFit.cover,
        ),
      ),
    )
    

1
在第二个示例中,将elevation: 0,添加到AppBar。 - evals

6
Scaffold(extendBodyBehindAppBar: true);

5

这就是我所做的,它已经起作用了。

现在Scaffold支持此功能(在稳定版 - v1.12.13+hotfix.5中)。

将Scaffold extendBodyBehindAppBar设置为true, 将AppBar elevation设置为0以摆脱阴影, 根据需要设置AppBar backgroundColor的透明度。

最好的问候


1
在我的情况下,我按照以下方式进行操作:
另外创建一个带有自定义返回按钮的应用栏(在这种情况下使用FloatingActionButton)。您仍然可以在Stack中添加小部件。
class Home extends StatefulWidget {
  @override
  _EditProfilePageState createState() => _EditProfilePageState();
}

class _HomeState extends State< Home > {

  @override
  Widget build(BuildContext context) {
    return Scaffold(
      body: Stack(
        children: <Widget>[
          this._backgroundImage(), // --> Background Image
          Positioned( // --> App Bar
            child: AppBar(
              backgroundColor: Colors.transparent,
              elevation: 0.0,
              leading: Padding( // --> Custom Back Button
                padding: const EdgeInsets.all(8.0),
                child: FloatingActionButton(
                  backgroundColor: Colors.white,
                  mini: true,
                  onPressed: this._onBackPressed,
                  child: Icon(Icons.arrow_back, color: Colors.black),
                ),
              ),
            ),
          ),
          // ------ Other Widgets ------
        ],
      ),
    );
  }

  Widget _backgroundImage() {
    return Container(
      height: 272.0,
      width: MediaQuery.of(context).size.width,
      child: FadeInImage(
        fit: BoxFit.cover,
        image: NetworkImage(
            'https://images.unsplash.com/photo-1527555197883-98e27ca0c1ea?ixlib=rb-1.2.1&ixid=eyJhcHBfaWQiOjEyMDd9&w=1000&q=80'),
        placeholder: AssetImage('assetName'),
      ),
    );
  }

  void _onBackPressed() {
    Navigator.of(context).pop();
  }
}

在以下链接中,您可以找到更多有关 链接 的信息。


0

不要忘记将foregroundColor属性设置为所需的颜色,以使导航图标和标题可见。

请注意,foregroundColor的默认值为白色。


网页内容由stack overflow 提供, 点击上面的
可以查看英文原文,
原文链接