我基于您上面声明的样式,但没有包含在代码中。您可以在纯xaml和视图模型中实现此操作。这将是一个非常简单和粗糙的示例。或者,您可以实现一个自定义控件,该控件继承了某个类,该类在层次结构中的某个位置具有
Selector类,而不是默认提供的默认cust控件模板中的控件。我建议您查看MVVM模式和Galasoft MVVM Light。在此示例中,我排除了
触摸手势,它们很容易实现,并且使用EventToCommand,您可以直接在vm或custcontrol中使用它们。
<ItemsPanelTemplate x:Key="YourItemsPanelTemplate">
   <VirtualizingStackPanel Orientation="Horizontal"/>
</ItemsPanelTemplate>

<DataTemplate x:Key="YourDataTemplate">
    <TextBlock Style="{StaticResource CountdownElement}" Text="{Binding .}" x:Name="PART_TextBlock"/>
    <DataTemplate.Triggers>
        <DataTrigger
        Binding="{Binding RelativeSource={RelativeSource Mode=FindAncestor, AncestorType= {x:Type ListViewItem}},Path=IsSelected}" Value="True">
            <!-- Here I'm just changing your fontsize, do whatever you want here :) -->
            <Setter Property="FontSize" Value="34" TargetName="PART_TextBlock"/>
        </DataTrigger>
    </DataTemplate.Triggers>
</DataTemplate>

<Style x:Key="YourContainerStyle" TargetType="ListViewItem">
    <Setter Property="HorizontalContentAlignment" Value="Center" />
    <Setter Property="VerticalContentAlignment" Value="Bottom" />
    <Setter Property="Background" Value="Transparent" />
    <Setter Property="BorderThickness" Value="0" />
    <Setter Property="Margin" Value="10,0,10,0" />
    <Setter Property="Padding" Value="0" />
    <Setter Property="Template">
        <Setter.Value>
            <ControlTemplate TargetType="{x:Type ListViewItem}">
                <ContentPresenter x:Name="PART_ContentPresenter"
                                HorizontalAlignment="{TemplateBinding HorizontalContentAlignment}"
                                Margin="{TemplateBinding Padding}"
                                Content="{TemplateBinding Content}"
                                ContentTemplate="{StaticResource YourDataTemplate}" />
            </ControlTemplate>
        </Setter.Value>
    </Setter>
</Style>

<Style x:Key="YourListBoxStyle" TargetType="ListBox">
    <Setter Property="ItemContainerStyle" Value="{StaticResource YourContainerStyle}"/>
    <Setter Property="ItemTemplate" Value="{StaticResource YourDataTemplate}"/>
    <Setter Property="ItemsPanel" Value="{StaticResource YourItemsPanelTemplate}"/>
</Style>
这是您的样式,现在来看XAML代码,注意我在此绑定了您的项目,并使用上述描述的样式。
XAML
<Grid>
    <ListView Background="{StaticResource  GuiSideBarBackgroundColor}"
        Style="{StaticResource YourListBoxStyle}"
        ItemsSource="{Binding CountDownElements}"
        SelectedItem="{Binding SelectedItem, Mode=TwoWay}"/>
<Grid>
视图模型
记得将其设置为视图的数据上下文,或将代码复制到您的代码后台。
public class YourViewModel : INotifyPropertyChanged
{
private ObservableCollection<string> countDownElements = new ObservableCollection<string> { "1s", "2s", "3s", "4s", "5s", "6s", "7s", "8s", "9s", "10s" };
private string selectedItem;
public ObservableCollection<string> CountDownElements
{
get { return countDownElements; }
set
{
if (Equals(value, countDownElements)) return;
countDownElements = value;
OnPropertyChanged();
}
}
public string SelectedItem
{
get { return selectedItem; }
set
{
if (value == selectedItem) return;
selectedItem = value;
OnPropertyChanged();
}
}
public event PropertyChangedEventHandler PropertyChanged;
[NotifyPropertyChangedInvocator]
protected virtual void OnPropertyChanged([CallerMemberName] string propertyName = null)
{
PropertyChangedEventHandler handler = PropertyChanged;
if (handler != null) handler(this, new PropertyChangedEventArgs(propertyName));
}
}
输出
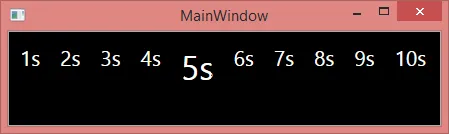
希望这有所帮助,或者至少能让你朝着正确的方向迈进!:)
祝福您
Stian