如何在Flutter中设置Row()的背景颜色?

75

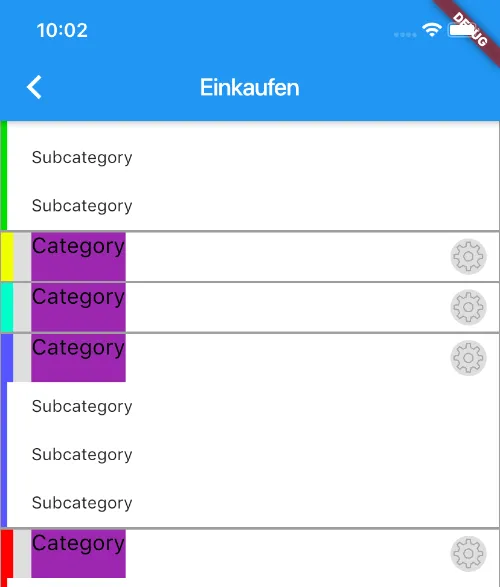
我想为一个 Row() 小部件设置背景颜色,但是Row本身没有背景颜色或颜色属性。在紫色背景的文本右侧,我已成功将容器的背景颜色设置为灰色,但是文本本身并没有完全填充背景,接下来的间隔也没有任何颜色。

那么如何将 Row 的背景设置为 "HexColor(COLOR_LIGHT_GREY)" 值,以覆盖整个行?

有什么建议吗?非常感谢!

输入图像描述

这是迄今为止我所拥有的代码:

import 'package:flutter/material.dart';
import '../manager/ShoppingListManager.dart';
import '../model/ShoppingListModel.dart';
import '../hexColor.dart';
import '../Constants.dart';

class ShoppingListWidget extends StatelessWidget {
  final Color color = Colors.amberAccent;
  final int shoppingListIndex;

  ShoppingListWidget({this.shoppingListIndex});

  @override
  Widget build(BuildContext context) {
    ShoppingListManager slm = new ShoppingListManager();
    String shoppingListName =
        slm.myShoppingLists.shoppingLists[shoppingListIndex].name;
    int categoryCount =
        slm.myShoppingLists.shoppingLists[shoppingListIndex].categories.length;

    return Scaffold(
      appBar: AppBar(
        title: Text(shoppingListName),
        automaticallyImplyLeading: true,
      ),
      body: ListView.builder(
        itemBuilder: (context, index) {
          Category cat = slm.myShoppingLists.shoppingLists[shoppingListIndex]
              .categories[index];

          return Container(
            decoration: new BoxDecoration(
              border: new Border.all(color: Colors.grey[500]),
              color: Colors.white,
            ),
            child: new Column(
              children: <Widget>[
                getCategoryWidget(context, cat),
                getCategoryItems(context, cat),
              ],
            ),
          );
        },
        itemCount: categoryCount,
      ),
    );
  }

  // Render the category "headline" row where I want to set the background color
  // to HexColor(COLOR_LIGHT_GREY)
  Widget getCategoryWidget(BuildContext context, Category cat) {
    return new Row(
      children: <Widget>[
        new Container(height: 40.0, width: 10.0, color: HexColor(cat.color)),
        new Container(
            height: 40.0, width: 15.0, color: HexColor(COLOR_LIGHT_GREY)),
        new Container(
          child: new Text("Category", textAlign: TextAlign.start,
            style: TextStyle(
                fontFamily: 'Bold',
                fontSize: 18.0,
                color: Colors.black),
          ),
          decoration: new BoxDecoration(
            color: Colors.purple,
          ),
          height: 40.0,
        ),
        Spacer(),

        CircleAvatar(
          backgroundImage:
              new AssetImage('assets/icons/food/food_settings.png'),
          backgroundColor: HexColor(COLOR_LIGHT_GREY),
          radius: 15.0,
        ),
        new Container(height: 15.0, width: 10.0, color: Colors.transparent),
      ],
    );
  }

  // render the category items
  Widget getCategoryItems(BuildContext context, Category cat) {
    return ListView.builder(
      itemBuilder: (context, index) {
        String itemName = "Subcategory";
        return new Row(children: <Widget>[
          new Container(height: 40.0, width: 5.0, color: HexColor(cat.color)),
          new Container(height: 40.0, width: 20.0, color: Colors.white),
          new Container(
            child: new Text(itemName),
              color: Colors.white,
          ),
          Spacer()
        ]);
      },
      itemCount: cat.items.length,
      shrinkWrap: true,
      physics:
          ClampingScrollPhysics(),
    );
  }

}

1
将其包装在容器内。请查看此链接 https://mightytechno.com/flutter-row-widget/ - Ishan Fernando
6个回答

141

只需像下面这样,使用带有颜色属性的容器(Container)包装你的行(Row)即可:

   Container(
            color: Colors.black,
            child: Row(
              children: <Widget>[
                Expanded(
                  child: Text('Demo', style: TextStyle(color: Colors.white),),
                )
              ],
            ),
          )

4
使用Container作为背景会遮挡住墨水飞溅的材料。最好使用Ink代替Container - Thomas
1
@Thomas 你知道如何使用 Ink 吗? - wang willway
3
- Jodeveloper8

40

Row组件包裹在ContainerColoredBox中,并为其提供一个color属性。

Container(
  color: Colors.red, // <-- Red color provided to below Row
  child: Row(...), /
)
或者
ColoredBox(
  color: Colors.red, // <-- Red color provided to below Row
  child: Row(...), /
)

使用ColoredBox非常优雅,谢谢。 - Felipe Sales

1

我使用自定义的行和列,有很多可定制的选项:

Widget column({
  final EdgeInsets padding = EdgeInsets.zero,
  final EdgeInsets margin = EdgeInsets.zero,
  final List<Widget> children = const <Widget>[],
  final MainAxisAlignment mainAxisAlignment = MainAxisAlignment.start,
  final MainAxisSize mainAxisSize = MainAxisSize.max,
  final CrossAxisAlignment crossAxisAlignment = CrossAxisAlignment.center,
  final VerticalDirection verticalDirection = VerticalDirection.down,
  final BoxDecoration? decoration,
  final double? width,
  final double? height,
  final bool isScrollable = false,
  final VoidCallback? onTap,
}) =>
    Container(
      width: width,
      height: height,
      decoration: decoration,
      padding: padding,
      margin: margin,
      child: isScrollable
          ? SingleChildScrollView(
              child: Column(
                mainAxisAlignment: mainAxisAlignment,
                mainAxisSize: mainAxisSize,
                crossAxisAlignment: crossAxisAlignment,
                verticalDirection: verticalDirection,
                children: children,
              ),
            )
          : GestureDetector(
              onTap: onTap,
              child: Column(
                mainAxisAlignment: mainAxisAlignment,
                mainAxisSize: mainAxisSize,
                crossAxisAlignment: crossAxisAlignment,
                verticalDirection: verticalDirection,
                children: children,
              ),
            ),
    );

Widget row({
  final EdgeInsets padding = EdgeInsets.zero,
  final EdgeInsets margin = EdgeInsets.zero,
  final List<Widget> children = const <Widget>[],
  final MainAxisAlignment mainAxisAlignment = MainAxisAlignment.start,
  final MainAxisSize mainAxisSize = MainAxisSize.max,
  final CrossAxisAlignment crossAxisAlignment = CrossAxisAlignment.center,
  final VerticalDirection verticalDirection = VerticalDirection.down,
  final BoxDecoration? decoration,
  final double? width,
  final double? height,
  final bool isScrollable = false,
  final VoidCallback? onTap,
}) =>
    Container(
      width: width,
      height: height,
      decoration: decoration,
      padding: padding,
      margin: margin,
      child: isScrollable
          ? SingleChildScrollView(
              child: Row(
                mainAxisAlignment: mainAxisAlignment,
                mainAxisSize: mainAxisSize,
                crossAxisAlignment: crossAxisAlignment,
                verticalDirection: verticalDirection,
                children: children,
              ),
            )
          : GestureDetector(
              onTap: onTap,
              child: Row(
                mainAxisAlignment: mainAxisAlignment,
                mainAxisSize: mainAxisSize,
                crossAxisAlignment: crossAxisAlignment,
                verticalDirection: verticalDirection,
                children: children,
              ),
            ),
    );

1
你可以尝试这个,它会起作用。
return DataRow.byIndex(
          index: row.key,
          color: MaterialStateColor.resolveWith(
            (states) {
              if (row.key % 2 == 0) {
                return Colors.blue[50];
              } else {
                return Colors.white;
              }
            },
          ),

0

您可以简单地使用ListTile并设置瓷砖颜色,例如:

return const ListTile(
    title: Text('This is a text'),
    tileColor: Colors.lightBlue,
);

这将改变ListView中整行的颜色


-1

或者您也可以向TableRow添加BoxDecoration。

然后将背景颜色作为TableRow上BoxDecoration的颜色属性添加。

Table(
    border: TableBorder.all(),
    children: pairs
        .asMap()
        .map((index, pair) => MapEntry(
            index,
            TableRow(
                decoration: BoxDecoration(
                  color: Theme.of(context)
                      .accentColor // Background color for the row
                      .withOpacity(index % 2 == 0 ? 1.0 : 0.5), // To alternate between dark and light shades of the row's background color.
                ),
                children: [
                  Padding(
                    padding: const EdgeInsets.all(kDefaultMargin / 2),
                    child: Text(
                      pair.first,
                    ),
                  ),
                  Padding(
                    padding: const EdgeInsets.all(kDefaultMargin / 2),
                    child: Text(pair.second),
                  )
                ])))
        .values
        .toList()
);

网页内容由stack overflow 提供, 点击上面的
可以查看英文原文,
原文链接