如何从JPEG图像中裁剪多个矩形或正方形?

5

我有一张jpeg图片,想要裁剪包含图表的部分(底部那个)。

目前我使用以下代码来实现这个目标:

from PIL import Image

img = Image.open(r'D:\aakash\graph2.jpg')
area = (20, 320, 1040, 590)
img2 = img.crop(area)
# img.show()
img2.show()

但是我通过多次猜测x1、y1、x2、y2的值来达到这个结果(猜测工作)。

裁剪前的图像:enter image description here

裁剪后的图像:enter image description here

我完全不懂基于一些逻辑进行图像裁剪。如何成功地裁剪所有图形以创建单独的图像,假设位置相同?

更新:我认为,它不是那个问题的可能重复,因为即使从逻辑上讲是相同的,但聚类逻辑的工作方式是不同的。在那个问题中,只有两条垂直白线进行分割,但在这里,有两条水平和两条垂直线,我几乎不知道如何使用KMeans解决这种类型的图像聚类。

需要一个精通 sklearn的KMeans 的专家来帮助解决这种问题。


你仍然可以在img变量中拥有整个图像,你可以裁剪另一部分并将其保存在一个新变量中。 - Gábor Fekete
我知道这一点,但我想要一种有效的方法来检测位置,以便可以自动完成裁剪。目前我所做的完全是手动的(多次猜测)。我非常不擅长理解图像分割或某些分离像素颜色的算法等。因此,希望从SO社区中获得一些解决方案。 - Aakash Basu
尽管从逻辑上讲是相同的,但聚类逻辑的工作方式是不同的。在那个问题中,只有2条垂直白线来分割,但在这里,有两条水平和两条垂直线,我几乎不知道如何使用KMeans来解决这种图像聚类问题。你能帮忙解决这种问题吗? - Aakash Basu
3个回答

4
这是另一种方法来完成它,但使用的是PIL/Pillow和skimage而不是OpenCV:
#!/usr/local/bin/python3

import numpy as np
from PIL import Image, ImageFilter
from skimage.measure import label, regionprops

# Load image and make Numpy version and greyscale PIL version
pim = Image.open('article.jpg')
n   = np.array(pim)
pgr = pim.convert('L')

# Threshold to make black and white
thr = pgr.point(lambda p: p < 230 and 255)
# Following line is just for debug
thr.save('result-1.png')

# Median filter to remove noise
fil = thr.filter(ImageFilter.MedianFilter(11))
# Following line is just for debug
fil.save('result-2.png')

# Make Numpy version for skimage to use
nim = np.array(fil)

# Image is now white blobs on black background, so label() it
label_image=label(nim)

# Iterate through blobs, saving each to disk
i=0
for region in regionprops(label_image):
   if region.area >= 100:
      # Extract rectangle containing blob and save
      name="blob-" + str(i) + ".png"
      minr, minc, maxr, maxc = region.bbox
      Image.fromarray(n[minr:maxr,minc:maxc,:]).save(name)
      i = i + 1

这会产生以下输出图像:

输入图像描述

输入图像描述

输入图像描述

输入图像描述

而中间的调试图像是result-1.png

输入图像描述

以及result-2.png

输入图像描述


嘿,马克,干得漂亮。在三个答案中,你认为哪一个更有效率(从时间和计算能力的角度),并且可以适用于不同的解决方案?就像文档链接中其他页面的图表一样。 - Aakash Basu
1
我不知道 - 这将取决于您的文档、操作系统、个人技巧、磁盘性能以及各种事情。我已经为它们全部提供了代码,所以请尝试几个并查看结果-如有喜欢的请认真点赞!如果您有很多文件需要处理,您可能会喜欢查看我的另外两个答案,它们使用GNUI Parallel快速处理数千张图片:https://dev59.com/MrLma4cB1Zd3GeqPYEIm#56279321 和 https://dev59.com/2LTma4cB1Zd3GeqP4Uw-#56472590。 - Mark Setchell

3
这里有第三种方法可以不需要编写任何Python代码来完成。它只使用终端中的ImageMagick,它已经安装在大多数Linux发行版上,并且也可用于macOS和Windows。
基本上,它使用了与我的其他答案相同的技术-阈值、中值滤波器和"Connected Components Analysis",也就是"labelling"
magick article.jpg -colorspace gray -threshold 95% -median 19x19  \
    -define connected-components:verbose=true                     \
    -define connected-components:area-threshold=100               \
    -connected-components 4 -auto-level output.png

样例输出

Objects (id: bounding-box centroid area mean-color):
  4: 963x241+38+333 519.0,453.0 231939 srgb(0,0,0)
  0: 1045x590+0+0 528.0,204.0 155279 srgb(255,255,255)
  2: 393x246+292+73 488.0,195.5 96534 srgb(0,0,0)
  3: 303x246+698+73 849.0,195.5 74394 srgb(0,0,0)
  1: 238x246+39+73 157.5,195.5 58404 srgb(0,0,0)

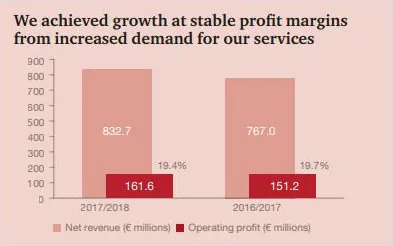
输出结果的开头会告诉你每个字段是什么,然后每行代表一张图片中找到的一个 blob。让我们看看这一行:

2: 393x246+292+73 488.0,195.5 96534 srgb(0,0,0)

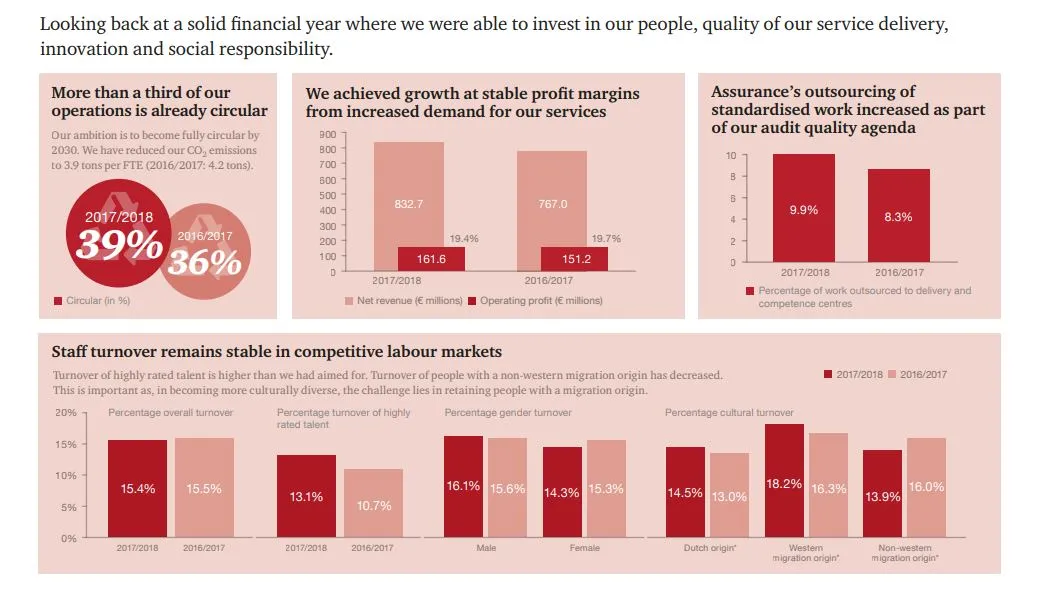
这意味着有一个宽393像素,高246像素的图块,在左上角偏移292,73处,我们可以使用以下半透明蓝色绘制:

magick article.jpg -fill "rgba(0,0,255,0.5)" -draw "rectangle 292,73 685,319" result.png
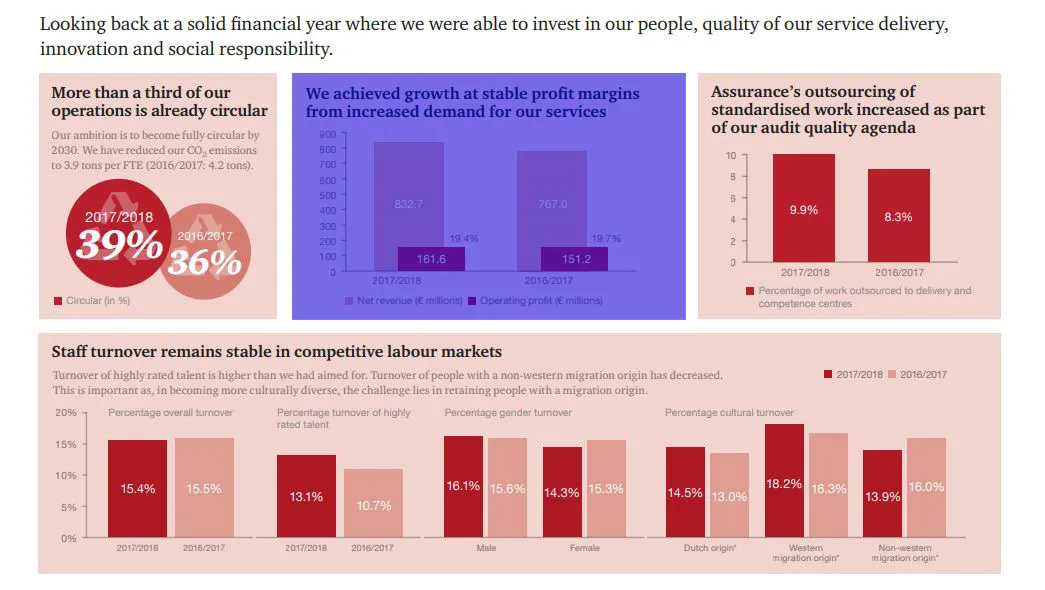
在此输入图片描述

我们可以使用以下方法进行裁剪:

magick article.jpg -crop 393x246+292+73 result.png

下面是翻译的结果:

enter image description here

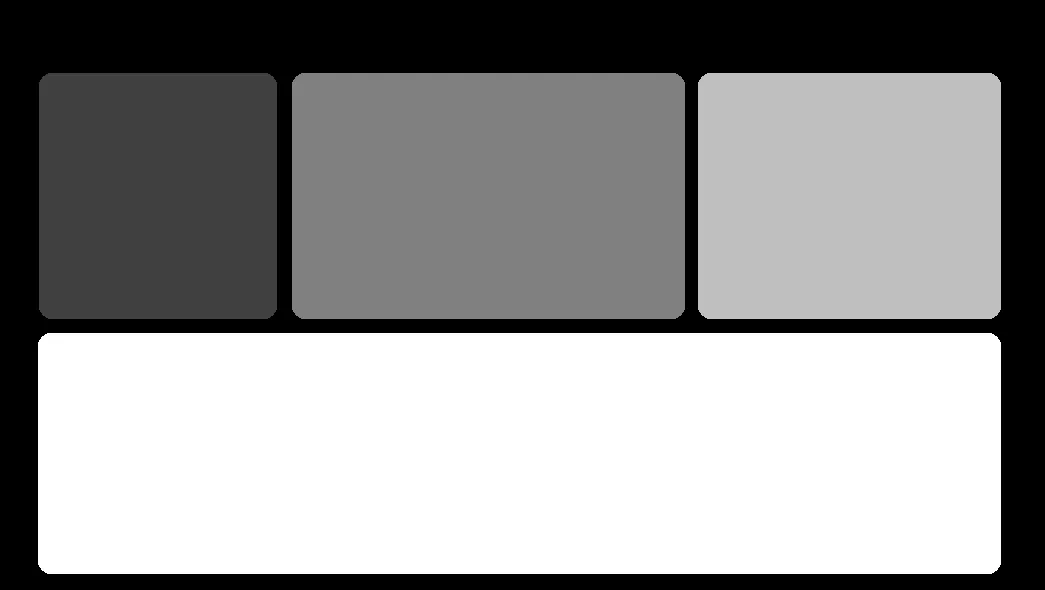
从第一个命令产生的标记图像(output.png)如下所示-您会发现每个blob都以不同的颜色(灰度值)进行标记:

enter image description here


请注意,如果您的ImageMagick版本为v6或更早版本,则需要在所有上述命令中使用convert而不是magick


一个非常幼稚的问题,这个解决方案能否运行通过PDF并捡起所有被某些方框/矩形/圆圈着色的图形或对象?我知道这是一个非常宽泛(无限制)的问题,但如果您能帮助回答这个问题就好了。 - Aakash Basu
@AakashBasu 尝试使用Poppler工具套件中的pdfimages命令行工具,看看效果如何。 - Mark Setchell

2
这是一种使用OpenCV的findContours()方法来实现的方法。
#!/usr/bin/env python3

import numpy as np
import cv2

# Load image
im = cv2.imread('article.jpg',cv2.IMREAD_UNCHANGED)

# Create greyscale version
gr = cv2.cvtColor(im, cv2.COLOR_BGR2GRAY)

# Threshold to get black and white
_,grthresh = cv2.threshold(gr,230,255,cv2.THRESH_BINARY)
cv2.imwrite('result-1.png',grthresh)

# Median filter to remove JPEG noise
grthresh = cv2.medianBlur(grthresh,11)
cv2.imwrite('result-2.png',grthresh)

# Find contours
im2, contours, hierarchy = cv2.findContours(grthresh,cv2.RETR_LIST,cv2.CHAIN_APPROX_SIMPLE)

# Look through contours, checking what we found
blob = 0
for i in range(len(contours)):
    area  = cv2.contourArea(contours[i])
    # Only consider ones taller than around 100 pixels and wider than about 300 pixels
    if area > 30000:
        # Get cropping box and crop
        rc = cv2.minAreaRect(contours[i])
        box = cv2.boxPoints(rc)
        Xs = [ box[0,0], box[1,0], box[2,0], box[3,0]]
        Ys = [ box[0,1], box[1,1], box[2,1], box[3,1]]
        x0 = int(round(min(Xs)))
        x1 = int(round(max(Xs)))
        y0 = int(round(min(Ys)))
        y1 = int(round(max(Ys)))
        cv2.imwrite(f'blob-{blob}.png', im[y0:y1,x0:x1])
        blob += 1

它会给你这些文件:
-rw-r--r--@ 1 mark  staff  248686  6 Jun 09:00 blob-0.png
-rw-r--r--@ 1 mark  staff   92451  6 Jun 09:00 blob-1.png
-rw-r--r--@ 1 mark  staff  101954  6 Jun 09:00 blob-2.png
-rw-r--r--@ 1 mark  staff  102373  6 Jun 09:00 blob-3.png
-rw-r--r--@ 1 mark  staff  633624  6 Jun 09:00 blob-4.png

enter image description here

enter image description here

enter image description here

enter image description here

enter image description here

The intermediate, debug files are result-1.png:

enter image description here

还有 result-2.png

enter image description here


网页内容由stack overflow 提供, 点击上面的
可以查看英文原文,
原文链接