如何在Flutter中使TextField的标签不会在失去焦点时移动

3

我是Flutter新手。

我正在尝试复制以下UI,它有多个TextField,当我单击其他TextField时,它们所有的标签都不会最大化,它们保持焦点以显示其中的内容: https://istack.dev59.com/8lUeV.webp

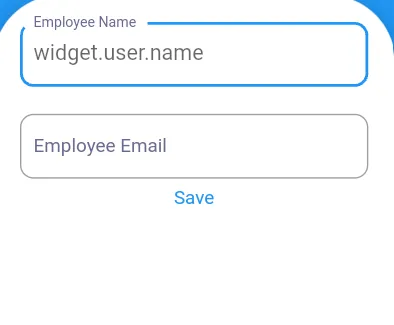
我制作的UI: https://istack.dev59.com/o9Rpj.webp

我尝试使用autofocus:on,但它不起作用,因为它一次只能用于一个TextField。

我的代码:

import 'dart:core';
import 'package:flutter/material.dart';
import 'package:login_sample/models/user.dart';

class EmployeeProfile extends StatefulWidget {
  const EmployeeProfile({Key? key, required this.user}) : super(key: key);

  final User user;

  @override
  _EmployeeProfileState createState() => _EmployeeProfileState();
}

class _EmployeeProfileState extends State<EmployeeProfile> {

  late String name = '';
  late String email = '';

  @override
  Widget build(BuildContext context) {
    return Scaffold(
      body: Stack(
        children: <Widget>[
          Container(
              decoration: const BoxDecoration(
                  gradient: LinearGradient(
                      begin: Alignment.centerLeft,
                      end: Alignment.bottomCenter,
                      colors: [Colors.blue, Colors.blue])),
              height: MediaQuery.of(context).size.height * 0.3
          ),
          Card(
              elevation: 20.0,
              shape: const RoundedRectangleBorder(
                borderRadius: BorderRadius.only(
                  topLeft: Radius.circular(50),
                  topRight: Radius.circular(50),
                ),
              ),
              margin: const EdgeInsets.only(left: 0.0, right: 0.0, top: 100.0),
              child: ListView(
                children: <Widget>[
                  SizedBox(
                    child: TextField(
                      autofocus: true,
                      onChanged: (val){
                        name = val;
                      },
                      decoration: InputDecoration(
                        contentPadding: const EdgeInsets.all(10.0),
                        labelText: 'Employee Name',
                        hintText: widget.user.name,
                        labelStyle: const TextStyle(
                          color: Color.fromARGB(255, 107, 106, 144),
                          fontSize: 14,
                          fontWeight: FontWeight.w500,
                        ),
                        border: OutlineInputBorder(
                          borderSide: const BorderSide(color: Color.fromARGB(255, 107, 106, 144), width: 2),
                          borderRadius: BorderRadius.circular(10),
                        ),
                      ),
                    ),
                    width: 150.0,
                  ),
                  SizedBox(
                    child: TextField(
                      autofocus: true,
                      onChanged: (val){
                        email = val;
                      },
                      decoration: InputDecoration(
                        contentPadding: const EdgeInsets.all(10.0),
                        labelText: 'Employee Email',
                        hintText: widget.user.email,
                        labelStyle: const TextStyle(
                          color: Color.fromARGB(255, 107, 106, 144),
                          fontSize: 14,
                          fontWeight: FontWeight.w500,
                        ),
                        border: OutlineInputBorder(
                          borderSide: const BorderSide(color: Color.fromARGB(255, 107, 106, 144), width: 2),
                          borderRadius: BorderRadius.circular(10),
                        ),
                      ),
                    ),
                    width: 150.0,
                  ),
                  TextButton(
                      onPressed: (){
                        print(widget.user.name);
                        print(widget.user.email);
                        setState(() {
                          widget.user.name = name;
                          widget.user.email = email;
                        });
                      },
                      child: const Text('Save'),
                  ),
                ],
              )
          ),
          Positioned(
            top: 0.0,
            left: 0.0,
            right: 0.0,
            child: AppBar(// Add AppBar here only
              backgroundColor: Colors.transparent,
              elevation: 0.0,
              title: Text(
                widget.user.name.toString(),
                style: const TextStyle(
                  letterSpacing: 0.0,
                  fontSize: 20.0,
                ),
              ),
            ),
          ),
        ],
      ),
    );
  }
}

附言:抱歉我的英语不太好,无法正确描述它。


你想让标签始终可见吗? - Miftakhul Arzak
是的,我希望标签始终在边框上,即使我与其他文本字段交互,它也不会从边框下移。 - Vu Hoan
如果TextField为空,你使其失去焦点,那么标签会被隐藏,而提示文本将会显示。在TextField上看到的是提示文本,而不是移动下来的标签。 - Miftakhul Arzak
2个回答

6

如果你聚焦在TextField上或者TextField有内容,那么标签就会显示出来。如果你想让标签一直可见,你可以在InputDecoration上添加floatingLabelBehavior: FloatingLabelBehavior.always

import 'dart:core';
import 'package:flutter/material.dart';
import 'package:login_sample/models/user.dart';

class EmployeeProfile extends StatefulWidget {
  const EmployeeProfile({Key? key, required this.user}) : super(key: key);

  final User user;

  @override
  _EmployeeProfileState createState() => _EmployeeProfileState();
}

class _EmployeeProfileState extends State<EmployeeProfile> {

  late String name = '';
  late String email = '';

  @override
  Widget build(BuildContext context) {
    return Scaffold(
      body: Stack(
        children: <Widget>[
          Container(
              decoration: const BoxDecoration(
                  gradient: LinearGradient(
                      begin: Alignment.centerLeft,
                      end: Alignment.bottomCenter,
                      colors: [Colors.blue, Colors.blue])),
              height: MediaQuery.of(context).size.height * 0.3
          ),
          Card(
              elevation: 20.0,
              shape: const RoundedRectangleBorder(
                borderRadius: BorderRadius.only(
                  topLeft: Radius.circular(50),
                  topRight: Radius.circular(50),
                ),
              ),
              margin: const EdgeInsets.only(left: 0.0, right: 0.0, top: 100.0),
              child: ListView(
                children: <Widget>[
                  SizedBox(
                    child: TextField(
                      autofocus: true,
                      onChanged: (val){
                        name = val;
                      },
                      decoration: InputDecoration(
                        contentPadding: const EdgeInsets.all(10.0),
                        labelText: 'Employee Name',
                        hintText: widget.user.name,
                        // add here
                        floatingLabelBehavior: FloatingLabelBehavior.always 
                        labelStyle: const TextStyle(
                          color: Color.fromARGB(255, 107, 106, 144),
                          fontSize: 14,
                          fontWeight: FontWeight.w500,
                        ),
                        border: OutlineInputBorder(
                          borderSide: const BorderSide(color: Color.fromARGB(255, 107, 106, 144), width: 2),
                          borderRadius: BorderRadius.circular(10),
                        ),
                      ),
                    ),
                    width: 150.0,
                  ),
                  SizedBox(
                    child: TextField(
                      autofocus: true,
                      onChanged: (val){
                        email = val;
                      },
                      decoration: InputDecoration(
                        contentPadding: const EdgeInsets.all(10.0),
                        labelText: 'Employee Email',
                        hintText: widget.user.email,
                        // add here
                        floatingLabelBehavior: FloatingLabelBehavior.always
                        labelStyle: const TextStyle(
                          color: Color.fromARGB(255, 107, 106, 144),
                          fontSize: 14,
                          fontWeight: FontWeight.w500,
                        ),
                        border: OutlineInputBorder(
                          borderSide: const BorderSide(color: Color.fromARGB(255, 107, 106, 144), width: 2),
                          borderRadius: BorderRadius.circular(10),
                        ),
                      ),
                    ),
                    width: 150.0,
                  ),
                  TextButton(
                      onPressed: (){
                        print(widget.user.name);
                        print(widget.user.email);
                        setState(() {
                          widget.user.name = name;
                          widget.user.email = email;
                        });
                      },
                      child: const Text('Save'),
                  ),
                ],
              )
          ),
          Positioned(
            top: 0.0,
            left: 0.0,
            right: 0.0,
            child: AppBar(// Add AppBar here only
              backgroundColor: Colors.transparent,
              elevation: 0.0,
              title: Text(
                widget.user.name.toString(),
                style: const TextStyle(
                  letterSpacing: 0.0,
                  fontSize: 20.0,
                ),
              ),
            ),
          ),
        ],
      ),
    );
  }
}

0

尝试下面的代码,希望对您有所帮助。将您的ListView()放在Padding内部。

    Padding(
          padding: EdgeInsets.all(20),
          child: ListView(
            children: <Widget>[
              SizedBox(
                child: TextField(
                  autofocus: true,
                  onChanged: (val) {},
                  decoration: InputDecoration(
                    contentPadding: const EdgeInsets.all(10.0),
                    labelText: 'Employee Name',
                    hintText: 'widget.user.name',
                    labelStyle: const TextStyle(
                      color: Color.fromARGB(255, 107, 106, 144),
                      fontSize: 14,
                      fontWeight: FontWeight.w500,
                    ),
                    border: OutlineInputBorder(
                      borderSide: const BorderSide(
                          color: Color.fromARGB(255, 107, 106, 144),
                          width: 2),
                      borderRadius: BorderRadius.circular(10),
                    ),
                  ),
                ),
                width: 150.0,
              ),
              SizedBox(
                height: 20,
              ),
              SizedBox(
                child: TextField(
                  autofocus: true,
                  onChanged: (val) {},
                  decoration: InputDecoration(
                    contentPadding: const EdgeInsets.all(10.0),
                    labelText: 'Employee Email',
                    hintText: 'widget.user.email',
                    labelStyle: const TextStyle(
                      color: Color.fromARGB(255, 107, 106, 144),
                      fontSize: 14,
                      fontWeight: FontWeight.w500,
                    ),
                    border: OutlineInputBorder(
                      borderSide: const BorderSide(
                          color: Color.fromARGB(255, 107, 106, 144),
                          width: 2),
                      borderRadius: BorderRadius.circular(10),
                    ),
                  ),
                ),
                width: 150.0,
              ),
              TextButton(
                onPressed: () {},
                child: const Text('Save'),
              ),
            ],
          ),
        ),

你的屏幕-> 在此输入图像描述


非常感谢,我很感激你的帮助,但是我想让这两个文本框看起来像这样 https://ibb.co/DM4jsNW,当其中一个处于焦点时,内容不会隐藏在labelText后面。如果我弄错了,对不起,如果图片中的那些不是TextField。 - Vu Hoan
@Kronkdark 如果我的答案解决了您的问题,请标记(打勾)它。谢谢。 - Ravindra S. Patil

网页内容由stack overflow 提供, 点击上面的
可以查看英文原文,
原文链接