我创建了一个类,它可以绘制带有 matplotlib 绘图的 tkinter 小部件。该绘图会动态更新(几乎实时)。
- 在 Python 3.10、Matplotlib 3.6.0 和 Tkinter 8.6 中进行了测试。
from matplotlib import pyplot as plt
from matplotlib import animation
from matplotlib.backends.backend_tkagg import FigureCanvasTkAgg, NavigationToolbar2Tk
from tkinter import *
class MatplotlibPlot:
def __init__(
self, master, datas: list[dict], update_interval_ms: int = 200, padding: int = 5,
fig_config: callable = None, axes_config: callable = None
):
"""
Creates a Matplotlib plot in a Tkinter environment. The plot is dynamic, i.e., the plot data is periodically
drawn and the canvas updates.
@param master: The master widget where the pot will be rendered.
@param datas: A list containing dictionaries of data. Each dictionary must have a `x` key, which holds the xx
data, and `y` key, which holds the yy data. The other keys are optional and are used as kwargs of
`Axes.plot()` function. Each list entry, i.e., each dict, is drawn as a separate line.
@param fig_config: A function that is called after the figure creation. This function can be used to configure
the figure. The function signature is `fig_config(fig: pyplot.Figure) -> None`. The example bellow allows
the configuration of the figure title and Dots Per Inch (DPI).
``` python
my_vars = [{"x": [], "y": [], "label": "Label"}, ]
window = Tk()
def my_fig_config(fig: pyplot.Figure) -> None:
fig.suptitle("Superior Title")
fig.set_dpi(200)
MatplotlibPlot(master=window, datas=my_vars, fig_config=my_fig_config)
window.mainloop()
```
@param axes_config: A function that is called after the axes creation. This function can be used to configure
the axes. The function signature is `axes_config(axes: pyplot.Axes) -> None`. The example bellow allows
the configuration of the axes xx and yy label, the axes title and also enables the axes legend.
``` python
my_vars = [{"x": [], "y": [], "label": "Label"}, ]
window = Tk()
def my_axes_config(axes: pyplot.Axes) -> None:
axes.set_xlabel("XX Axis")
axes.set_ylabel("YY Axis")
axes.set_title("Axes Title")
axes.legend()
MatplotlibPlot(master=window, datas=my_vars, axes_config=my_axes_config)
window.mainloop()
```
@param update_interval_ms: The plot update interval in milliseconds (ms). Defaults to 200 ms.
@param padding: The padding, in pixels (px), to be used between widgets. Defaults to 5 px.
"""
fig = plt.Figure()
if fig_config:
fig_config(fig)
canvas = FigureCanvasTkAgg(figure=fig, master=master)
canvas.get_tk_widget().pack(side=TOP, fill=BOTH, expand=True, padx=padding, pady=padding)
NavigationToolbar2Tk(canvas=canvas, window=master, pack_toolbar=True)
axes = fig.add_subplot(1, 1, 1)
for data in datas:
axes.plot(data["x"], data["y"])
_kwargs = data.copy()
_kwargs.pop("x")
_kwargs.pop("y")
axes.lines[-1].set(**_kwargs)
if axes_config:
axes_config(axes)
self.animation = animation.FuncAnimation(
fig=fig,
func=self.update_plot,
fargs=(canvas, axes, datas),
interval=update_interval_ms,
repeat=False,
blit=True
)
def update_plot(self, _, canvas, axes, datas):
update_canvas = False
xx_max, xx_min = axes.get_xlim()
yy_max, yy_min = axes.get_ylim()
for line, data in zip(axes.lines, datas):
line.set_data(data["x"], data["y"])
_kwargs = data.copy()
_kwargs.pop("x")
_kwargs.pop("y")
line.set(**_kwargs)
if len(data["x"]) > 1:
if min(data["x"]) < xx_min:
xx_min = min(data["x"])
update_canvas = True
if max(data["x"]) > xx_max:
xx_max = max(data["x"])
update_canvas = True
if min(data["y"]) < yy_min:
yy_min = min(data["y"])
update_canvas = True
if max(data["y"]) > yy_max:
yy_max = max(data["y"])
update_canvas = True
if update_canvas:
axes.set_xlim(xx_min, xx_max)
axes.set_ylim(yy_min, yy_max)
canvas.draw()
return axes.lines
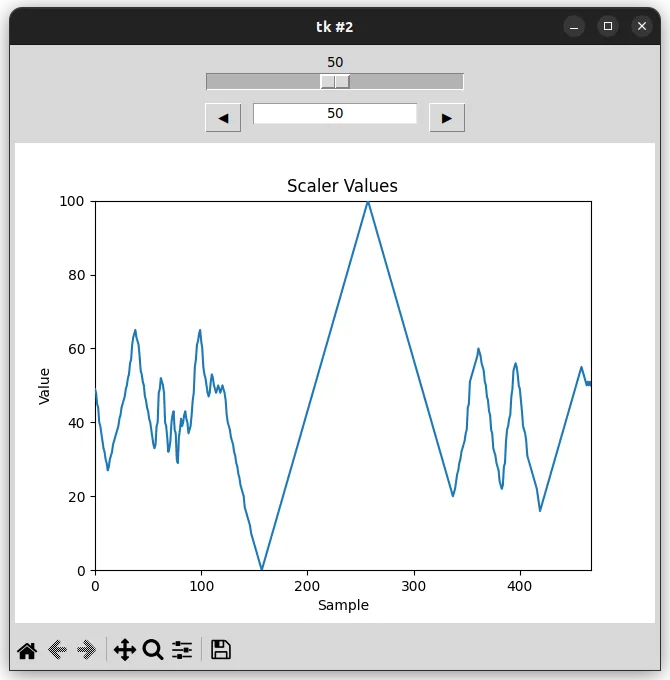
以下是一个自定义的tkinter比例尺示例,用于更新在tkinter绘图中绘制的数据。
from matplotlib import pyplot as plt
from matplotlib import animation
from matplotlib.backends.backend_tkagg import FigureCanvasTkAgg, NavigationToolbar2Tk
from tkinter import *
class MatplotlibPlot:
def __init__(
self, master, datas: list[dict], update_interval_ms: int = 200, padding: int = 5,
fig_config: callable = None, axes_config: callable = None
):
"""
Creates a Matplotlib plot in a Tkinter environment. The plot is dynamic, i.e., the plot data is periodically
drawn and the canvas updates.
@param master: The master widget where the pot will be rendered.
@param datas: A list containing dictionaries of data. Each dictionary must have a `x` key, which holds the xx
data, and `y` key, which holds the yy data. The other keys are optional and are used as kwargs of
`Axes.plot()` function. Each list entry, i.e., each dict, is drawn as a separate line.
@param fig_config: A function that is called after the figure creation. This function can be used to configure
the figure. The function signature is `fig_config(fig: pyplot.Figure) -> None`. The example bellow allows
the configuration of the figure title and Dots Per Inch (DPI).
``` python
my_vars = [{"x": [], "y": [], "label": "Label"}, ]
window = Tk()
def my_fig_config(fig: pyplot.Figure) -> None:
fig.suptitle("Superior Title")
fig.set_dpi(200)
MatplotlibPlot(master=window, datas=my_vars, fig_config=my_fig_config)
window.mainloop()
```
@param axes_config: A function that is called after the axes creation. This function can be used to configure
the axes. The function signature is `axes_config(axes: pyplot.Axes) -> None`. The example bellow allows
the configuration of the axes xx and yy label, the axes title and also enables the axes legend.
``` python
my_vars = [{"x": [], "y": [], "label": "Label"}, ]
window = Tk()
def my_axes_config(axes: pyplot.Axes) -> None:
axes.set_xlabel("XX Axis")
axes.set_ylabel("YY Axis")
axes.set_title("Axes Title")
axes.legend()
MatplotlibPlot(master=window, datas=my_vars, axes_config=my_axes_config)
window.mainloop()
```
@param update_interval_ms: The plot update interval in milliseconds (ms). Defaults to 200 ms.
@param padding: The padding, in pixels (px), to be used between widgets. Defaults to 5 px.
"""
fig = plt.Figure()
if fig_config:
fig_config(fig)
canvas = FigureCanvasTkAgg(figure=fig, master=master)
canvas.get_tk_widget().pack(side=TOP, fill=BOTH, expand=True, padx=padding, pady=padding)
NavigationToolbar2Tk(canvas=canvas, window=master, pack_toolbar=True)
axes = fig.add_subplot(1, 1, 1)
for data in datas:
axes.plot(data["x"], data["y"])
_kwargs = data.copy()
_kwargs.pop("x")
_kwargs.pop("y")
axes.lines[-1].set(**_kwargs)
if axes_config:
axes_config(axes)
self.animation = animation.FuncAnimation(
fig=fig,
func=self.update_plot,
fargs=(canvas, axes, datas),
interval=update_interval_ms,
repeat=False,
blit=True
)
def update_plot(self, _, canvas, axes, datas):
update_canvas = False
xx_max, xx_min = axes.get_xlim()
yy_max, yy_min = axes.get_ylim()
for line, data in zip(axes.lines, datas):
line.set_data(data["x"], data["y"])
_kwargs = data.copy()
_kwargs.pop("x")
_kwargs.pop("y")
line.set(**_kwargs)
if len(data["x"]) > 1:
if min(data["x"]) < xx_min:
xx_min = min(data["x"])
update_canvas = True
if max(data["x"]) > xx_max:
xx_max = max(data["x"])
update_canvas = True
if min(data["y"]) < yy_min:
yy_min = min(data["y"])
update_canvas = True
if max(data["y"]) > yy_max:
yy_max = max(data["y"])
update_canvas = True
if update_canvas:
axes.set_xlim(xx_min, xx_max)
axes.set_ylim(yy_min, yy_max)
canvas.draw()
return axes.lines
class CustomScaler:
def __init__(self, master, init: int = None, start: int = 0, stop: int = 100,
padding: int = 5, callback: callable = None):
"""
Creates a scaler with an increment and decrement button and a text entry.
@param master: The master Tkinter widget.
@param init: The scaler initial value.
@param start: The scaler minimum value.
@param stop: The scaler maximum value.
@param padding: The widget padding.
@param callback: A callback function that is called each time that the scaler changes its value. The function
signature is `callback(var_name: str, var_index: int, var_mode: str) -> None`.
"""
self.start = start
self.stop = stop
if init:
self.value = IntVar(master=master, value=init, name="scaler_value")
else:
self.value = IntVar(master=master, value=(self.stop - self.start) // 2, name="scaler_value")
if callback:
self.value.trace_add("write", callback=callback)
Scale(master=master, from_=self.start, to=self.stop, orient=HORIZONTAL, variable=self.value) \
.pack(side=TOP, expand=True, fill=BOTH, padx=padding, pady=padding)
Button(master=master, text="◀", command=self.decrement, repeatdelay=500, repeatinterval=5) \
.pack(side=LEFT, fill=Y, padx=padding, pady=padding)
Button(master=master, text="▶", command=self.increment, repeatdelay=500, repeatinterval=5) \
.pack(side=RIGHT, fill=Y, padx=padding, pady=padding)
Entry(master=master, justify=CENTER, textvariable=self.value) \
.pack(fill=X, expand=False, padx=padding, pady=padding)
def decrement(self):
_value = self.value.get()
if _value <= self.start:
return
self.value.set(_value - 1)
def increment(self):
_value = self.value.get()
if _value >= self.stop:
return
self.value.set(_value + 1)
def scaler_changed(my_vars: list[dict], scaler: CustomScaler) -> None:
my_vars[0]["x"].append(len(my_vars[0]["x"]))
my_vars[0]["y"].append(scaler.value.get())
def my_axes_config(axes: plt.Axes) -> None:
axes.set_xlabel("Sample")
axes.set_ylabel("Value")
axes.set_title("Scaler Values")
def main():
my_vars = [{"x": [], "y": []}, ]
window = Tk()
window.rowconfigure(0, weight=10)
window.rowconfigure(1, weight=90)
frame_scaler = Frame(master=window)
frame_scaler.grid(row=0, column=0)
scaler = CustomScaler(
master=frame_scaler, start=0, stop=100, callback=lambda n, i, m: scaler_changed(my_vars, scaler)
)
frame_plot = Frame(master=window)
frame_plot.grid(row=1, column=0)
MatplotlibPlot(master=frame_plot, datas=my_vars, axes_config=my_axes_config, update_interval_ms=10)
window.mainloop()
if __name__ == "__main__":
main()
上面的示例会产生以下窗口。
{{link1:
}}。