如何在jFrame上布局多个面板?(Java)

18

想要的布局

我正在制作自己的java socket游戏。我的游戏已经可以在整个屏幕上绘制图形(在“这里绘制图形”的位置),但现在我想添加一个带有滚动条的文本框,仅用于显示文本,并且不接受任何输入,另外再添加一个文本框,以接收用户的输入文本,然后再添加一个按钮用于发送文本,以进行聊天。但是我的问题是,我该如何开始布局呢?我知道我需要一个布局,但是否有人能帮助我呢?以下是目前我的代码(目前只设置了整个屏幕的绘制,现在需要像上面图片中一样将屏幕划分):

public class Setup extends JFrame implements Runnable{
     JPanel panel;
     JFrame window;
     public Setup(Starter start, JFrame window){
         window.setSize(600,500);
         window.setLocationRelativeTo(null);
         window.setDefaultCloseOperation(JFrame.EXIT_ON_CLOSE);
         window.setResizable(false);
         panel = new Display(start);
         this.window = window;
     }
     public void run(){
         window.getContentPane().add(panel);
         window.setBackground(Color.BLACK);
         window.setVisible(true);
     }
}

"new Display(start)" - 这扩展了jpanel,基本上是我绘制所有图形的地方。

此外,我看到有人添加了不同的面板,但它们不能具有相同的大小。就像图片中,“在这里绘制图形”的面板最大,以此类推。

2个回答

44
JPanel实际上只是一个容器,您可以在其中放置不同的元素(甚至是其他JPanels)。因此,在您的情况下,我建议使用一个大型JPanel作为窗口的某种主容器。您可以为该主面板分配适合您需求的Layout这里是布局介绍)。
设置了主面板的布局后,您可以添加绘图面板和其他想要的JPanels(例如带有文本的那些)。
  JPanel mainPanel = new JPanel();
  mainPanel.setLayout(new BoxLayout(mainPanel, BoxLayout.Y_AXIS));

  JPanel paintPanel = new JPanel();
  JPanel textPanel = new JPanel();

  mainPanel.add(paintPanel);
  mainPanel.add(textPanel);

这只是一个示例,将所有的子面板在垂直方向(Y 轴)上排序。因此,如果你想要在主面板底部放置其他东西(例如一些图标或按钮),应该使用另一种布局(如水平布局),只需创建一个新的JPanel作为其他所有内容的容器,然后设置 setLayout(new BoxLayout(mainPanel, BoxLayout.X_AXIS)
如你所见,布局相当严格,可能很难找到最适合你的面板的最佳布局方式。所以不要放弃,阅读简介(上面的链接),并查看图片-这就是我做的方式 :)
或者你可以使用NetBeans编写程序。那里有一个相当容易的可视化编辑器(拖放),可以创建各种窗口和框架。(仅在之后理解代码有时会有点棘手。)

编辑

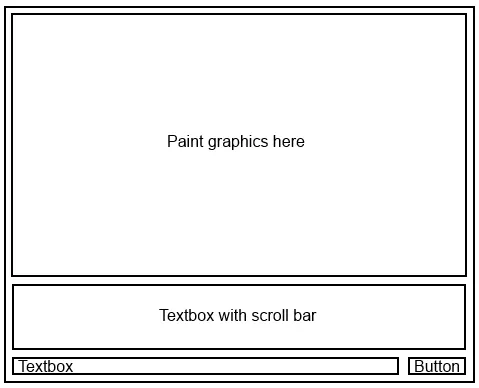
由于有这么多人关注这个问题,我想提供一个完整的示例,说明如何布局JFrame以使其看起来像OP想要的那样。
该类名为MyFrame,继承了Swings的JFrame
public class MyFrame extends javax.swing.JFrame{

    // these are the components we need.
    private final JSplitPane splitPane;  // split the window in top and bottom
    private final JPanel topPanel;       // container panel for the top
    private final JPanel bottomPanel;    // container panel for the bottom
    private final JScrollPane scrollPane; // makes the text scrollable
    private final JTextArea textArea;     // the text
    private final JPanel inputPanel;      // under the text a container for all the input elements
    private final JTextField textField;   // a textField for the text the user inputs
    private final JButton button;         // and a "send" button

    public MyFrame(){

        // first, lets create the containers:
        // the splitPane devides the window in two components (here: top and bottom)
        // users can then move the devider and decide how much of the top component
        // and how much of the bottom component they want to see.
        splitPane = new JSplitPane();

        topPanel = new JPanel();         // our top component
        bottomPanel = new JPanel();      // our bottom component

        // in our bottom panel we want the text area and the input components
        scrollPane = new JScrollPane();  // this scrollPane is used to make the text area scrollable
        textArea = new JTextArea();      // this text area will be put inside the scrollPane

        // the input components will be put in a separate panel
        inputPanel = new JPanel();
        textField = new JTextField();    // first the input field where the user can type his text
        button = new JButton("send");    // and a button at the right, to send the text

        // now lets define the default size of our window and its layout:
        setPreferredSize(new Dimension(400, 400));     // let's open the window with a default size of 400x400 pixels
        // the contentPane is the container that holds all our components
        getContentPane().setLayout(new GridLayout());  // the default GridLayout is like a grid with 1 column and 1 row,
        // we only add one element to the window itself
        getContentPane().add(splitPane);               // due to the GridLayout, our splitPane will now fill the whole window

        // let's configure our splitPane:
        splitPane.setOrientation(JSplitPane.VERTICAL_SPLIT);  // we want it to split the window verticaly
        splitPane.setDividerLocation(200);                    // the initial position of the divider is 200 (our window is 400 pixels high)
        splitPane.setTopComponent(topPanel);                  // at the top we want our "topPanel"
        splitPane.setBottomComponent(bottomPanel);            // and at the bottom we want our "bottomPanel"

        // our topPanel doesn't need anymore for this example. Whatever you want it to contain, you can add it here
        bottomPanel.setLayout(new BoxLayout(bottomPanel, BoxLayout.Y_AXIS)); // BoxLayout.Y_AXIS will arrange the content vertically

        bottomPanel.add(scrollPane);                // first we add the scrollPane to the bottomPanel, so it is at the top
        scrollPane.setViewportView(textArea);       // the scrollPane should make the textArea scrollable, so we define the viewport
        bottomPanel.add(inputPanel);                // then we add the inputPanel to the bottomPanel, so it under the scrollPane / textArea

        // let's set the maximum size of the inputPanel, so it doesn't get too big when the user resizes the window
        inputPanel.setMaximumSize(new Dimension(Integer.MAX_VALUE, 75));     // we set the max height to 75 and the max width to (almost) unlimited
        inputPanel.setLayout(new BoxLayout(inputPanel, BoxLayout.X_AXIS));   // X_Axis will arrange the content horizontally

        inputPanel.add(textField);        // left will be the textField
        inputPanel.add(button);           // and right the "send" button

        pack();   // calling pack() at the end, will ensure that every layout and size we just defined gets applied before the stuff becomes visible
    }

    public static void main(String args[]){
        EventQueue.invokeLater(new Runnable(){
            @Override
            public void run(){
                new MyFrame().setVisible(true);
            }
        });
    }
}

请注意,这只是一个例子,有多种方法可以布局窗口。这取决于您的需求,以及是否希望内容可调整大小/响应式。另一个非常好的方法是GridBagLayout,它可以处理相当复杂的布局,但学习起来也相当复杂。


为什么需要 EventQueue.invokeLater(...)new Example3().setVisible(true) 独立使用似乎没有问题。 - Little Helper
1
如果您想要一个全面的简短答案,请看这里:https://dev59.com/xGEh5IYBdhLWcg3wVCLK#22534931 - GameDroids

2
您需要使用多种布局管理器来帮助您实现所需的基本结果。
请查看布局管理器视觉指南以进行比较。
您可以使用GridBagLayout,但它是JDK中最复杂(和强大)的布局管理器之一。
相反,您可以使用一系列复合布局管理器。
我会将图形组件和文本区域放在单个JPanel上,使用BorderLayout,其中图形组件位于CENTER位置,文本区域位于SOUTH位置。
我会将文本字段和按钮放在单独的JPanel上,使用GridBagLayout(因为我认为这是实现所需超级结果最简单的方法)
我会将这两个面板放在第三个主面板上,使用BorderLayout,将第一个面板放在CENTER位置,第二个面板放在SOUTH位置。
以上只是我的建议。

如果有人能够解释为什么会被踩,我很愿意学习如何改进我的回答。 - MadProgrammer

网页内容由stack overflow 提供, 点击上面的
可以查看英文原文,
原文链接