我如何为一张图片添加带有cornerRadius的边框?我收到了一个弃用警告,说我应该使用RoundedRectange Shape,但我不知道具体如何使用它。
Beta 4:
Image(uiImage: ...)
   .border(Color.black, width: 2, cornerRadius: 10)
这是另一种我们可以使用clipShape修饰符(用于裁剪视图)然后覆盖以颜色描边的方式。
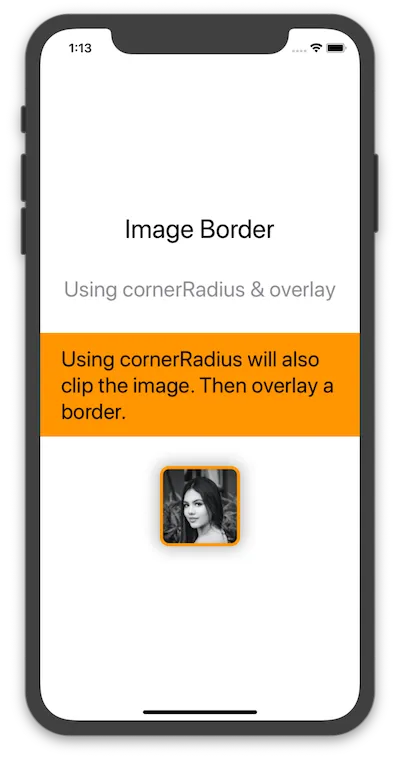
VStack(spacing: 40) {
    Text("Image Border").font(.largeTitle)
    Text("Using cornerRadius & overlay").font(.title).foregroundColor(.gray)
    Text("Using cornerRadius will also clip the image. Then overlay a border.")
        .frame(maxWidth: .infinity)
        .font(.title)
        .padding()
        .background(Color.orange)
        .foregroundColor(.black)

    Image("profile")
        .clipShape(RoundedRectangle(cornerRadius: 10))
        .overlay(RoundedRectangle(cornerRadius: 10)
            .stroke(Color.orange, lineWidth: 4))
        .shadow(radius: 10)
}
View实例。这也是为什么添加修饰符的顺序很重要的原因。Image("cat")
.cornerRadius(7) // Inner corner radius
.padding(5) // Width of the border
.background(Color.primary) // Color of the border
.cornerRadius(10) // Outer corner radius
结果为:

您甚至可以将此转换为ViewModifier以更轻松地重复使用:
struct RoundedEdge: ViewModifier {
    let width: CGFloat
    let color: Color
    let cornerRadius: CGFloat

    func body(content: Content) -> some View {
        content.cornerRadius(cornerRadius - width)
            .padding(width)
            .background(color)
            .cornerRadius(cornerRadius)
    }
}
Image("cat").modifier(RoundedEdge(width: 5, color: .black, cornerRadius: 20))
这适用于任何SwiftUI视图,例如Text:
Text("Some text")
    .padding(15)
    .background(Color.red)
    .modifier(RoundedEdge(width: 5, color: .black, cornerRadius: 20))
结果为:

.padding以避免裁剪Image边缘。在决定是否根据您想要实现的视觉效果添加.padding时,请记住这一点。 - Legonaftik首先,需要注意的是,您以前的方法并没有裁剪图像。可能是因为图像太小,或者它的背景与画布的颜色相同而您没有注意到。但即使使用了beta 4语法,您还需要添加.clipShape()。
回到您的问题,根据Beta 5发布说明:
背景(:alignment:)和边框(:width:)修饰符的复杂重载已弃用。改用在背景(:alignment:)或叠加层(:alignment:)中绘制这些形状。(53067530)
所以模式应该像这样:
.overlay(RoundedRectangle(...).stroke(...).foregroundColor(...))
就您的情况而言:
Image("mypic").resizable().frame(width: 300, height: 300)
    .clipShape(RoundedRectangle(cornerRadius: 30))
    .overlay(RoundedRectangle(cornerRadius: 30).stroke(lineWidth: 2).foregroundColor(Color.black))
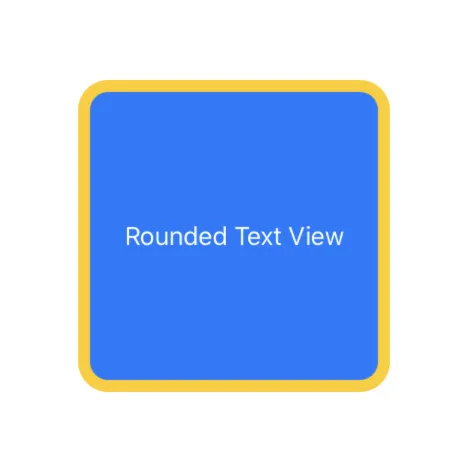
.clipShape(RoundedRectangle(cornerRadius: 30))比圆角更好。 - Honghao Zstruct RoundedTextView: View {
var body: some View {
Text("Rounded Text View")
.frame(width: 200, height: 200, alignment: .center)
.foregroundColor(.white)
.background(Color.blue)
.cornerRadius(16)
.overlay(
RoundedRectangle(cornerRadius: 16).stroke(Color.yellow, lineWidth: 8)
)
}
}
预览如下图所示:
我非常喜欢kontiki的回答,但是觉得有些长,因此我写了以下内容:
import SwiftUI

func strokedRoundedRectangle(
        cornerRadius r: CGFloat,
        lineWidth w: CGFloat = 1,
        color c: Color = .primary
    ) -> some View {

    return RoundedRectangle(cornerRadius: r).stroke(lineWidth: w).foregroundColor(c)
}
struct ContentView: View {
    var body: some View {
        Image("sunrise")
            .resizable()
            .cornerRadius(16)
            .aspectRatio(contentMode: .fit)
            .border(Color.black, width: 5)
            .padding(.all, 50)
        Image("sunrise")
            .resizable()
            .cornerRadius(16)
            .aspectRatio(contentMode: .fit)
            .border(Color.orange, width: 10)
            .padding(.all, 50)
    }
}
完成;