如何将打包为可执行jar的Spring Boot应用程序在Linux系统中配置为服务?这种方法是否值得推荐,或者我应该将此应用程序转换为war文件并安装到Tomcat中?
目前,我可以从screen会话中运行Spring Boot应用程序,这很好,但需要在服务器重新启动后手动启动。
我正在寻找一般建议/方向或示例init.d脚本,如果我的使用可执行的jar 是适当的。
如何将打包为可执行jar的Spring Boot应用程序在Linux系统中配置为服务?这种方法是否值得推荐,或者我应该将此应用程序转换为war文件并安装到Tomcat中?
目前,我可以从screen会话中运行Spring Boot应用程序,这很好,但需要在服务器重新启动后手动启动。
我正在寻找一般建议/方向或示例init.d脚本,如果我的使用可执行的jar 是适当的。
sudo link -s /var/myapp/myapp.jar /etc/init.d/myapp
或者
sudo ln -s ~/myproject/build/libs/myapp-1.0.jar /etc/init.d/myapp_servicename
之后,您可以像往常一样进行操作。
/etc/init.d/myapp start
如果需要,在引导时可以在任何运行级别中设置一个链接以启动/停止应用程序。
作为systemd服务
要运行安装在var/myapp中的Spring Boot应用程序,您可以在/etc/systemd/system/myapp.service中添加以下脚本:
[Unit]
Description=myapp
After=syslog.target

[Service]
ExecStart=/var/myapp/myapp.jar

[Install]
WantedBy=multi-user.target
注意:如果您使用此方法,请不要忘记使jar文件本身可执行(使用chmod +x),否则它将出现“权限被拒绝”的错误。
参考
pom.xml中添加了<executable>true</executable>,但打包的JAR文件无法执行(... ./myapp.jar ... cannot execute binary file)。 - Abdull/etc/init.d stop无法停止该应用程序,它正在尝试重新启动它。 - tintin[Unit]
Description=Java Service
[Service]
User=nobody
# The configuration file application.properties should be here:
WorkingDirectory=/data
ExecStart=/usr/bin/java -Xmx256m -jar application.jar --server.port=8081
SuccessExitStatus=143
TimeoutStopSec=10
Restart=on-failure
RestartSec=5
[Install]
WantedBy=multi-user.target
systemd有关新的服务文件。systemctl daemon-reload
systemctl enable javaservice.service
systemctl start javaservice
systemctl stop javaservice
systemctl restart javaservice
systemctl status javaservice
SuccessExitStatus=143 的意思是“将退出状态 143(对应 SIGTERM)视为此服务的正常退出状态”。 - spinlok[Unit]部分中添加排序语句,例如 After=mysql.service,Before=apache2.service。 - rustyx您还可以使用supervisord,这是一个非常方便的守护进程,可用于轻松控制服务。这些服务由简单的配置文件定义,定义了要在哪个用户、哪个目录下执行等信息,有无数的选项。supervisord语法非常简单,因此它是编写SysV init脚本的很好替代品。
以下是一个适用于您正在尝试运行/控制的程序的简单的supervisord配置文件(将其放入/etc/supervisor/conf.d/yourapp.conf中)。
[program:yourapp]
command=/usr/bin/java -jar /path/to/application.jar
user=usertorun
autostart=true
autorestart=true
startsecs=10
startretries=3
stdout_logfile=/var/log/yourapp-stdout.log
stderr_logfile=/var/log/yourapp-stderr.log
要控制该应用程序,您需要执行supervisorctl命令,这将呈现一个提示符,您可以在其中启动、停止和查看状态yourapp。
# sudo supervisorctl
yourapp             RUNNING   pid 123123, uptime 1 day, 15:00:00
supervisor> stop yourapp
supervisor> start yourapp
supervisord守护程序已经在运行,并且您已经添加了服务的配置而没有重新启动守护程序,您只需在supervisorctl shell中执行reread和update命令即可。systemd相同。 - rustyx/data/svcmgmt/conf/my-spring-boot-api.sh,用于设置环境变量。#!/bin/bash
export JAVA_HOME=/opt/jdk1.8.0_05/jre
export APP_HOME=/data/apps/my-spring-boot-api
export APP_NAME=my-spring-boot-api
export APP_PORT=40001
我正在使用CentOS,为了确保我的服务在服务器重新启动后启动,我有一个位于/etc/init.d/my-spring-boot-api的服务控制脚本:
#!/bin/bash
# description: my-spring-boot-api start stop restart
# processname: my-spring-boot-api
# chkconfig: 234 20 80

. /data/svcmgmt/conf/my-spring-boot-api.sh

/data/svcmgmt/bin/spring-boot-service.sh $1

exit 0
正如您所看到的,这调用了初始配置脚本以设置环境变量,然后调用一个共享脚本,我用它来重新启动所有的Spring Boot服务。这个共享脚本是关键所在:
#!/bin/bash

echo "Service [$APP_NAME] - [$1]"

echo "    JAVA_HOME=$JAVA_HOME"
echo "    APP_HOME=$APP_HOME"
echo "    APP_NAME=$APP_NAME"
echo "    APP_PORT=$APP_PORT"

function start {
    if pkill -0 -f $APP_NAME.jar > /dev/null 2>&1
    then
        echo "Service [$APP_NAME] is already running. Ignoring startup request."
        exit 1
    fi
    echo "Starting application..."
    nohup $JAVA_HOME/bin/java -jar $APP_HOME/$APP_NAME.jar \
        --spring.config.location=file:$APP_HOME/config/   \
        < /dev/null > $APP_HOME/logs/app.log 2>&1 &
}

function stop {
    if ! pkill -0 -f $APP_NAME.jar > /dev/null 2>&1
    then
        echo "Service [$APP_NAME] is not running. Ignoring shutdown request."
        exit 1
    fi

    # First, we will try to trigger a controlled shutdown using
    # spring-boot-actuator
    curl -X POST http://localhost:$APP_PORT/shutdown < /dev/null > /dev/null 2>&1

    # Wait until the server process has shut down
    attempts=0
    while pkill -0 -f $APP_NAME.jar > /dev/null 2>&1
    do
        attempts=$[$attempts + 1]
        if [ $attempts -gt 5 ]
        then
            # We have waited too long. Kill it.
            pkill -f $APP_NAME.jar > /dev/null 2>&1
        fi
        sleep 1s
    done
}

case $1 in
start)
    start
;;
stop)
    stop
;;
restart)
    stop
    start
;;
esac
exit 0
java -jar 执行的需求。其余部分的脚本仍然是必需的。 - Steve如果你想使用Spring Boot 1.2.5与Spring Boot Maven插件1.3.0.M2,请使用以下解决方案:
<parent>
    <groupId>org.springframework.boot</groupId>
    <artifactId>spring-boot-starter-parent</artifactId>
    <version>1.2.5.RELEASE</version>
</parent>

<build>
    <plugins>
        <plugin>
            <groupId>org.springframework.boot</groupId>
            <artifactId>spring-boot-maven-plugin</artifactId>
            <version>1.3.0.M2</version>
            <configuration>
                <executable>true</executable>
            </configuration>
        </plugin>
    </plugins>
</build>

<pluginRepositories>
    <pluginRepository>
        <id>spring-libs-milestones</id>
        <url>http://repo.spring.io/libs-milestone</url>
    </pluginRepository>
</pluginRepositories>
然后像往常一样编译:mvn clean package,创建一个符号链接ln -s /.../myapp.jar /etc/init.d/myapp,将其设为可执行文件chmod +x /etc/init.d/myapp并启动它service myapp start(适用于Ubuntu服务器)。
1.3.0.M2 版本,但当我尝试使用 1.3.0.RC1 时出现了错误。 - JBCPspringBoot { executable = true } 块来进行配置。 - Natix我知道这是一个较旧的问题,但我想提供另一种方式,那就是appassembler-maven-plugin。以下是我的POM中的相关部分,包括我们发现有用的许多其他选项值:
<plugin>
    <groupId>org.codehaus.mojo</groupId>
    <artifactId>appassembler-maven-plugin</artifactId>
    <configuration>
        <generateRepository>true</generateRepository>
        <repositoryLayout>flat</repositoryLayout>
        <useWildcardClassPath>true</useWildcardClassPath>
        <includeConfigurationDirectoryInClasspath>true</includeConfigurationDirectoryInClasspath>
        <configurationDirectory>config</configurationDirectory>
        <target>${project.build.directory}</target>
        <daemons>
            <daemon>
                <id>${installer-target}</id>
                <mainClass>${mainClass}</mainClass>
                <commandLineArguments>
                    <commandLineArgument>--spring.profiles.active=dev</commandLineArgument>
                    <commandLineArgument>--logging.config=${rpmInstallLocation}/config/${installer-target}-logback.xml</commandLineArgument>
                </commandLineArguments>
                <platforms>
                    <platform>jsw</platform>
                </platforms>
                <generatorConfigurations>
                    <generatorConfiguration>
                        <generator>jsw</generator>
                        <includes>
                            <include>linux-x86-64</include>
                        </includes>
                        <configuration>
                            <property>
                                <name>wrapper.logfile</name>
                                <value>logs/${installer-target}-wrapper.log</value>
                            </property>
                            <property>
                                <name>wrapper.logfile.maxsize</name>
                                <value>5m</value>
                            </property>
                            <property>
                                <name>run.as.user.envvar</name>
                                <value>${serviceUser}</value>
                            </property>
                            <property>
                                <name>wrapper.on_exit.default</name>
                                <value>RESTART</value>
                            </property>
                        </configuration>
                    </generatorConfiguration>
                </generatorConfigurations>
                <jvmSettings>
                    <initialMemorySize>256M</initialMemorySize>
                    <maxMemorySize>1024M</maxMemorySize>
                    <extraArguments>
                        <extraArgument>-server</extraArgument>
                    </extraArguments>
                </jvmSettings>
            </daemon>
        </daemons>
    </configuration>
    <executions>
        <execution>
            <id>generate-jsw-scripts</id>
            <phase>package</phase>
            <goals>
                <goal>generate-daemons</goal>
            </goals>
        </execution>
    </executions>
</plugin>
http://repo.jenkins-ci.org/releases/com/sun/winsw/winsw/2.1.2/
然后将其重命名为jar文件名(例如:your-app.jar)
winsw.exe -> your-app.exe
<?xml version="1.0" encoding="UTF-8"?>
<service>
     <id>your-app</id>
     <name>your-app</name>
     <description>your-app as a Windows Service</description>
     <executable>java</executable>
     <arguments>-jar "your-app.jar"</arguments>
     <logmode>rotate</logmode>
</service>
your-app.exe install
eg -> D:\Springboot\your-app.exe install
Error: Registry key 'Software\JavaSoft\Java Runtime Environment'\CurrentVersion' has value '1.8', but '1.7' is required.
Delete java.exe, javaw.exe and javaws.exe from C:\Windows\System32
在Windows中卸载服务
your-app.exe uninstall
查看/运行/停止服务: 按下win+r,输入管理工具,然后从中选择服务。然后右键单击选择运行/停止选项。
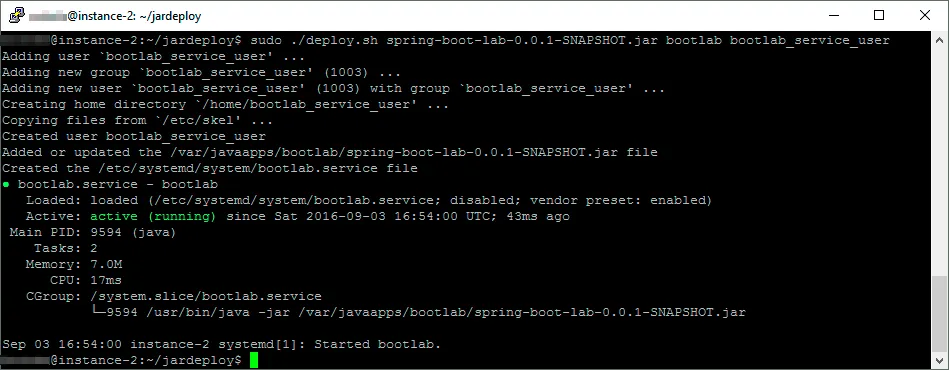
#!/bin/bash

# Argument: The jar file to deploy
APPSRCPATH=$1

# Argument: application name, no spaces please, used as folder name under /var
APPNAME=$2

# Argument: the user to use when running the application, may exist, created if not exists
APPUSER=$3

# Help text
USAGE="
Usage: sudo $0 <jar-file> <app-name> <runtime-user>
If an app with the name <app-name> already exist, it is stopped and deleted.
If the <runtime-user> does not already exist, it is created.
"

# Check that we are root
if [ ! "root" = "$(whoami)" ]; then
    echo "Must be root. Please use e.g. sudo"
    echo "$USAGE"
    exit
fi

# Check arguments
if [ "$#" -ne 3 -o ${#APPSRCPATH} = 0 -o ${#APPNAME} = 0 -o ${#APPUSER} = 0 ]; then
    echo "Incorrect number of parameters."
    echo "$USAGE"
    exit
fi

if [ ! -f $APPSRCPATH ]; then
    echo "Can't find jar file $APPSRCPATH"
    echo "$USAGE"
    exit
fi

# Infered values
APPFILENAME=$(basename $APPSRCPATH)
APPFOLDER=/var/javaapps/$APPNAME
APPDESTPATH=$APPFOLDER/$APPFILENAME

# Stop the service if it already exist and is running
systemctl stop $APPNAME >/dev/null 2>&1

# Create the app folder, deleting any previous content
rm -fr $APPFOLDER
mkdir -p $APPFOLDER

# Create the user if it does not exist
if id "$APPUSER" >/dev/null 2>&1; then
    echo "Using existing user $APPUSER"
else
    adduser --disabled-password --gecos "" $APPUSER
    echo "Created user $APPUSER"
fi

# Place app in app folder, setting owner and rights
cp $APPSRCPATH $APPDESTPATH
chown $APPUSER $APPDESTPATH
chmod 500 $APPDESTPATH
echo "Added or updated the $APPDESTPATH file"

# Create the .service file used by systemd
echo "
[Unit]
Description=$APPNAME
After=syslog.target
[Service]
User=$APPUSER
ExecStart=/usr/bin/java -jar $APPDESTPATH
SuccessExitStatus=143
[Install]
WantedBy=multi-user.target
" > /etc/systemd/system/$APPNAME.service
echo "Created the /etc/systemd/system/$APPNAME.service file"

# Reload the daemon
systemctl daemon-reload

# Start the deployed app
systemctl start $APPNAME
systemctl status $APPNAME
例子:
cat /etc/systemd/system/spring-mvc.service
[Unit]
Description=Spring MVC Java Service
[Service]
User=spring-mvc
# The configuration file application.properties should be here:
WorkingDirectory=/usr/local/spring-mvc
# Run ExecStartPre with root-permissions
PermissionsStartOnly=true
ExecStartPre=-/bin/mkdir -p /var/log/spring-mvc
ExecStartPre=/bin/chown -R spring-mvc:syslog /var/log/spring-mvc
ExecStartPre=/bin/chmod -R 775 /var/log/spring-mvc
#https://www.freedesktop.org/software/systemd/man/systemd.service.html#ExecStart=
ExecStart=/usr/bin/java \
-Dlog4j.configurationFile=log4j2-spring.xml \
-DLog4jContextSelector=org.apache.logging.log4j.core.async.AsyncLoggerContextSelector \
-Dspring.profiles.active=dev \
-Denvironment-type=dev \
-XX:+UseConcMarkSweepGC \
-XX:CMSInitiatingOccupancyFraction=80 \
-XX:NewSize=756m \
-XX:MetaspaceSize=256m \
-Dsun.net.inetaddr.ttl=5 \
-Xloggc:/var/log/spring-mvc/gc.log \
-verbose:gc \
-verbosegc \
-XX:+DisableExplicitGC \
-XX:+PrintGCDetails \
-XX:+PrintGCDateStamps \
-XX:+PreserveFramePointer \
-XX:+StartAttachListener \
-Xms1024m \
-Xmx1024m \
-XX:+HeapDumpOnOutOfMemoryError \
-jar spring-mvc.war
SuccessExitStatus=143
StandardOutput=journal
StandardError=journal
KillSignal=SIGINT
TimeoutStopSec=20
Restart=always
RestartSec=5
StartLimitInterval=0
StartLimitBurst=10
LimitNOFILE=500000
LimitNPROC=500000
#https://www.freedesktop.org/software/systemd/man/systemd.exec.html#LimitCPU=
#LimitCPU=, LimitFSIZE=, LimitDATA=, LimitSTACK=, LimitCORE=, LimitRSS=, LimitNOFILE=, LimitAS=, LimitNPROC=, LimitMEMLOCK=, LimitLOCKS=, LimitSIGPENDING=, LimitMSGQUEUE=, LimitNICE=, LimitRTPRIO=, LimitRTTIME=
SyslogIdentifier=spring-mvc
[Install]
WantedBy=multi-user.target
# https://www.freedesktop.org/software/systemd/man/journalctl.html
#check logs --- journalctl -u spring-mvc -f -o cat
rsyslog - 将应用程序的syslog输入重定向到特定文件夹/文件
cat /etc/rsyslog.d/30-spring-mvc.conf
if $programname == 'spring-mvc' then /var/log/spring-mvc/spring-mvc.log
& stop
logrotate
cat /etc/logrotate.d/spring-mvc.conf
/var/log/spring-mvc/spring-mvc.log
{
    daily
    rotate 30
    maxage 30
    copytruncate
    missingok
    notifempty
    compress
    dateext
    dateformat _%Y-%m-%d_%H-%M
    delaycompress
    create 644 spring-mvc syslog
    su spring-mvc syslog
}
日志轮换垃圾回收
cat /etc/logrotate.d/spring-mvc-gc.conf
/var/log/spring-mvc/gc.log
{
    daily
    rotate 30
    maxage 30
    copytruncate
    missingok
    notifempty
    compress
    dateext
    dateformat _%Y-%m-%d_%H-%M
    delaycompress
    create 644 spring-mvc syslog
    su spring-mvc syslog
}
# Default-Start: 2 3 4 5),因此chkconfig可以将其添加为“服务”。/usr/lib/systemd/system/spring-app.service。[Unit]
Description=My loverly application
After=syslog.target
[Service]
Type=forking
PIDFile=/var/run/spring-app/spring-app.pid
ExecStart=/etc/init.d/spring-app start
SuccessExitStatus=143
[Install]
WantedBy=multi-user.target