如何使WPF图像可禁用?

3
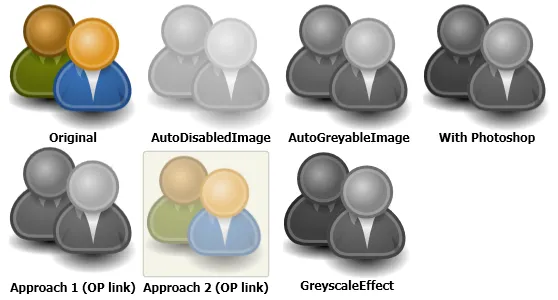
我需要一张图像,当它被禁用时(IsEnabled=False),变成灰色。可以通过将BitmapImage读入一个FormatConvertedBitmap来生成图像的灰色版本,在这里展示了如何实现。
我已经能够在UserControl中实现此功能,但现在我希望在专门的Image类中获得相同的行为,以获得更大的灵活性。我不在乎这是在XAML、代码后台还是两者都实现,但它必须是Image的子类。
使用方法可能是:
<DisableableImage Source="Images/image1.png" />
<DisableableImage Source="Images/image1.png" IsEnabled="False" />

<!-- Since IsEnabled is inherited down the tree,
     the image will be grayed out like the rest of the button -->
<Button IsEnabled="False">
    <StackPanel Orientation="Horizontal">
        <TextBlock>OK</TextBlock>
        <DisableableImage Source="Images/ok.png" />
    </StackPanel>
</Button>

5个回答

9

谢谢!但是我不准备为这门课程购买整个Infragistics Win Client套餐 :) - Oskar
抱歉,我没有意识到这是一个Infragistics控件...我有另一个链接,我会更新我的答案。 - Thomas Levesque
第二个链接是一个不错的起点,但并不是完整的解决方案。我添加了一个MarkupExtension来创建这样的图像,并添加了一个样式和触发器,当禁用时将Opacity设置为0.5,使图像变得轻盈和灰色。 - ygoe
仅提供链接的答案可以通过在此处添加相关细节来改进... - StayOnTarget

6
我根据以下解决方案进行了比较:

由于我已经有了Infragistics Net Advantage for WPF的许可证,所以尝试它很容易。

以下是结果:

enter image description here

因此,最佳方法取决于您想要的结果。 对于我而言,我认为Infragistics的 AutoDisabledImage 的结果太亮, AutoGreyableImage 的效果非常好(与Approach 1(OP link)的结果相同),而 GreyscaleEffect 产生了最好的结果。


2
更完整的AutoGreyableImage版本,由Thomas Lebrun创建。如果有兴趣的话,我开始使用Thomas Lebruns类,并遇到了一些空引用异常,同时发现如果isEnabled属性先设置,然后再设置源,则图像不会被禁用。

所以这是最终为我解决问题的类。顺便说一下,您当然可以将不透明度加入其中,但我决定将其留给围绕图像的xaml处理。

using System;
using System.Windows;
using System.Windows.Controls;
using System.Windows.Media.Imaging;
using System.Windows.Media;

namespace MyDisabledImages
{
    /// <summary>
    /// Class used to have an image that is able to be gray when the control is not enabled.
    /// Based on the version by Thomas LEBRUN (http://blogs.developpeur.org/tom)
    /// </summary>
    public class AutoGreyableImage : Image
    {
        /// <summary>
        /// Initializes a new instance of the <see cref="AutoGreyableImage"/> class.
        /// </summary>
        static AutoGreyableImage()
        {
            // Override the metadata of the IsEnabled and Source property.
            IsEnabledProperty.OverrideMetadata(typeof(AutoGreyableImage), new FrameworkPropertyMetadata(true, new PropertyChangedCallback(OnAutoGreyScaleImageIsEnabledPropertyChanged)));
            SourceProperty.OverrideMetadata(typeof(AutoGreyableImage), new FrameworkPropertyMetadata(null, new PropertyChangedCallback(OnAutoGreyScaleImageSourcePropertyChanged)));
        }

        protected static AutoGreyableImage GetImageWithSource(DependencyObject source)
        {
            var image = source as AutoGreyableImage;
            if (image == null)
                return null;

            if (image.Source == null)
                return null;

            return image;
        }

        /// <summary>
        /// Called when [auto grey scale image source property changed].
        /// </summary>
        /// <param name="source">The source.</param>
        /// <param name="args">The <see cref="System.Windows.DependencyPropertyChangedEventArgs"/> instance containing the event data.</param>
        protected static void OnAutoGreyScaleImageSourcePropertyChanged(DependencyObject source, DependencyPropertyChangedEventArgs ars)
        {
            AutoGreyableImage image = GetImageWithSource(source);
            if (image != null)
                ApplyGreyScaleImage(image, image.IsEnabled);
        }

        /// <summary>
        /// Called when [auto grey scale image is enabled property changed].
        /// </summary>
        /// <param name="source">The source.</param>
        /// <param name="args">The <see cref="System.Windows.DependencyPropertyChangedEventArgs"/> instance containing the event data.</param>
        protected static void OnAutoGreyScaleImageIsEnabledPropertyChanged(DependencyObject source, DependencyPropertyChangedEventArgs args)
        {
            AutoGreyableImage image = GetImageWithSource(source);
            if (image != null)
            {
                var isEnabled = Convert.ToBoolean(args.NewValue);
                ApplyGreyScaleImage(image, isEnabled);
            }
        }

        protected static void ApplyGreyScaleImage(AutoGreyableImage autoGreyScaleImg, Boolean isEnabled)
        {
            try
            {
                if (!isEnabled)
                {
                    BitmapSource bitmapImage = null;

                    if (autoGreyScaleImg.Source is FormatConvertedBitmap)
                    {
                        // Already grey !
                        return;
                    }
                    else if (autoGreyScaleImg.Source is BitmapSource)
                    {
                        bitmapImage = (BitmapSource)autoGreyScaleImg.Source;
                    }
                    else // trying string 
                    {
                        bitmapImage = new BitmapImage(new Uri(autoGreyScaleImg.Source.ToString()));
                    }
                    FormatConvertedBitmap conv = new FormatConvertedBitmap(bitmapImage, PixelFormats.Gray32Float, null, 0);
                    autoGreyScaleImg.Source = conv;

                    // Create Opacity Mask for greyscale image as FormatConvertedBitmap does not keep transparency info
                    autoGreyScaleImg.OpacityMask = new ImageBrush(((FormatConvertedBitmap)autoGreyScaleImg.Source).Source); //equivalent to new ImageBrush(bitmapImage)
                }
                else
                {
                    if (autoGreyScaleImg.Source is FormatConvertedBitmap)
                    {
                        autoGreyScaleImg.Source = ((FormatConvertedBitmap)autoGreyScaleImg.Source).Source;
                    }
                    else if (autoGreyScaleImg.Source is BitmapSource)
                    {
                        // Should be full color already.
                        return;
                    }

                    // Reset the Opcity Mask
                    autoGreyScaleImg.OpacityMask = null;
                }
            }
            catch (Exception)
            {
                // nothin'
            }

        }

    }
}

2

如果您经常使用此功能,请考虑创建一个定制的效果,该效果在 .NET 3.5 SP1 中引入(而非位图效果),以在 GPU 上渲染此类操作。这个效果可以很容易地通过触发器进行控制。


0
创建一个可禁用的图像类,它是一个典型的WPF控件。在内部,放置两个元素:图像和一个当控件被禁用时才出现的矩形。矩形应与图像具有相同的宽度和高度,并覆盖在图像上方。使用灰色和大约为40%的alpha颜色,您应该能够获得类似于实际将图像变灰的效果,而无需真正修改图像本身所需的所有工作。

这是一个不错的想法,但如果你尝试一下,它看起来与提问者想要实现的效果完全不同。它只是在图像上覆盖了一个半透明的灰色矩形。 :) - Mal Ross
我猜这要看对于“灰化”字眼的具体含义,但是是的,还会有一点颜色残留。 - John Fisher
不仅颜色会保留 - 轮廓从图标内容变成矩形。那是完全不同的事情。你还不如直接隐藏图标。 - ygoe

网页内容由stack overflow 提供, 点击上面的
可以查看英文原文,
原文链接