从资源中自定义视图:
// Set up the action bar.
final ActionBar actionBar = getActionBar();
actionBar.setNavigationMode(ActionBar.NAVIGATION_MODE_STANDARD);
actionBar.setCustomView(R.layout.custom_action_bar);
actionBar.setDisplayOptions(ActionBar.DISPLAY_SHOW_CUSTOM);
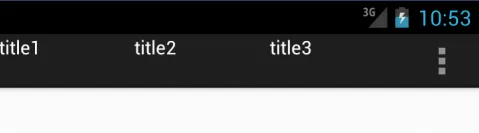
结果是:
 手动充气的自定义视图:
// Set up the action bar.
final ActionBar actionBar = getActionBar();
actionBar.setNavigationMode(ActionBar.NAVIGATION_MODE_STANDARD);
LayoutInflater inflater = (LayoutInflater) this .getSystemService(Context.LAYOUT_INFLATER_SERVICE);
View view = inflater.inflate(R.layout.custom_action_bar, null);
actionBar.setCustomView(view);
actionBar.setDisplayOptions(ActionBar.DISPLAY_SHOW_CUSTOM);
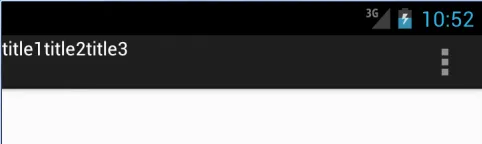
结果是:
 custom_action_bar.xml:
<?xml version="1.0" encoding="utf-8"?>
<LinearLayout xmlns:android="http://schemas.android.com/apk/res/android"
    android:layout_width="match_parent"
    android:layout_height="match_parent"
    android:orientation="horizontal"
    android:weightSum="3">

    <TextView
        android:id="@+id/bar_title1"
        android:layout_width="0dp"
        android:layout_height="wrap_content"
        android:layout_weight="1"
        android:textColor="@color/White"
        android:text="title1"/>
    <TextView
        android:id="@+id/bar_title2"
        android:layout_width="0dp"
        android:layout_height="wrap_content"
        android:layout_weight="1"
        android:textColor="@color/White"
        android:text="title2"/>
    <TextView
        android:id="@+id/bar_title3"
        android:layout_width="0dp"
        android:layout_height="wrap_content"
        android:layout_weight="1"
        android:textColor="@color/White"
        android:text="title3"/>

</LinearLayout>
这里展示的第一个布局是正确的,因为它在其小部件上有权重。第二次尝试应该产生相同的结果,但它没有。
fill_parent部分不需要(fill_parent等同于match_parent)。移除weightsum属性就可以了。 - ilomambo