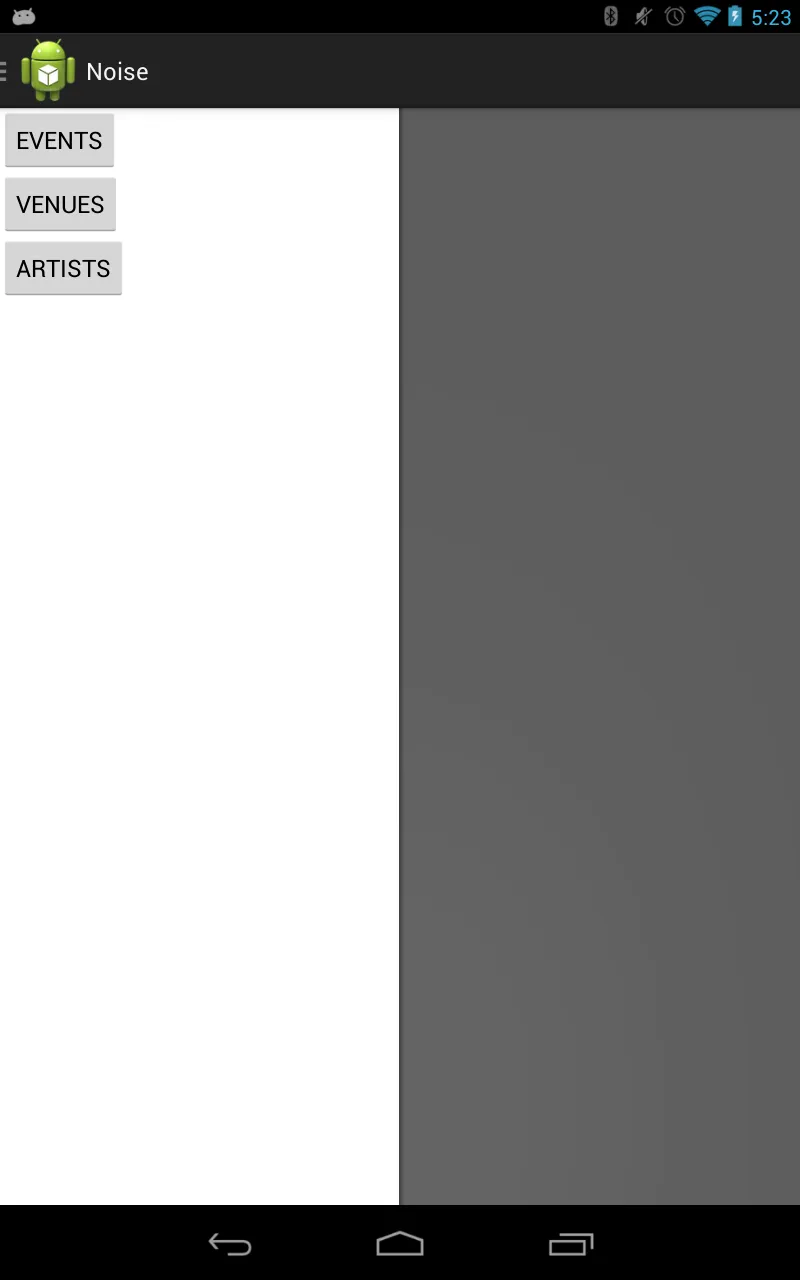
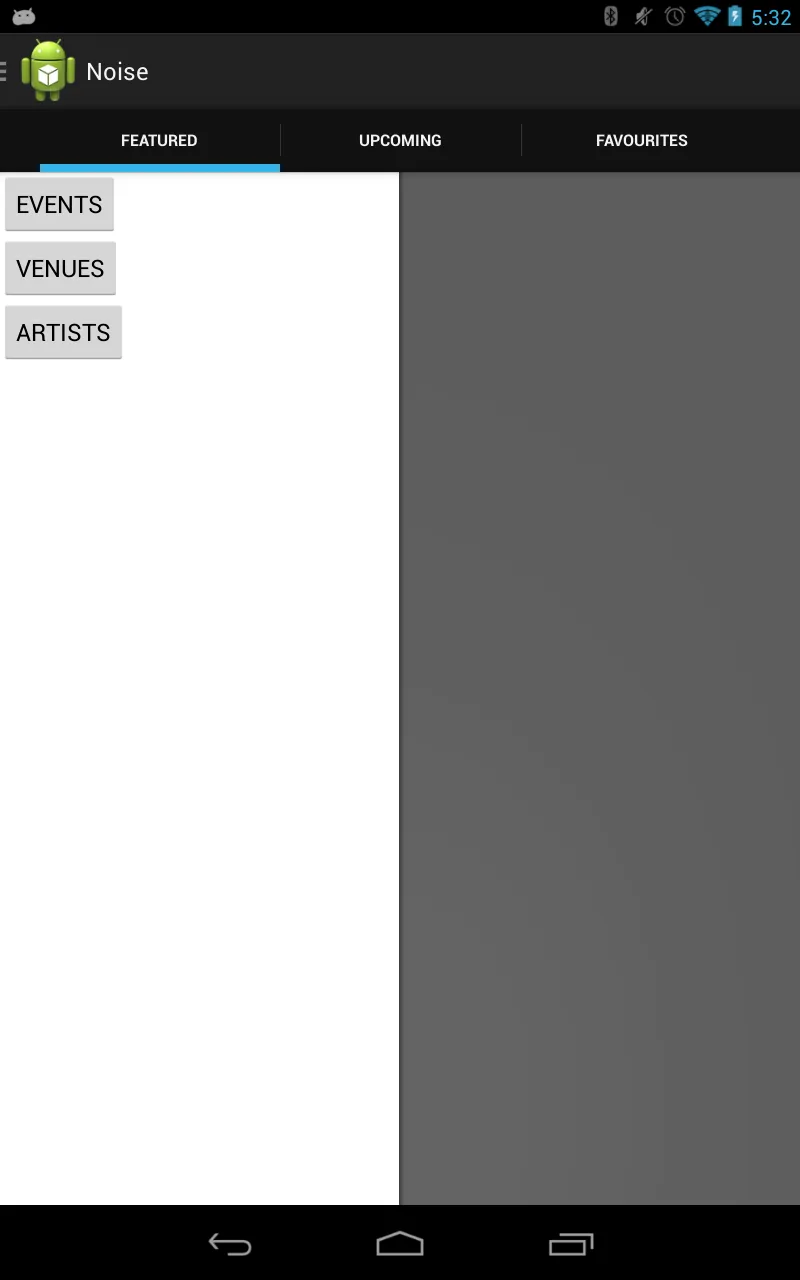
我正在使用支持库中提供的新导航抽屉。当与选项卡一起使用时,抽屉菜单会显示在选项卡下面,如下所示。如何确保抽屉菜单显示在选项卡上方。(应该像没有选项卡一样显示抽屉菜单)
没有选项卡的抽屉菜单
有选项卡的抽屉菜单
我正在使用支持库中提供的新导航抽屉。当与选项卡一起使用时,抽屉菜单会显示在选项卡下面,如下所示。如何确保抽屉菜单显示在选项卡上方。(应该像没有选项卡一样显示抽屉菜单)
没有选项卡的抽屉菜单
有选项卡的抽屉菜单
我遇到了同样的问题,来自Android团队的Roman Nurik给出的答案是导航抽屉不应该与动作栏标签一起使用。
可以在这里找到相关讨论: https://plus.google.com/u/1/116515063230772720916/posts/8dWEkFcbTFX
创建一个名为TabsFragment的独立片段,并将该片段添加到主活动的片段容器中。
可以使用以下代码在选项卡片段中添加选项卡。
private FragmentTabHost mTabHost;

@Override
public View onCreateView(LayoutInflater inflater, ViewGroup container,
        Bundle savedInstanceState) {
    mTabHost = new FragmentTabHost(getActivity());
    mTabHost.setup(getActivity(), getChildFragmentManager(), R.id.fragment1);

    mTabHost.addTab(mTabHost.newTabSpec("TabA").setIndicator("TabA"),
           TabA.class, null);
    mTabHost.addTab(mTabHost.newTabSpec("TabB").setIndicator("TabB"),
            TabB.class, null);

    return mTabHost;
}
这里,TabA和TabB是用于选项卡的不同片段。您可以在各自的片段中实现相应选项卡的功能。
参考:http://developer.android.com/reference/android/support/v4/app/FragmentTabHost.html
activity_main.xml
<android.support.v4.widget.DrawerLayout
    android:id="@+id/drawer_layout"
    xmlns:android="http://schemas.android.com/apk/res/android"
    xmlns:tools="http://schemas.android.com/tools"
    android:layout_width="match_parent"
    android:layout_height="match_parent">

    <!--<include-->
    <!--android:id="@+id/toolbar"-->
    <!--layout="@layout/toolbar"/>-->
    <FrameLayout
        android:id="@+id/content_frame"
        android:layout_width="match_parent"
        android:layout_height="match_parent">

        <LinearLayout

            android:layout_width="match_parent"
            android:layout_height="match_parent"
            android:orientation="vertical">

            <android.support.design.widget.TabLayout
                android:id="@+id/sliding_tabs"
                android:layout_width="match_parent"
                scrol
                android:layout_height="wrap_content"/>

            <android.support.v4.view.ViewPager
                android:id="@+id/viewpager"
                android:layout_width="match_parent"
                android:layout_height="match_parent"/>
        </LinearLayout>
    </FrameLayout>

    <ListView
        android:id="@+id/navList"
        android:layout_width="200dp"
        android:layout_height="match_parent"
        android:layout_gravity="left|start"
        android:background="#ffeeeeee"/>

</android.support.v4.widget.DrawerLayout>
我相信已经晚了,因为问题已经被提出。 如果您已经使用导航抽屉并想要导航选项卡,请在您的项目文件夹中包含这两个文件:
1)SlidingTabLayout.java http://developer.android.com/samples/SlidingTabsBasic/src/com.example.android.common/view/SlidingTabLayout.html
2)SlidingTabStrip.java http://developer.android.com/samples/SlidingTabsBasic/src/com.example.android.common/view/SlidingTabStrip.html
在导航抽屉片段中,包括以下内容:
private SlidingTabLayout mSlidingTabLayout;
    private  SamplePagerAdapter_tasks mPagerAdapter;
    private ViewPager mViewPager;

    public void onViewCreated(View view, Bundle savedInstanceState) {
        // BEGIN_INCLUDE (setup_viewpager)
        // Get the ViewPager and set it's PagerAdapter so that it can display items
        //fragment manager of a fragment,Return a private FragmentManager for placing and managing Fragments inside of this Fragment.

        mPagerAdapter = new SamplePagerAdapter_tasks(getChildFragmentManager(),Titles of Tabs(array of string),Numboftabs (integer));
        mViewPager = (ViewPager) view.findViewById(R.id.viewpager);
        mViewPager.setAdapter(mPagerAdapter);

        // Give the SlidingTabLayout the ViewPager, this must be done AFTER the ViewPager has had
        // it's PagerAdapter set.
        mSlidingTabLayout = (SlidingTabLayout) view.findViewById(R.id.sliding_tabs);
        mSlidingTabLayout.setDistributeEvenly(true); // this helps to all the tabs on screen to take equal spaces (eg. if 3 tabs each would take one-third of the total space on the screen)

        mSlidingTabLayout.setViewPager(mViewPager);

        // END_INCLUDE (setup_slidingtablayout)
    }
希望能对你有所帮助!
您可以手动隐藏负责渲染选项卡的视图:
public static void setActionBarNavigationVisibility(Activity activity, boolean visible) {
    // --- If the Tabs are BELOW ActionBar (narrow screens) ---
    int actionViewResId = Resources.getSystem().getIdentifier("action_bar_container", "id", "android"); // @see https://dev59.com/0mIj5IYBdhLWcg3wpmsH
    View actionBarContainer = activity.findViewById(actionViewResId); // returns instance of com.android.internal.widget.ActionBarContainer (inaccessible)
    try {
        Field mTabContainerField = actionBarContainer.getClass().getDeclaredField("mTabContainer");
        if (mTabContainerField != null) {
            mTabContainerField.setAccessible(true);
            View mmTabContainer = (View) mTabContainerField.get(actionBarContainer);
            if (mmTabContainer != null)
                mmTabContainer.setVisibility(visible ? View.VISIBLE : View.GONE); // use GONE, so the mTabContainer below ActionBar does not take space in layout
        }
    } catch (Exception e) {
        // TODO handle exception
    }
}
只需从你的 ActionBarDrawerToggle 实现中像这样调用此方法:
public void onDrawerSlide(View drawerView, float slideOffset) {
        super.onDrawerSlide(drawerView, slideOffset);
        if (slideOffset == 0) { // 0 = drawer is closed
            setActionBarNavigationVisibility(activity, true); //show Tabs when Drawer is closed
        }
    }

public void onDrawerStateChanged(int newState) {
        super.onDrawerStateChanged(newState);
        //hides Tabs right after Drawer starts opening
        if (DrawerLayout.STATE_DRAGGING == newState || DrawerLayout.STATE_SETTLING == newState) {
            setActionBarNavigationVisibility(activity, false);
        }
    }
public static void setActionBarNavigationVisibility(Activity activity, boolean visible) {
    try {
        /* 1. --- If the navigation items are showing in ActionBar directly. We have 3 options Spinner, Tabs, and CustomNav ---
         (When Tabs are showing BELOW ActionBar, is handled at the end) */
        int actionViewResId = Resources.getSystem().getIdentifier("action_bar", "id", "android"); // @see https://dev59.com/0mIj5IYBdhLWcg3wpmsH
        View actionBarView = activity.findViewById(actionViewResId); // returns instance of com.android.internal.widget.ActionBarView (inaccessible)
        if (actionBarView != null) {
            int visibility = visible ? View.VISIBLE : View.INVISIBLE; // not GONE, so it still takes space in ActionBar layout

            // handle tabs navigation
            Field mTabScrollViewField = actionBarView.getClass().getDeclaredField("mTabScrollView");
            if (mTabScrollViewField != null) {
                mTabScrollViewField.setAccessible(true);
                View mTabScrollView = (View) mTabScrollViewField.get(actionBarView); // instance of com.android.internal.widget.ScrollingTabContainerView (inaccessible)
                if (mTabScrollView != null)
                    mTabScrollView.setVisibility(visibility);
            }

            // handle Spinner navigation
            Field mSpinnerField = actionBarView.getClass().getDeclaredField("mSpinner"); // resp. mListNavLayout
            if (mSpinnerField != null) {
                mSpinnerField.setAccessible(true);
                View mSpinner = (View) mSpinnerField.get(actionBarView); // instance of android.widget.Spinner
                if (mSpinner != null)
                    mSpinner.setVisibility(visibility);
            }

            // handle Custom navigation
            Field mCustomNavViewField = actionBarView.getClass().getDeclaredField("mCustomNavView"); // resp. mListNavLayout
            if (mCustomNavViewField != null) {
                mCustomNavViewField.setAccessible(true);
                View mCustomNavView = (View) mCustomNavViewField.get(actionBarView);
                if (mCustomNavView != null)
                    mCustomNavView.setVisibility(visibility);
            }
        }
        // 2. --- If the Tabs are BELOW ActionBar (narrow screens) ---
        ViewParent actionBarContainer = actionBarView.getParent(); // parent of ActionBarView is com.android.internal.widget.ActionBarContainer (inaccessible)
        Field mTabContainerField = actionBarContainer.getClass().getDeclaredField("mTabContainer");
        if (mTabContainerField != null) {
            mTabContainerField.setAccessible(true);
            View mmTabContainer = (View) mTabContainerField.get(actionBarContainer);
            if (mmTabContainer != null)
                mmTabContainer.setVisibility(visible ? View.VISIBLE : View.GONE); // now use GONE, so the mTabContainer below Actionbar does not take space in layout
        }

    } catch (Exception ex) {
        // TODO Handle exception...
    }
}
WordPress的Android版本已经实现了你所提及的问题。
他们开发了一个名为“HorizontalTabView”的TabView模拟版本。它恰好符合你(也包括我)的需求。
WordPress的Github链接如下:https://github.com/WordPress/WordPress
相关源代码:
希望这个提示有所帮助。
DrawerLayout drawerLayoutMenu =(DrawerLayout) findViewById(R.id.drawer_layout_menu);
RelativeLayout mDrawerPane =(RelativeLayout) findViewById(R.id.drawerPane);
我在工具栏菜单图标上调用这个函数
if (drawerLayoutMenu.isDrawerOpen(mDrawerPane)) {
    drawerLayoutMenu.closeDrawer(mDrawerPane);
} else {
        drawerLayoutMenu.openDrawer(mDrawerPane);
}
XML 文件
<android.support.v4.widget.DrawerLayout
        android:id="@+id/drawer_layout_menu"
        xmlns:android="http://schemas.android.com/apk/res/android"
        xmlns:app="http://schemas.android.com/apk/res-auto"
        xmlns:tools="http://schemas.android.com/tools"
        android:layout_width="match_parent"
        android:layout_height="match_parent">

        <FrameLayout
            android:id="@+id/content_frame"
            android:layout_width="match_parent"
            android:layout_height="match_parent">

            <LinearLayout
                android:layout_width="match_parent"
                android:layout_height="match_parent"
                android:orientation="vertical">

                <android.support.v7.widget.Toolbar
                    android:id="@+id/toolbar"
                    android:layout_width="match_parent"
                    android:layout_height="?attr/actionBarSize"
                    android:background="?attr/colorPrimary"
                    app:layout_scrollFlags="enterAlways"
                    app:popupTheme="@style/AppTheme.PopupOverlay">

                </android.support.v7.widget.Toolbar>

                <android.support.design.widget.TabLayout
                    android:id="@+id/tabs"
                    android:layout_width="match_parent"
                    android:layout_height="wrap_content"/>

                <android.support.v4.view.ViewPager
                    android:id="@+id/container"
                    android:layout_width="match_parent"
                    android:layout_height="match_parent"/>
            </LinearLayout>
        </FrameLayout>

        <!--for menu-->

        <RelativeLayout
            android:id="@+id/drawerPane"
            android:layout_width="270dp"
            android:layout_height="match_parent"
            android:orientation="vertical"
            android:background="#fff"
            android:layout_gravity="left|start">

            <!--you can add a ListView-->

        </RelativeLayout>

    </android.support.v4.widget.DrawerLayout>
ActionBar导航抽屉和SwipeTabs不能同时使用。您应该使用ActionBar实现导航抽屉,使用简单的TabHosts实现SwipeTabs。您可以使用TabHost作为选项卡,并使用片段作为每个选项卡内部视图。应使用片段通过ViewPager提供滚动/滑动效果。通过它们的方法将选项卡和ViewPager连接在一起。
<LinearLayout xmlns:android="http://schemas.android.com/apk/res/android"
android:layout_width="match_parent"
android:layout_height="match_parent"
android:orientation="vertical" >

<TabHost
    android:id="@+id/tabHost"
    android:layout_width="match_parent"
    android:layout_height="match_parent" >

    <LinearLayout
        android:layout_width="match_parent"
        android:layout_height="match_parent"
        android:orientation="vertical" >

        <HorizontalScrollView
            android:layout_width="fill_parent"
            android:layout_height="wrap_content"
            android:fillViewport="true"
            android:scrollbars="none" >

            <TabWidget
                android:id="@android:id/tabs"
                android:layout_width="wrap_content"
                android:layout_height="wrap_content" >
            </TabWidget>
        </HorizontalScrollView>

        <FrameLayout
            android:id="@android:id/tabcontent"
            android:layout_width="match_parent"
            android:layout_height="match_parent" >

            <android.support.v4.view.ViewPager
                android:id="@+id/viewPager_home"
                android:layout_width="match_parent"
                android:layout_height="match_parent" />
        </FrameLayout>
    </LinearLayout>
</TabHost>