如何设置形状的不透明度?

102

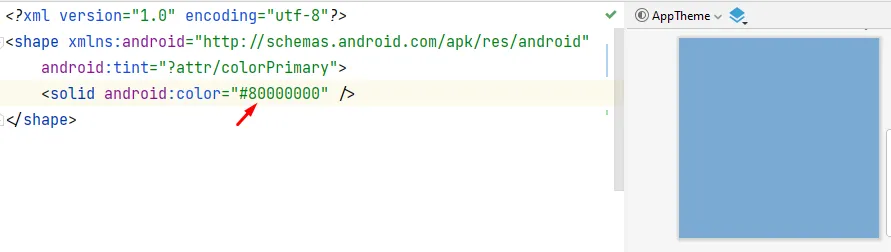
我已经知道如何设置背景图像的不透明度,但我需要设置我的形状对象的不透明度。

在我的Android应用程序中,我像这样实现:

enter image description here

我想让这个黑色区域稍微透明一点,就像这里一样,例如我可以通过这个“Welcome…”看到圆形:
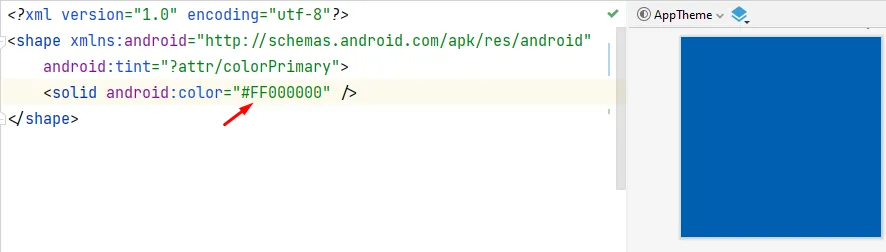
enter image description here

这是我的形状代码:

<?xml version="1.0" encoding="UTF-8"?>
<shape xmlns:android="http://schemas.android.com/apk/res/android"
    android:id="@+id/shape_my"">
    <stroke android:width="4dp" android:color="#636161" />
    <padding android:left="20dp"
        android:top="20dp"
        android:right="20dp"
        android:bottom="20dp" />
    <corners android:radius="24dp" />
</shape>

我该如何做到这一点?


2
这里将会用到形状对象的代码。 - Octavian Helm
6个回答

227
一般情况下,当你创建形状时,只需要定义一个略带透明度的颜色即可。你可以通过设置颜色的alpha通道来实现这一点。代码中,#FF000000代表纯黑色,而#00000000代表100%透明的黑色(显然不再是黑色了)。颜色方案如下:#AARRGGBB,其中A代表alpha通道,R代表红色,G代表绿色,B代表蓝色。如果你在Java中设置颜色,同样会用到0xFF000000。更新:在你的情况下,你需要添加一个solid节点,就像下面这样。
<?xml version="1.0" encoding="UTF-8"?>
<shape xmlns:android="http://schemas.android.com/apk/res/android"
    android:id="@+id/shape_my">
    <stroke android:width="4dp" android:color="#636161" />
    <padding android:left="20dp"
        android:top="20dp"
        android:right="20dp"
        android:bottom="20dp" />
    <corners android:radius="24dp" />
    <solid android:color="#88000000" />
</shape>
这里的颜色是半透明黑色。

这很奇怪...无论我将颜色设置为什么值,我的形状都是完全透明的 =( - lomza
3
在我的理解中,不透明度只能应用于视图或图片上... 因为当我在我的LinearLayout中使用android:background="#88000000"而不是android:background="@drawable/shape"时它可以工作。 - lomza
2
它也适用于形状。你试过我上面发布的内容了吗? - Octavian Helm
1
是的,但它不起作用。你在你的机器上尝试了所有这些代码吗? - lomza
哦,天啊!你知道错在哪里了吗???是android:color="#88000000",不仅仅是color="#88000000"!哈哈,再次感谢你! - lomza
显示剩余4条评论

16

我们可以使用颜色状态列表来定义alpha值,而不是将alpha转换为十六进制值。

res/values/colors.xml

<color name="colorPrimary">#0000FF</color>

res/color/color_primary_20.xml

<?xml version="1.0" encoding="utf-8"?>
<selector xmlns:android="http://schemas.android.com/apk/res/android">
    <item android:alpha="0.2" android:color="?attr/colorPrimary" />
</selector>

res/drawable/a_shape.xml

<?xml version="1.0" encoding="utf-8"?>
<shape xmlns:android="http://schemas.android.com/apk/res/android"
    android:shape="oval">
    <stroke
        android:width="2dp"
        android:color="@color/color_primary_20" />
</shape>

很酷,正是我正在寻找的! - TwiXter
我得到了AAPT:error:resource attr / accent(又名com.example.project:attr / colorPrimary)未找到。 - Martin Thoma

4
请使用以下代码作为progress.xml文件:
<layer-list xmlns:android="http://schemas.android.com/apk/res/android">

    <item android:id="@android:id/background">
        <shape>
            <corners android:radius="5dip" />
            <gradient
                    android:startColor="#ff9d9e9d"
                    android:centerColor="#ff5a5d5a"
                    android:centerY="0.75"
                    android:endColor="#ff747674"
                    android:angle="270"
            />
        </shape>
    </item>

    <item android:id="@android:id/secondaryProgress">
        <clip>
            <shape>
                <solid android:color="#00000000" />
            </shape>
        </clip>
    </item>

    <item android:id="@android:id/progress">
        <clip>
            <shape>
                <solid android:color="#00000000" />
            </shape>
        </clip>
    </item>

</layer-list>

where:

  • "progress" 表示滑块前面的当前进度,"secondaryProgress" 表示滑块后面的进度。
  • color="#00000000" 表示完全透明。
  • 注意:上面的文件来自默认的 Android 资源,针对的是 2.3.7 版本,在 Android 源码中可以找到路径:frameworks/base/core/res/res/drawable/progress_horizontal.xml。如果你使用的是更新版本,需要找到与你的 Android 版本相应的 seekbar 默认 drawable 文件。

之后将其应用于包含此 XML 的布局中:

<SeekBar
    android:id="@+id/myseekbar"
    ...
    android:progressDrawable="@drawable/progress"
    />

你可以通过使用自定义图标 seek_thumb.png 来定制拇指:

android:thumb="@drawable/seek_thumb"

2

使用这个,我已经将它写入我的应用程序中。

<?xml version="1.0" encoding="utf-8"?>
<!--  res/drawable/rounded_edittext.xml -->
<shape xmlns:android="http://schemas.android.com/apk/res/android"
    android:shape="rectangle" android:padding="10dp">
    <solid android:color="#882C383E"/>
    <corners
        android:bottomRightRadius="5dp"
        android:bottomLeftRadius="5dp"
        android:topLeftRadius="5dp"
        android:topRightRadius="5dp"/>
</shape>

1

要使用主题属性颜色(例如?attr/colorSurface)设置alpha:

<shape xmlns:android="http://schemas.android.com/apk/res/android"
    android:tint="?attr/colorSurface"> <!-- specify your tint color -->
    <solid android:color="#AA000000" /> <!-- instead of `AA` specify your alpha level -->
</shape>

Full alpha changeel

enter image description here


0
如果有人正在尝试使用CardView,可以尝试以下代码。
<androidx.cardview.widget.CardView
            android:id="@+id/cvView"
            android:layout_width="48dp"
            android:layout_height="48dp"
            android:layout_marginBottom="16dp"
            android:shape="ring"
            android:visibility="visible"
            app:cardCornerRadius="75dp"
            app:cardBackgroundColor="@android:color/transparent"
            app:layout_constraintBottom_toTopOf="@id/fab"
            app:layout_constraintEnd_toEndOf="@+id/fab"
            app:layout_constraintStart_toStartOf="@+id/fab">

            <ImageView
                android:id="@+id/ivImage"
                android:orientation="horizontal"
                android:layout_width="48dp"
                android:layout_height="48dp"
                android:layout_gravity="center"
                android:padding="@dimen/_10sdp"
                android:background="@drawable/custom_circle_shape"
                android:src="@drawable/ic_fab_rpt"/>

</androidx.cardview.widget.CardView>

custom_circle_shape.xml

<?xml version="1.0" encoding="utf-8"?>
<shape xmlns:android="http://schemas.android.com/apk/res/android"
    android:shape="oval">
    <solid android:color="#4D4953D2" />
    <corners android:radius="40dp" />
    <stroke
        android:width="@dimen/_2sdp"
        android:color="#7882FA" />
</shape>

网页内容由stack overflow 提供, 点击上面的
可以查看英文原文,
原文链接