如何使用XML布局在文本周围添加边框,如图所示
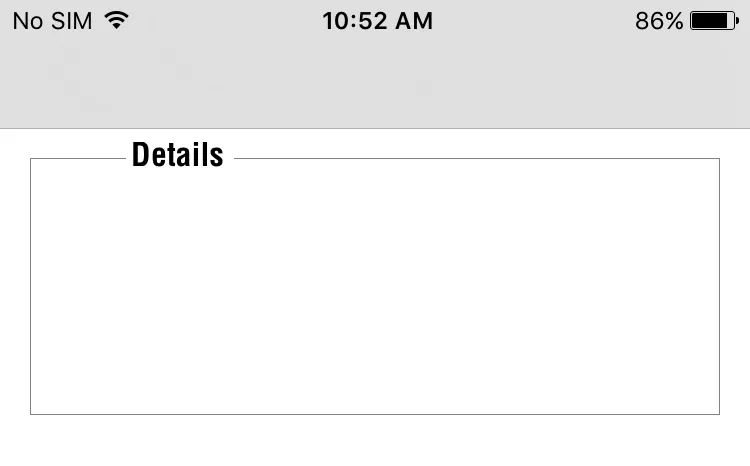
我尝试将边框添加到布局中,但它与文本重叠。
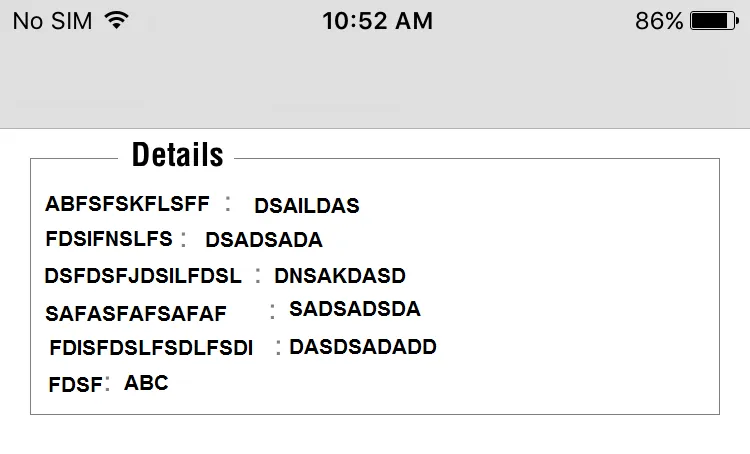
你可以尝试这个布局,它会按照你的要求反映出来。
    <?xml version="1.0" encoding="utf-8"?>
    <RelativeLayout xmlns:android="http://schemas.android.com/apk/res/android"
        android:layout_width="match_parent"
        android:layout_height="match_parent"
        android:layout_margin="15dp" >

        <LinearLayout
            android:layout_width="match_parent"
            android:layout_height="wrap_content"
            android:background="@drawable/border"
            android:layout_marginTop="10dp"
            android:orientation="vertical"
            android:padding="15dp">

            <TextView
                android:layout_width="wrap_content"
                android:layout_height="wrap_content"
                android:textStyle="bold"
                android:text="Label 1: Value 1"/>

            <TextView
                android:layout_width="wrap_content"
                android:layout_height="wrap_content"
                android:textStyle="bold"
                android:text="Label 2: Value 2"/>

            <TextView
                android:layout_width="wrap_content"
                android:layout_height="wrap_content"
                android:textStyle="bold"
                android:text="Label 3: Value 3"/>

        </LinearLayout>

        <TextView
            android:layout_width="wrap_content"
            android:layout_height="wrap_content"
            android:layout_alignParentTop="true"
            android:text="   Details   "
            android:layout_marginLeft="15dp"
            android:background="#ffffff"
            android:textSize="17sp" />

    </RelativeLayout>
border.xml的XML
<?xml version="1.0" encoding="utf-8"?>
<shape xmlns:android="http://schemas.android.com/apk/res/android"
    android:shape="rectangle" >
    <stroke
        android:width="2dp"
        android:color="#cdcdcd" />
</shape>
希望这能在某种程度上对你有所帮助。
要给Android TextView添加边框,我们需要创建一个包含矩形形状的xml文件,将其放置在drawable文件夹下,并将其设置为TextView的背景。
<stroke> tag is used to set the border width and color.
border.xml
<shape xmlns:android="http://schemas.android.com/apk/res/android"
android:shape="rectangle" >
<stroke
android:width="2dp"
android:color="#000000" />
</shape>
activity_main.xml
<RelativeLayout xmlns:android="http://schemas.android.com/apk/res/android"
 android:layout_width="fill_parent"
 android:layout_height="fill_parent"
 android:padding="10dp" xmlns:tools="http://schemas.android.com/tools"   >
<TextView
android:id="@+id/textView2"
android:layout_width="match_parent"
android:layout_height="30dp"
android:layout_centerHorizontal="true"
android:layout_centerVertical="true"
android:background="@drawable/border"
android:gravity="center"
android:text="Android Programming is fun!!" />
</RelativeLayout>
**android:background="@drawable/border"**
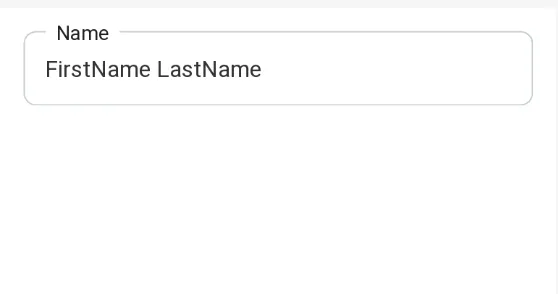
众所周知,ConstraintLayout 在性能方面表现良好且高效,因此以下是一个使用 ConstraintLayout 的代码。
<?xml version="1.0" encoding="utf-8"?>
<layout xmlns:android="http://schemas.android.com/apk/res/android"
        xmlns:app="http://schemas.android.com/apk/res-auto"
        xmlns:tools="http://schemas.android.com/tools">

    <androidx.constraintlayout.widget.ConstraintLayout
        android:layout_width="match_parent"
        android:layout_height="match_parent"
        android:background="@color/color_white">

        <LinearLayout
            android:id="@+id/ll_user_name"
            android:layout_width="match_parent"
            android:layout_height="wrap_content"
            android:layout_margin="16dp"
            android:layout_marginStart="16dp"
            android:layout_marginTop="16dp"
            android:layout_marginEnd="16dp"
            android:background="@drawable/rectangle_with_circular_border"
            android:orientation="vertical"
            android:padding="15dp"
            app:layout_constraintEnd_toEndOf="parent"
            app:layout_constraintStart_toStartOf="parent"
            app:layout_constraintTop_toTopOf="parent">

            <TextView
                android:id="@+id/tv_user_name"
                style="@style/TextViewStyle"
                android:layout_width="wrap_content"
                android:layout_height="wrap_content"
                android:textColor="@color/color_333333"
                android:textSize="@dimen/sixteen_sp"
                tools:text="FirstName LastName"/>
        </LinearLayout>

        <TextView
            android:id="@+id/tv_user_name_title"
            style="@style/TextViewStyle"
            android:layout_width="wrap_content"
            android:layout_height="wrap_content"
            android:layout_marginStart="32dp"
            android:layout_marginTop="8dp"
            android:layout_marginEnd="8dp"
            android:textSize="@dimen/fourteen_sp"
            android:background="@color/color_white"
            android:text="  Name  "
            app:layout_constraintEnd_toEndOf="parent"
            app:layout_constraintHorizontal_bias="0.0"
            app:layout_constraintStart_toStartOf="parent"
            app:layout_constraintTop_toTopOf="parent"/>

    </androidx.constraintlayout.widget.ConstraintLayout>
</layout>
  <?xml version="1.0" encoding="utf-8"?>

    <shape xmlns:android="http://schemas.android.com/apk/res/android"
        android:shape="rectangle">

        <corners android:radius="2dp" />
        <stroke
            android:width="2px"
            android:color="@color/colorGreyBrown" />
        <solid android:color="#ffffff" />
    </shape>
    <TextView
                android:id="@+id/Textview_register_als"
                android:layout_width="match_parent"
                android:layout_height="wrap_content"
     android:background="@drawable/foodynet_rounded_corner_brown_color_border_white_bg"
                android:gravity="center"
                android:text="@string/string_text_register"
                android:textColor="@color/colorGreyBrown"
                android:textSize="@dimen/text" />
<?xml version="1.0" encoding="utf-8"?>
<LinearLayout xmlns:android="http://schemas.android.com/apk/res/android"
android:layout_width="match_parent"
android:layout_height="wrap_content"
android:orientation="vertical">

<FrameLayout
    android:layout_width="match_parent"
    android:layout_height="match_parent"
    android:padding="16dip">

    <TextView
        android:id="@+id/txt_notificaiton"
        android:layout_width="match_parent"
        android:layout_height="wrap_content"
        android:layout_margin="10dip"
        android:background="@drawable/button_effect_white"
        android:padding="16dip"
        android:text=""
        android:textColor="@drawable/text_color_white"
        android:textSize="22dip" />

    <TextView
        android:id="@+id/txt_createddateandtime"
        android:layout_width="wrap_content"
        android:layout_height="wrap_content"
        android:layout_gravity="right|bottom"
        android:padding="16dp"
        android:text=""
        android:textSize="12dip" />

    <TextView
        android:id="@+id/iv_read_unread"
        android:layout_width="wrap_content"
        android:layout_height="wrap_content"
        android:layout_gravity="left|top"
        android:layout_marginRight="10dp"
        android:background="@color/white"
        android:text="Details" />

</FrameLayout>
</LinearLayout>
      textbackground.xml
      <?xml version="1.0" encoding="utf-8"?>
      <selector xmlns:android="http://schemas.android.com/apk/res/android" >

<item android:state_pressed="true">
<shape  >
<solid android:color="@color/white"/>
<corners
android:radius="1dp"/>
</shape>
</item>

<item android:state_focused="true" >
<shape xmlns:android="http://schemas.android.com/apk/res/android" >
<solid android:color="@color/white"/>
<corners
android:radius="1dp"/>
</shape>
 </item>

<item android:state_focused="false" >


<shape xmlns:android="http://schemas.android.com/apk/res/android" >

<solid android:color="#c38416"/>
<stroke
    android:width="3dp"
    android:color="@color/bordercolor" />

<corners android:radius="3dp" />

<padding
    android:bottom="6dp"
    android:left="6dp"
    android:right="6dp"
    android:top="6dp" />

</shape>
 </item>

<item android:state_pressed="false" >
<shape xmlns:android="http://schemas.android.com/apk/res/android" >
<solid android:color="#c38416"/>
<corners
android:radius="1dp"
/>
</shape>
 and
  <TextView
   android:background="@drawable/textbackground"

   />