我有一个现有的Android Studio项目,想在其中使用Jetpack Compose。文档说明如何创建带有Jetpack Compose的新项目,但如何在现有项目中使用它呢?
3个回答
23
Jetpack Compose需要至少21的minSdkVersion。因此,请在您的app/build.gradle文件中添加/更新以下内容。
android{
   //...
   defaultConfig {
      minSdkVersion 21
      targetSdkVersion 29
      //...
   }
  //...
 }
同时,您需要使用Android Studio(从金丝雀通道下载)才能使用jetpack-compose的最新功能。
对于现有项目的最简方法
步骤1:
在项目窗口中,右键单击要包含组合活动的软件包 -> 组成 -> 空组合活动。
或者
File -> new -> compose -> Empty compose activity.
步骤2
将会出现一个对话窗口,请填写必填字段并点击完成。
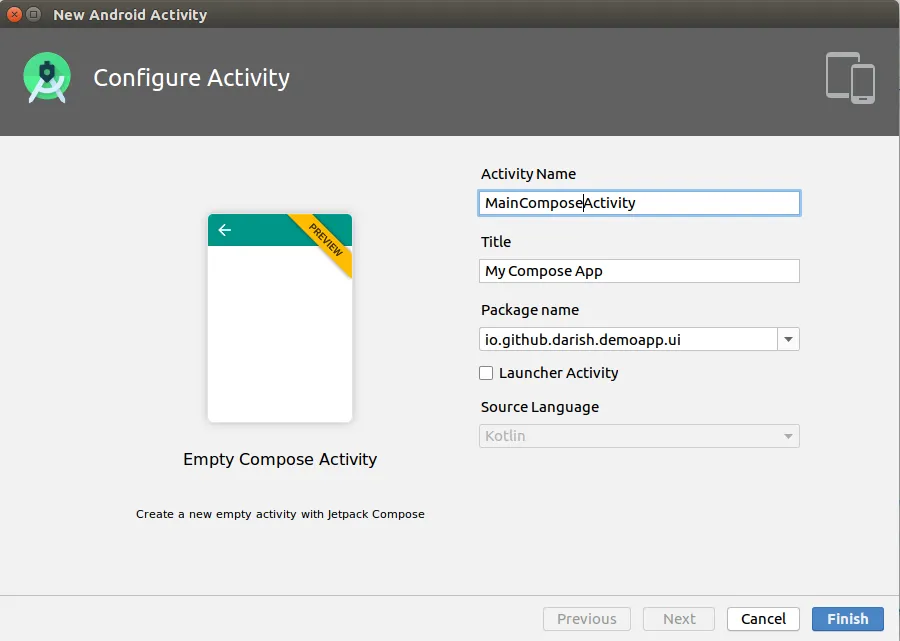
就是这样。
现有项目的手动配置
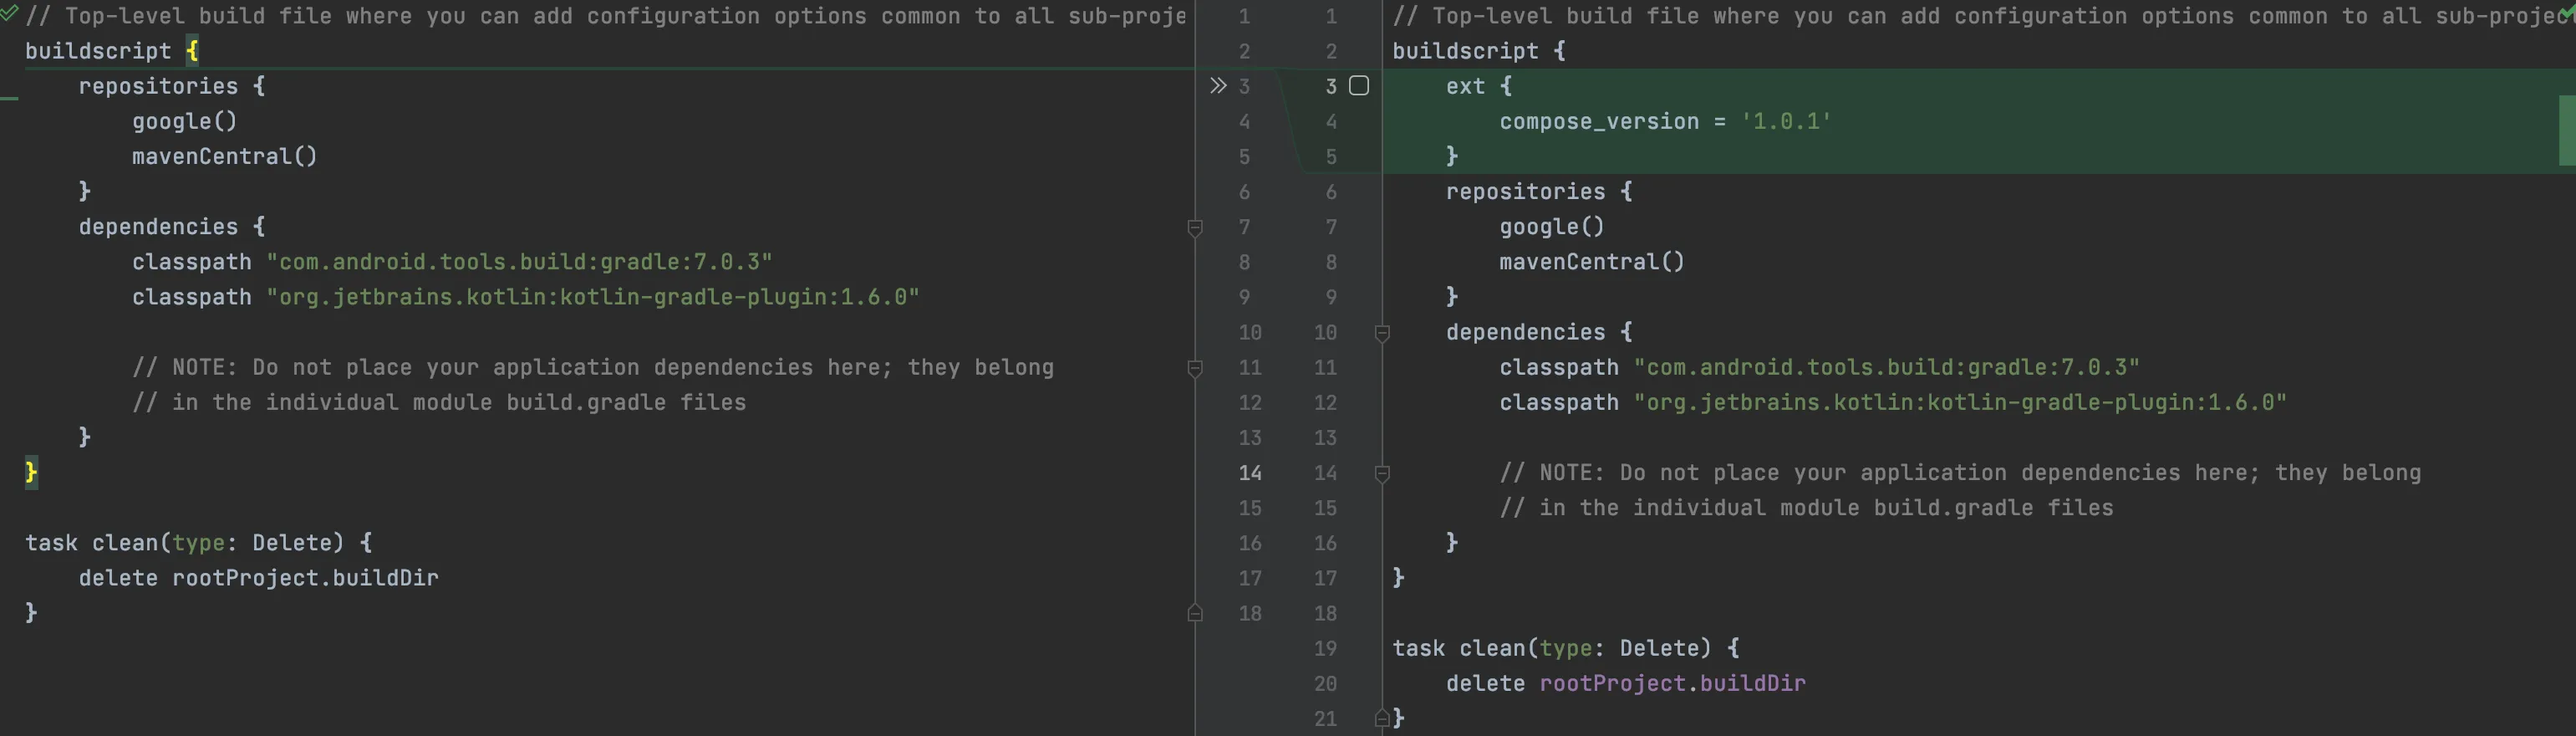
步骤1:
在您的project/build.gradle文件中使用最新版本的 kotlin 和 gradle 插件。
示例:
buildscript {
     ext {
    compose_version = '1.3.1'
}

    repositories {
        google()
        jcenter()
    }
    dependencies {
        classpath 'com.android.tools.build:gradle:7.1.0-alpha02'
    classpath "org.jetbrains.kotlin:kotlin-gradle-plugin:1.5.10"
    }
}

allprojects {
    repositories {
        google()
        jcenter()
    }
}
在你的project/app/build.gradle文件中,添加以下内容:
android{
   //...
   defaultConfig {
      minSdkVersion 21
      targetSdkVersion 30
      //...
   }
  //...

  kotlinOptions {
       jvmTarget = "1.8"
        useIR = true
  }

  buildFeatures {
    compose true
  }
  composeOptions {
    kotlinCompilerExtensionVersion compose_version
    kotlinCompilerVersion '1.4.32'
}
}


dependencies {
  implementation 'androidx.core:core-ktx:1.5.2'
implementation 'androidx.appcompat:appcompat:1.3.0'
implementation 'com.google.android.material:material:1.3.0'
implementation "androidx.compose.ui:ui:$compose_version"
implementation "androidx.compose.material:material:$compose_version"
implementation "androidx.compose.ui:ui-tooling:$compose_version"
implementation 'androidx.lifecycle:lifecycle-runtime-ktx:2.3.1'
implementation 'androidx.activity:activity-compose:1.3.0-beta1'
testImplementation 'junit:junit:4.13.2'
androidTestImplementation 'androidx.test.ext:junit:1.1.2'
androidTestImplementation 'androidx.test.espresso:espresso-core:3.3.0'
androidTestImplementation "androidx.compose.ui:ui-test-junit4:$compose_version"
}
步骤2:将撰写活动添加到您的清单文件中。
 <application
    android:label="@string/app_name"
     <!-- ... -->
     >
     <activity
        android:name=".MainActivity"
        android:exported="true"
        android:label="@string/app_name"
        android:theme="@style/Theme.MyApp.NoActionBar">
        <intent-filter>
            <action android:name="android.intent.action.MAIN" />

            <category android:name="android.intent.category.LAUNCHER" />
        </intent-filter>
    </activity>

      <!-- ... -->
  </application>
步骤3:
创建Jetpack Compose活动。
import android.os.Bundle
import androidx.appcompat.app.AppCompatActivity
import androidx.compose.Composable
import androidx.ui.foundation.Text
import androidx.ui.core.setContent
import androidx.ui.material.MaterialTheme
import androidx.ui.tooling.preview.Preview
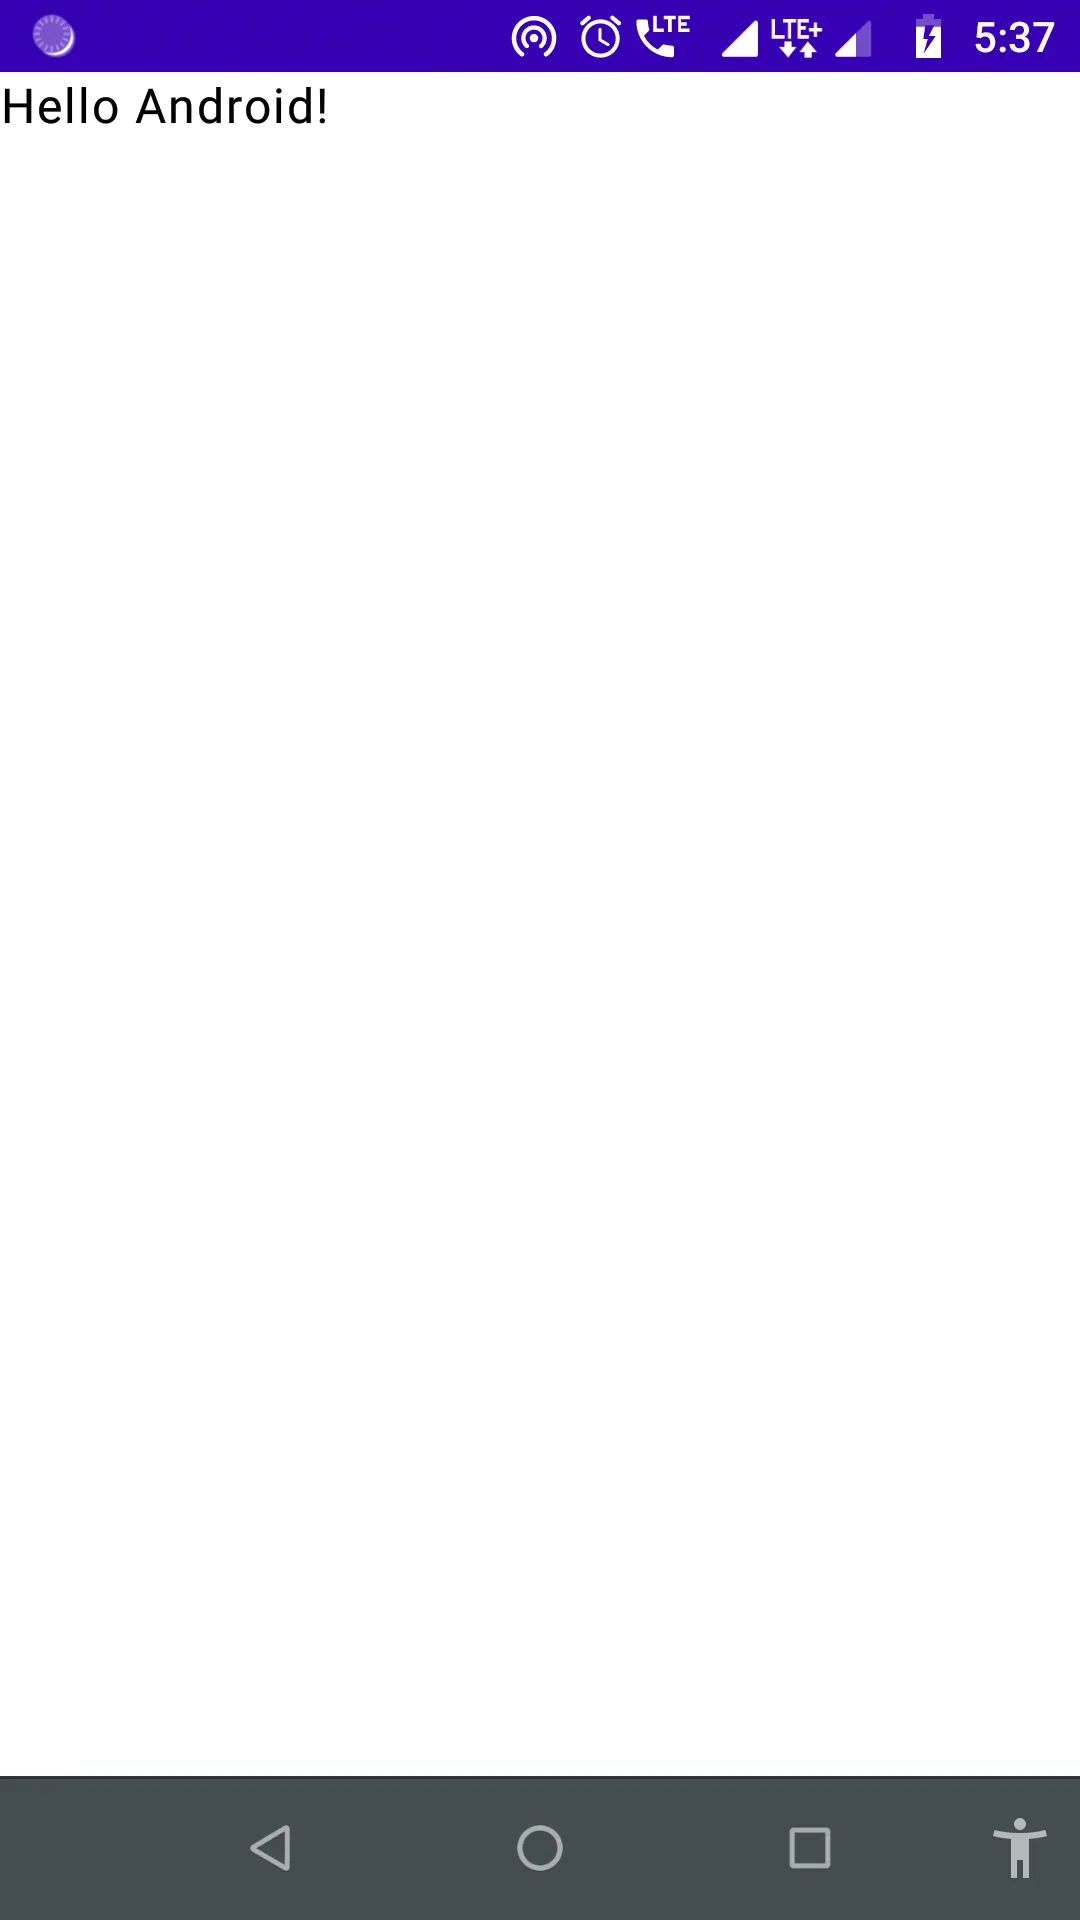
class MainComposeActivity : AppCompatActivity() {
override fun onCreate(savedInstanceState: Bundle?) {
super.onCreate(savedInstanceState)
setContent {
MaterialTheme {
Greeting("Android")
}
}
}
}
@Composable
fun Greeting(name: String) {
Text(text = "Hello $name!")
}
@Preview
@Composable
fun DefaultPreview() {
MaterialTheme {
Greeting("Android")
}
}
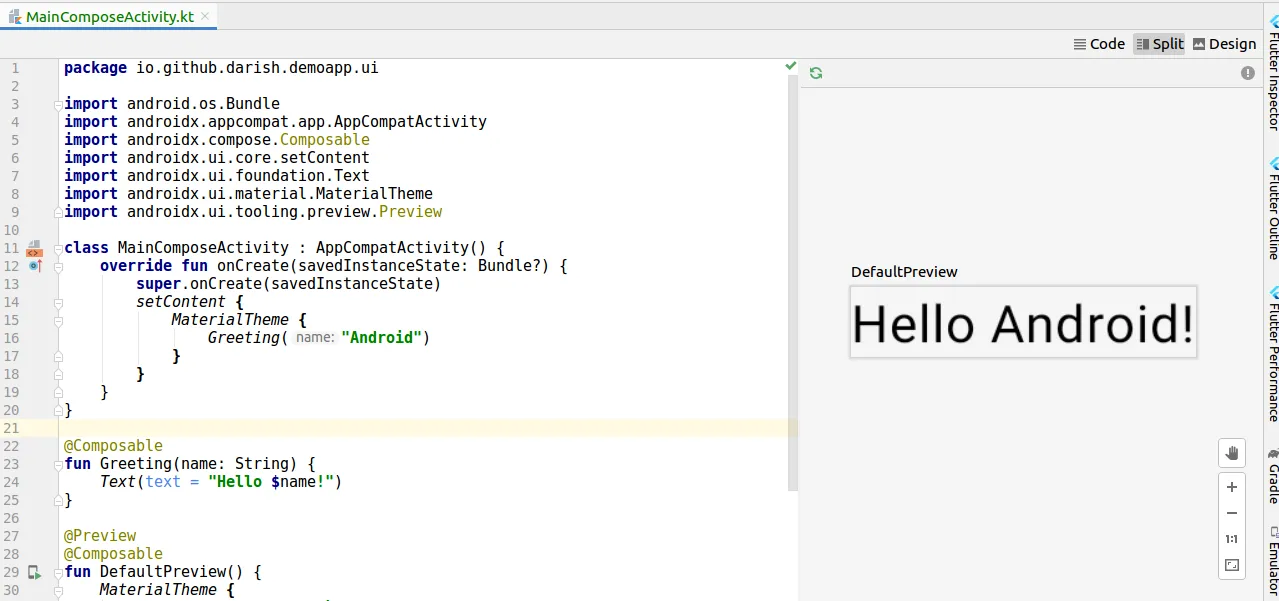
就这些。愉快的编程 :)
- Darish
1
请帮忙,我有一个已经用Java和XML编写的Android项目,我可以按照您提到的步骤进行吗? - user15919016
4
只需按照官方设置指南进行操作。
在build.gradle文件中添加:
plugins {
  id 'org.jetbrains.kotlin.android' version '1.4.0'
}

android {
    defaultConfig {
        ...
        minSdkVersion 21
    }

    buildFeatures {
        // Enables Jetpack Compose for this module
        compose true
    }
    ...

    // Set both the Java and Kotlin compilers to target Java 8.

    compileOptions {
        sourceCompatibility JavaVersion.VERSION_1_8
        targetCompatibility JavaVersion.VERSION_1_8
    }

    kotlinOptions {
        jvmTarget = "1.8"
        useIR = true
    }

    composeOptions {
        kotlinCompilerExtensionVersion "1.0.0-alpha01"
    }
}

dependencies {
    // You also need to include the following Compose toolkit dependencies.
    implementation 'androidx.compose.ui:ui:1.0.0-alpha01'
    implementation 'androidx.compose.material:material:1.0.0-alpha01'
    implementation 'androidx.ui:ui-tooling:1.0.0-alpha01'
    ...
}
从1.0.0-alpha01版本开始,您可以将Compose与现有的UI设计结合使用。
在布局中添加ComposeView:
<LinearLayout
    xmlns:android="http://schemas.android.com/apk/res/android"
    android:orientation="vertical"
    android:layout_width="match_parent"
    android:layout_height="match_parent">

    <TextView/>

    <androidx.compose.ui.platform.ComposeView
        android:id="@+id/compose_view"
        android:layout_width="match_parent"
        android:layout_height="match_parent" />

</LinearLayout>
在您的
Activity中,使用XML ID设置ComposeView,并调用setContent()来使用Compose:override fun onCreate(savedInstanceState: Bundle?) {
super.onCreate(savedInstanceState)
setContentView(R.layout.activity_main_std)
.apply {
findViewById<ComposeView>(R.id.compose_view).setContent {
MaterialTheme () {
Text(text = "Compose text", style = MaterialTheme.typography.body2)
}
}
}
}

- Gabriele Mariotti
1
你能让旧的 XML 布局预览器在包含 ComposeViews 的 XML 文件中工作吗?
在我的 Android Studio(4.2)中,预览器会因为 ComposeView 没有附加 ViewTreeLifecycleOwner 而导致 IllegalStateException 异常。 - machfour
2
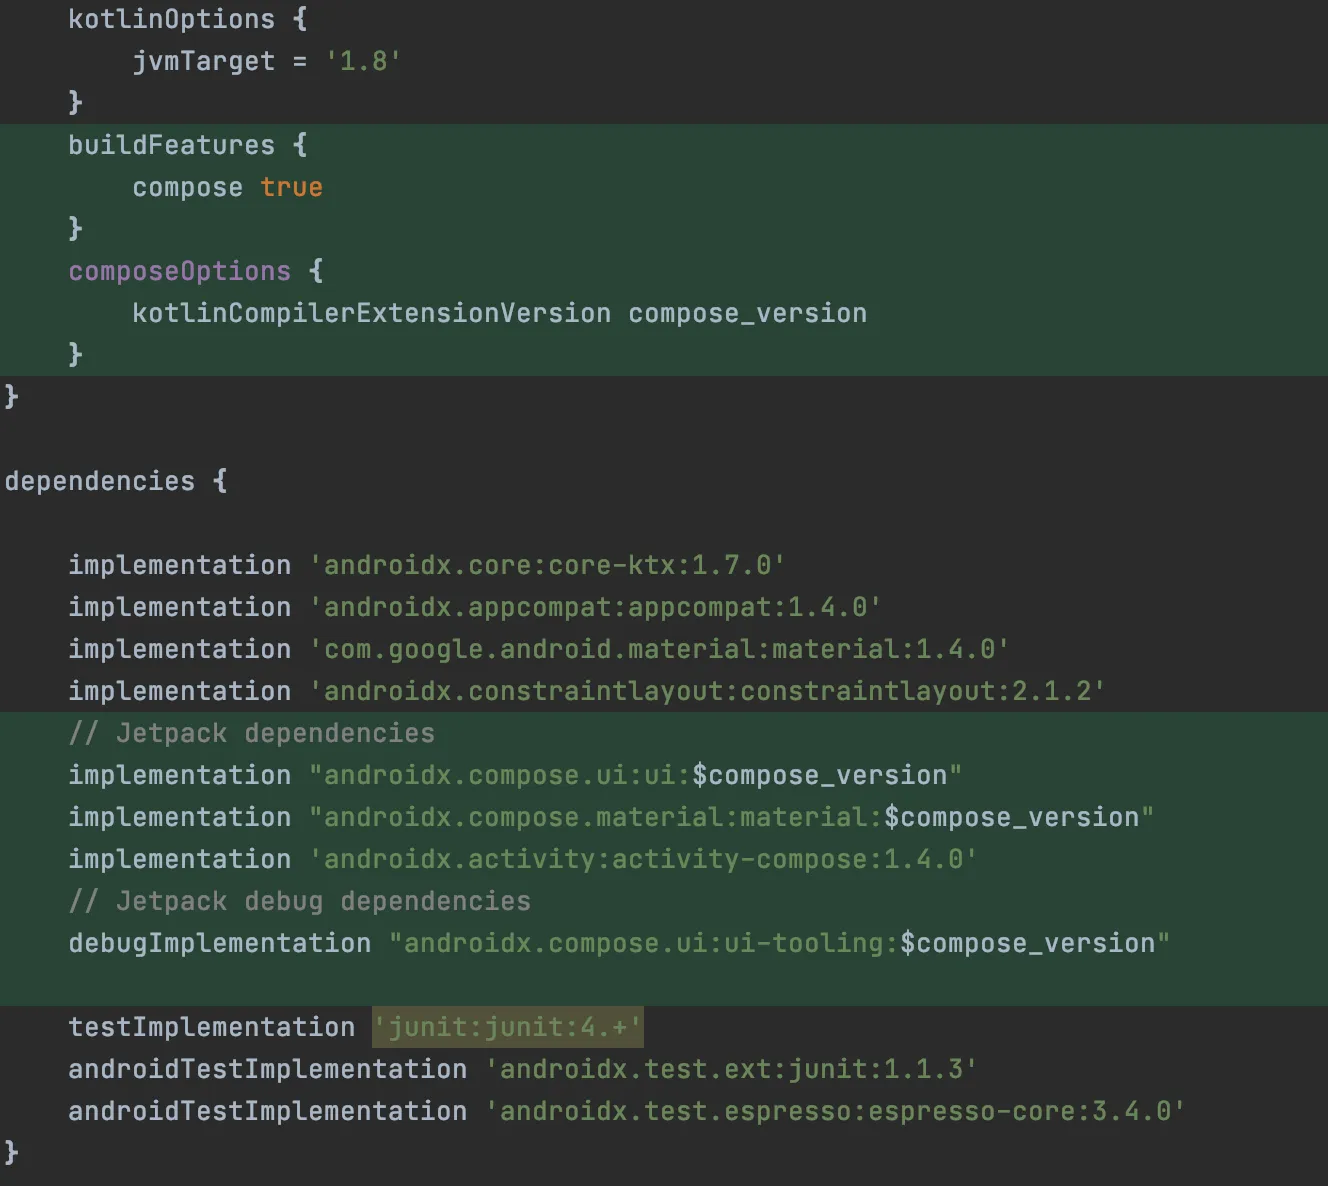
在你的根级别(root level)build.gradle文件中,在buildscript内添加Compose版本变量。
"在你的依赖项中"
ext {
    compose_version = '1.0.1'
}
buildFeatures {
    compose true
}
composeOptions {
    kotlinCompilerExtensionVersion compose_version
}
"在你的依赖项中"
// Jetpack dependencies
implementation "androidx.compose.ui:ui:$compose_version"
implementation "androidx.compose.material:material:$compose_version"
implementation 'androidx.activity:activity-compose:1.4.0'
// Jetpack debug dependencies
debugImplementation "androidx.compose.ui:ui-tooling:$compose_version"
class MainActivity : AppCompatActivity() {
override fun onCreate(savedInstanceState: Bundle?) {
    super.onCreate(savedInstanceState)
    setContent {
        // your compose code goes here
    }
  }
}
- Extremis II
网页内容由stack overflow 提供, 点击上面的可以查看英文原文,
原文链接
原文链接
- 相关问题
- 3 在现有项目中集成 Jetpack Compose
- 5 如何在Jetpack Compose LazyStaggeredGrid项目中添加Span大小
- 7 将Jetpack Compose添加到使用21以下API的项目中
- 4 为什么Jetpack Compose项目中列表项图片无法显示?
- 4 Jetpack Compose如何将可组合项切成两半?
- 11 如何将libgdx添加到现有项目中。
- 8 将Google地图API v2添加到现有项目中
- 4 现有多模块应用中的Jetpack Compose依赖项
- 3 Jetpack Compose在多模块项目中无法编译
- 17 将gif动画添加到Jetpack Compose中