我希望能够直接在工具栏上更改标题(h1,h2,h3),就像tinymce版本3一样,因为我在创建新文章时经常使用它。 我尝试在互联网上搜索,但没有找到任何答案。 请帮助我。 非常感谢。
如何在Tinymce 4的工具栏中直接添加标题(h1,h2,h3)?
24
- saurom_90
4个回答
36
这个答案来的有些晚,但也许能帮助像我一样正在寻找同样问题答案的人。我在这里阅读了这篇文章:http://blog.ionelmc.ro/2013/10/17/tinymce-formatting-toolbar-buttons/
首先,你需要创建插件:
tinyMCE.PluginManager.add('stylebuttons', function(editor, url) {
  ['pre', 'p', 'code', 'h1', 'h2', 'h3', 'h4', 'h5', 'h6'].forEach(function(name){
   editor.addButton("style-" + name, {
       tooltip: "Toggle " + name,
         text: name.toUpperCase(),
         onClick: function() { editor.execCommand('mceToggleFormat', false, name); },
         onPostRender: function() {
             var self = this, setup = function() {
                 editor.formatter.formatChanged(name, function(state) {
                     self.active(state);
                 });
             };
             editor.formatter ? setup() : editor.on('init', setup);
         }
     })
  });
});
然后在工具栏中使用它:
tinyMCE.init({
   selector: '#id',
   toolbar: "undo redo | style-p style-h1 style-h2 style-h3 style-pre style-code",
   plugins: "stylebuttons",
});
- Angel
3
14
        tinymce.init({
            toolbar: 'undo redo | alignleft aligncenter alignright alignjustify | formatselect fontselect fontsizeselect | bullist numlist | outdent indent',
         });
这是在TinyMCE 4中快速添加H1、段落和其他选项到工具栏的方法。
完整列表请参见:http://www.tinymce.com/wiki.php/Controls,特别是“核心”部分。其中显示了最常用的工具。
- guest
4
1这是针对格式选择器的,就像OP提供的截图一样。不是他所要求的内容。 - Denis de Bernardy
实际上,如果您像@guest上面所做的那样添加'formatselect'控件,您将得到这个(截至4.1):在评论中添加图像有困难。请参见http://imgur.com/po9rl9t - jomofrodo
谢谢,这对我有用。 TinyMCE现在太差了,请尽快用Summernote.js替换它 哈哈 - Andy
2据我理解,问题是如何将标题按钮直接放在工具栏上,这意味着每种类型的标题都应该有一个单独的按钮。从这个意义上讲,答案并没有解决问题。 - Serg
12
以下方法对我有用:
tinymce.init({
    toolbar: 'formatselect',
    block_formats: 'Paragraph=p;Heading 2=h2;Heading 3=h3;Heading 4=h4;',
});
编辑器将会长成这个样子:

- atoms
1
这种方法非常简单。 - Nguyen
4
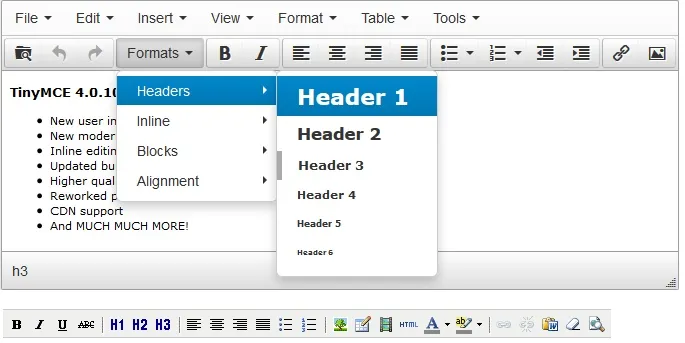
参考TINYMCE论坛上的这个问题:
http://www.tinymce.com/forum/viewtopic.php?id=32801
在配置中使用这些参数。
style_formats: [
            {title: 'Headers', items: [
                {title: 'h1', block: 'h1'},
                {title: 'h2', block: 'h2'},
                {title: 'h3', block: 'h3'},
                {title: 'h4', block: 'h4'},
                {title: 'h5', block: 'h5'},
                {title: 'h6', block: 'h6'}
            ]},

            {title: 'Inline', items: [
                {title: 'Bold', inline: 'b', icon: 'bold'},
                {title: 'Italic', inline: 'i', icon: 'italic'},
                {title: 'Underline', inline: 'span', styles : {textDecoration : 'underline'}, icon: 'underline'},
                {title: 'Strikethrough', inline: 'span', styles : {textDecoration : 'line-through'}, icon: 'strikethrough'},
                {title: 'Superscript', inline: 'sup', icon: 'superscript'},
                {title: 'Subscript', inline: 'sub', icon: 'subscript'},
                {title: 'Code', inline: 'code', icon: 'code'},
            ]},

            {title: 'Blocks', items: [
                {title: 'Paragraph', block: 'p'},
                {title: 'Blockquote', block: 'blockquote'},
                {title: 'Div', block: 'div'},
                {title: 'Pre', block: 'pre'}
            ]},

            {title: 'Alignment', items: [
                {title: 'Left', block: 'div', styles : {textAlign : 'left'}, icon: 'alignleft'},
                {title: 'Center', block: 'div', styles : {textAlign : 'center'}, icon: 'aligncenter'},
                {title: 'Right', block: 'div', styles : {textAlign : 'right'}, icon: 'alignright'},
                {title: 'Justify', block: 'div', styles : {textAlign : 'justify'}, icon: 'alignjustify'}
            ]}
        ]
- SequenceDigitale.com
网页内容由stack overflow 提供, 点击上面的可以查看英文原文,
原文链接
原文链接
editor.ui.registry.addButton和onAction而不是onClick。 https://www.tiny.cloud/docs/demo/custom-toolbar-button/ - Jan Matuszewski