如何使用OAuth2保护两个Spring Boot微服务之间的通信?

4

我正在学习如何使用基本身份验证和OAuth2 JWT令牌验证保护微服务。我使用基本身份验证实施了它,现在我想将其转换为OAuth2身份验证。

以下是使用基本身份验证来保护这两个微服务之间通信的实现。

微服务1 - REST API

@Configuration
@Getter
public class DemoApiConfiguration {
    @Value("${demo.api.credentials.username}")
    private String username;

    @Value("${demo.api.credentials.password}")
    private String password;
}

SecurityConfigurer类:

@Configuration
@RequiredArgsConstructor
public class SecurityConfigurer extends WebSecurityConfigurerAdapter {
    private final DemoApiConfiguration apiConfig;

    @Override
    protected void configure(HttpSecurity http) throws Exception {
        http
                .csrf().disable()
                .authorizeRequests().anyRequest().authenticated()
                .and()
                .httpBasic();
    }

    @Bean
    public UserDetailsService userDetailsService(PasswordEncoder passwordEncoder) {

        UserDetails theUser = User.withUsername(apiConfig.getUsername())
                .password(passwordEncoder.encode(apiConfig.getPassword())).roles("USER").build();

        InMemoryUserDetailsManager userDetailsManager = new InMemoryUserDetailsManager();
        userDetailsManager.createUser(theUser);

        return userDetailsManager;
    }

    @Bean
    public PasswordEncoder passwordEncoder() {
        return new BCryptPasswordEncoder();
    }
}

控制器类:

@RestController
@RequestMapping("/rest/api/v1")
public class HomeController {

    @GetMapping("/products")
    public String home() {
        return "These are products!";
    }
}

application.yml:

demo:
  api:
    credentials:
      username: ${demo_api_username:john}
      password: ${demo_api_password:test}

微服务2 - REST消费者

@Configuration
@Getter
public class DemoApiConfiguration {
    @Value("${demo.api.credentials.username}")
    private String username;

    @Value("${demo.api.credentials.password}")
    private String password;

    @Value("${demo.api.credentials.basePath}")
    private String basePath;
}

WebConfigurer 类:

@Configuration
@RequiredArgsConstructor
public class WebConfigurer {

    private final DemoApiConfiguration apiConfig;

    @Bean
    public ApiClient restTemplate() {
        RestTemplate restTemplate = new RestTemplate();
        ApiClient apiClient = new ApiClient(restTemplate);
        apiClient.setBasePath(apiConfig.getBasePath());

        return apiClient;
    }

    public String getAuthorization() {
        return (!StringUtils.isEmpty(apiConfig.getUsername()) &&
                !StringUtils.isEmpty(apiConfig.getPassword())) ?
                "Basic " + Base64Utils.encodeToString((
                        apiConfig.getUsername() + ":" + apiConfig.getPassword())
                        .getBytes()) :
                null;
    }
}

ApiClient 类:

@Getter
@RequiredArgsConstructor
@Slf4j
public class ApiClient {

    private static final String AUTHORIZATION_HEADER = "Authorization";
    private final RestTemplate restTemplate;
    private String basePath;

    public ApiClient setBasePath(String basePath) {
        this.basePath = basePath;
        return this;
    }

    public String invokeApi(String path, String credentials) {
        UriComponentsBuilder builder = UriComponentsBuilder.fromHttpUrl(basePath).path(path);

        RequestEntity.BodyBuilder requestBuilder =
                RequestEntity.method(HttpMethod.GET, builder.build().toUri());

        requestBuilder.contentType(MediaType.APPLICATION_JSON);
        requestBuilder.header(AUTHORIZATION_HEADER, credentials);

        RequestEntity<Object> requestEntity = requestBuilder.body(null);

        return restTemplate
                .exchange(requestEntity, String.class).getBody();
    }
}

ConsumeController 类:

@RestController
@RequiredArgsConstructor
public class ConsumeController {

    private static final String PATH = "/rest/api/v1/products";
    private final WebConfigurer webConfigurer;
    private final ApiClient apiClient;

    @GetMapping(value = "/products-client")
    public String getProductList() {

        return apiClient.invokeApi(PATH, webConfigurer.getAuthorization());
    }
}

application.yml:

server:
  port: 8090

demo:
  api:
    credentials:
      username: ${demo_api_username:john}
      password: ${demo_api_password:test}
      basePath: ${demo_api_path:http://localhost:8080}

第一个微服务是一个REST API,第二个微服务是一个REST消费者,通信使用Basic Auth进行安全保护。

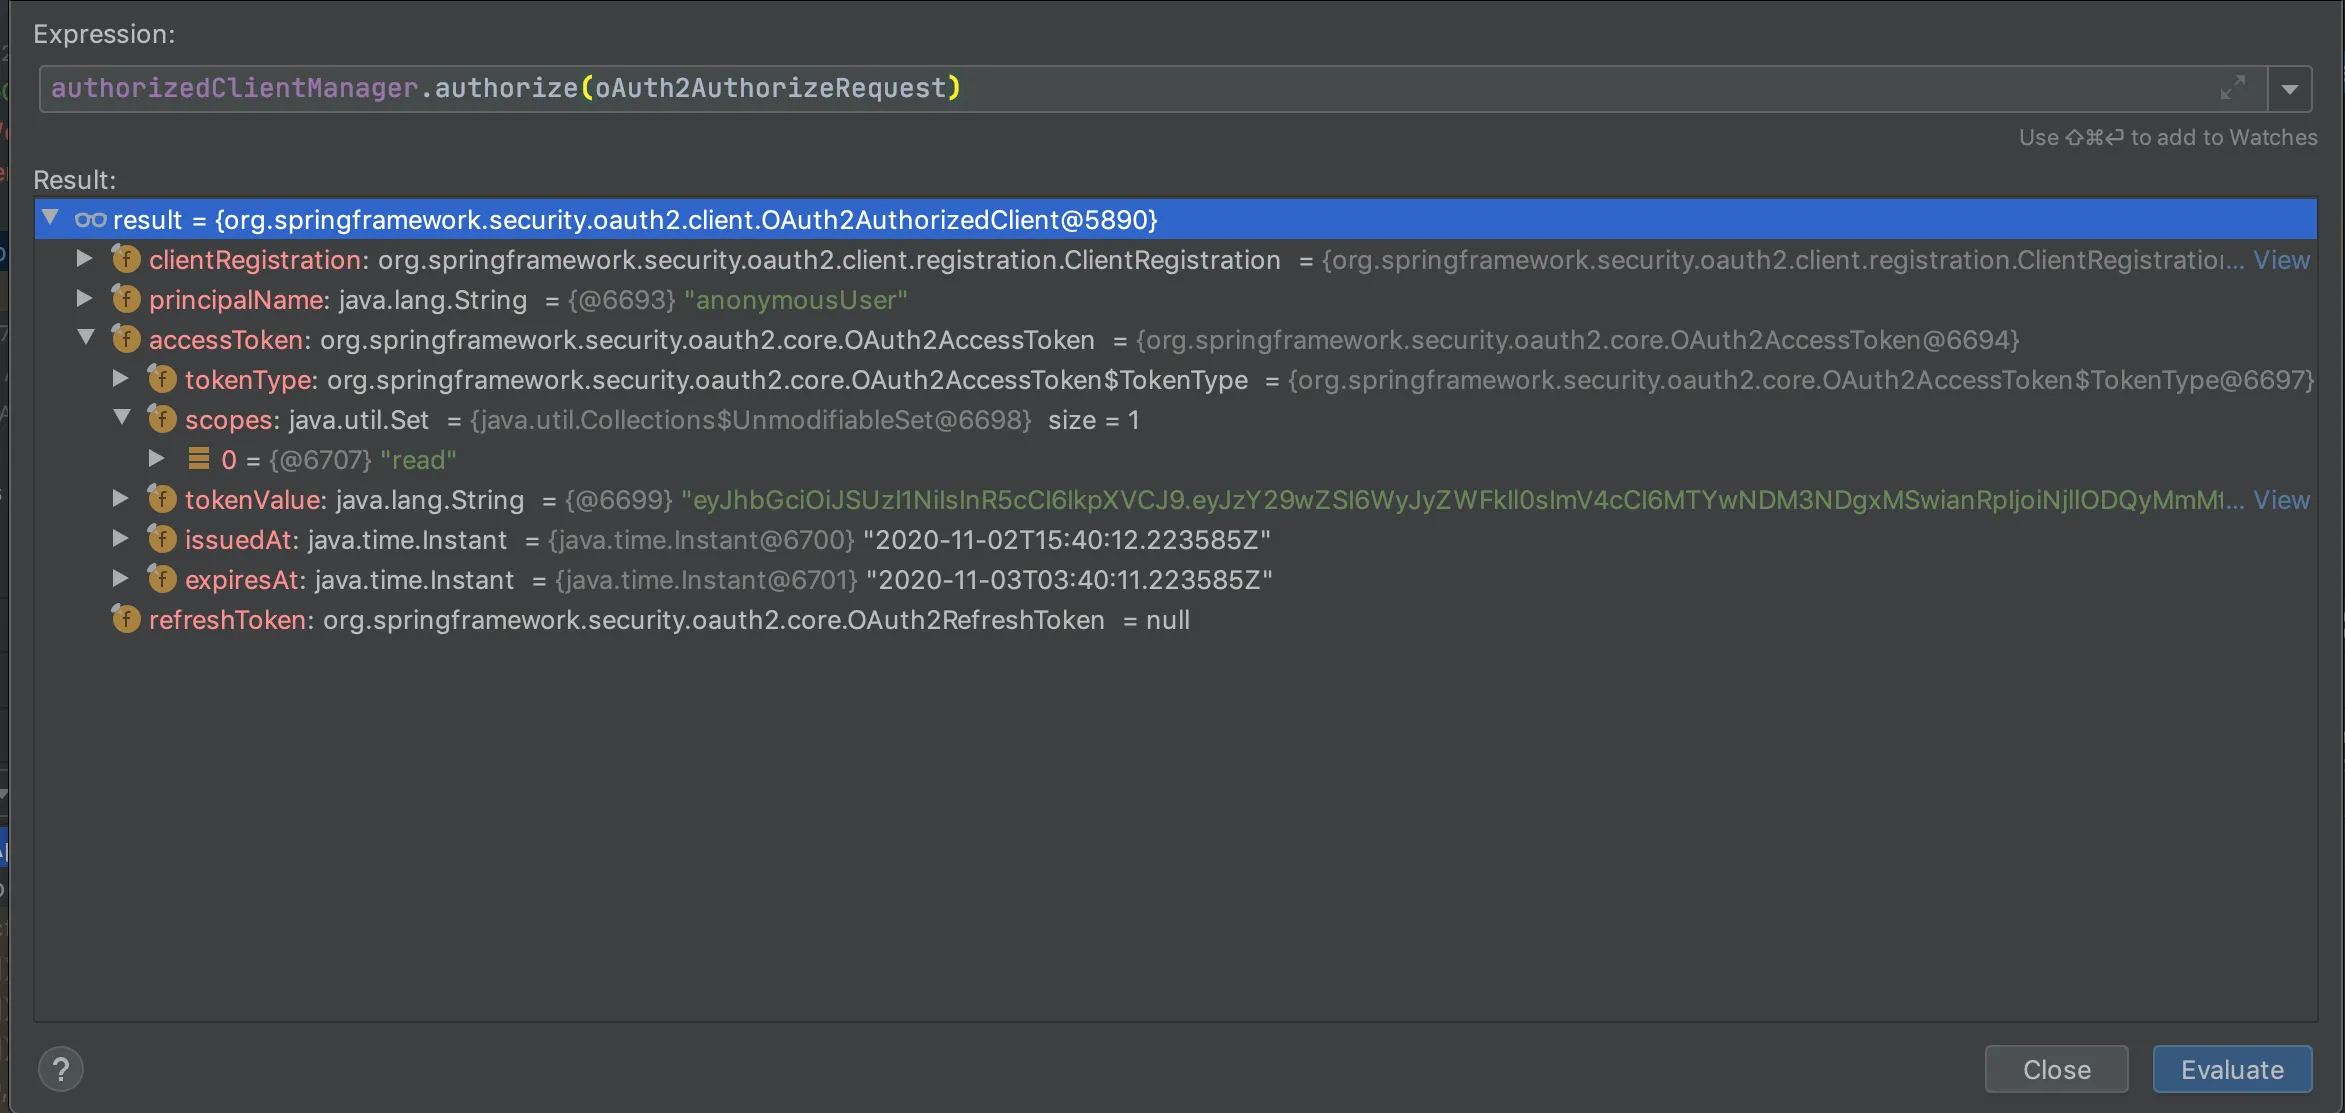
现在我想要使用OAuth2来实现,并请问您如何使用OAuth2来保障通信的安全性?因此,我想添加另一个端点,例如"/access-token",客户端首先将使用用户名和密码对该端点发出请求,并获取jwt令牌。之后,将使用此jwt令牌向"/products"端点发出带有Authorization头的请求。您能帮助我完成这种实现吗?谢谢!


1
请您能否审核现有的答案并提供反馈?谢谢! - s7vr
嗨svr,我刚刚审查了答案,所有的答案都非常好,而且你的答案也很棒,因为它是关于OAuth实现的。我没有时间去实现它,因为我在工作上非常忙,我想在周末实现它。谢谢! - elvis
3个回答

6

概述

你需要使用客户端凭据授权类型流来在应用程序之间进行通信。Spring内置了对诸如Facebook、Google等知名供应商的支持。在我们的情况下,我们提供自己的授权服务器。

注意 - 根据规范,客户端凭据不返回刷新令牌 - 因此,请确保在当前访问令牌过期时请求新的访问令牌。

客户端

应用程序属性

security.basic.enabled=false

server.port=8082

spring.security.oauth2.client.registration.server.client-id=first-client
spring.security.oauth2.client.registration.server.client-secret=noonewilleverguess

spring.security.oauth2.client.registration.server.client-authentication-method=basic
spring.security.oauth2.client.registration.server.authorization-grant-type=client_credentials
spring.security.oauth2.client.registration.server.scope=read

spring.security.oauth2.client.provider.server.token-uri=http://server:8080/oauth/token

主类

@SpringBootApplication
public class App {

    public static void main(String[] args) {
        SpringApplication.run(App.class, args);
    }

    @Bean
    RestTemplate restTemplate(RestTemplateBuilder builder) {
        return builder.build();
    }
}

凭证客户端授权流配置

@Configuration
public class OauthClientCredentialConfig {
    @Bean
    public OAuth2AuthorizedClientManager authorizedClientManager(ClientRegistrationRepository clientRegistrationRepository) {
            OAuth2AuthorizedClientService service =
                    new InMemoryOAuth2AuthorizedClientService(clientRegistrationRepository);
            AuthorizedClientServiceOAuth2AuthorizedClientManager authorizedClientManager =
                    new AuthorizedClientServiceOAuth2AuthorizedClientManager(clientRegistrationRepository, service);
            OAuth2AuthorizedClientProvider authorizedClientProvider =
                    OAuth2AuthorizedClientProviderBuilder.builder()
                            .clientCredentials()
                            .build();
            authorizedClientManager.setAuthorizedClientProvider(authorizedClientProvider);
            return authorizedClientManager;
    }
}

POM依赖

<dependency>
        <groupId>org.springframework.boot</groupId>
        <artifactId>spring-boot-starter-security</artifactId>
    </dependency>
    
    <dependency>
        <groupId>org.springframework.boot</groupId>
        <artifactId>spring-boot-starter-oauth2-client</artifactId>
</dependency>

REST客户端

@Getter
@RequiredArgsConstructor
@Slf4j
@Component
public class ApiClient {

    private static final String AUTHORIZATION_HEADER = "Authorization";
    private final RestTemplate restTemplate;
    private final OAuth2AuthorizedClientManager authorizedClientManager;

    public String invokeApi(String path) {
        UriComponentsBuilder builder = UriComponentsBuilder.fromHttpUrl("http://server:8080").path(path);

        RequestEntity.BodyBuilder requestBuilder =
                RequestEntity.method(HttpMethod.GET, builder.build().toUri());

        requestBuilder.contentType(MediaType.APPLICATION_JSON);

        Authentication principal = SecurityContextHolder.getContext().getAuthentication();

        OAuth2AuthorizeRequest oAuth2AuthorizeRequest =
            OAuth2AuthorizeRequest.withClientRegistrationId("server")
                .principal(principal.getName())
                .build();

        requestBuilder.header(AUTHORIZATION_HEADER, "Bearer " + authorizedClientManager.authorize(oAuth2AuthorizeRequest).getAccessToken().getTokenValue());

        RequestEntity<Object> requestEntity = requestBuilder.body(null);

        return restTemplate.exchange(requestEntity, String.class).getBody();
    }
}

授权服务器和资源服务器

请注意,由于新的Spring Security OAuth2模块不支持创建授权服务器,因此我们正在使用传统版本的授权服务器和资源服务器。

配置

@EnableWebSecurity
public class Security extends WebSecurityConfigurerAdapter {

    @Override
    protected void configure(HttpSecurity http) throws Exception {
        http.requestMatchers()
                .antMatchers("/oauth/token")
                .and()
                .authorizeRequests()
                .anyRequest().authenticated();
    }

}

@EnableAuthorizationServer
@EnableResourceServer
@SpringBootApplication
public class App {

    public static void main(String[] args) {
        SpringApplication.run(App.class, args);
    }

}

认证服务器配置

@Import(AuthorizationServerEndpointsConfiguration.class)
@Configuration
@Order(2)
@RequiredArgsConstructor
public class AuthServerConfig extends AuthorizationServerConfigurerAdapter {

    private final TokenStore tokenStore;

    private final AccessTokenConverter accessTokenConverter;

    @Bean
    public PasswordEncoder passwordEncoder() {
        return PasswordEncoderFactories.createDelegatingPasswordEncoder();
    }

    @Override
    public void configure(ClientDetailsServiceConfigurer clients) throws Exception {
        clients
            .inMemory()
                .withClient("first-client")
                .secret(passwordEncoder().encode("noonewilleverguess"))
                .scopes("read")
                .authorizedGrantTypes("client_credentials")
                .scopes("resource-server-read", "resource-server-write");
    }

    @Override
    public void configure(AuthorizationServerEndpointsConfigurer endpoints) {
        endpoints
            .accessTokenConverter(accessTokenConverter)
            .tokenStore(tokenStore);
    }

}

JWT配置

@Configuration
public class JwtTokenConfig {
    @Bean
    public KeyPair keyPair() throws NoSuchAlgorithmException {
        KeyPairGenerator gen = KeyPairGenerator.getInstance("RSA");
        gen.initialize(2048);
        KeyPair keyPair = gen.generateKeyPair();
        return keyPair;
    }

    @Bean
    public TokenStore tokenStore() throws NoSuchAlgorithmException {
        return new JwtTokenStore(accessTokenConverter());
    }

    @Bean
    public JwtAccessTokenConverter accessTokenConverter() throws NoSuchAlgorithmException {
        JwtAccessTokenConverter converter = new JwtAccessTokenConverter();
        converter.setKeyPair(keyPair());
        return converter;
    }
}

pom

<dependency>
    <groupId>org.springframework.boot</groupId>
    <artifactId>spring-boot-starter-security</artifactId>
</dependency>
<dependency>
    <groupId>org.springframework.security.oauth</groupId>
    <artifactId>spring-security-oauth2</artifactId>
    <version>2.4.0.RELEASE</version>
</dependency>
<dependency>
     <groupId>org.springframework.security.oauth.boot</groupId>
     <artifactId>spring-security-oauth2-autoconfigure</artifactId>
     <version>2.2.4.RELEASE</version>
</dependency>
<dependency>
     <groupId>org.springframework.security</groupId>
     <artifactId>spring-security-jwt</artifactId>
     <version>1.1.0.RELEASE</version>
</dependency>
<dependency>
     <groupId>com.nimbusds</groupId>
     <artifactId>nimbus-jose-jwt</artifactId>
     <version>8.6</version>
</dependency>

我在以下链接中添加了一个可工作的示例:

https://github.com/saagar2000/oauth2_server

https://github.com/saagar2000/oauth2_client

图片描述

使用有效访问令牌响应:

图片描述

更多解释可在此处找到。


5

微服务架构

通常情况下,API网关模式是微服务的理想方式或首选方式,但根据项目和要求可能会发生变化。让我们考虑以下组件:

配置服务器: 负责管理微服务的配置,可以使用Spring Cloud功能通过具有Kafka或RabbitMQ公共总线接口动态更改配置。

API网关: 这将是管理其他服务的REST请求的通用入口点。我们可以在此处使用负载均衡器来管理请求。此外,我们还可以从API网关提供UI。

认证服务(UAA): 应该负责管理用户管理和相关活动。在这里,您将添加@EnableAuthorizationServer并扩展AuthorizationServerConfigurerAdapter

 @Override
    public void configure(ClientDetailsServiceConfigurer clients) throws Exception {
        int accessTokenValidity = uaaProperties.getWebClientConfiguration().getAccessTokenValidityInSeconds();
        accessTokenValidity = Math.max(accessTokenValidity, MIN_ACCESS_TOKEN_VALIDITY_SECS);
        int refreshTokenValidity = uaaProperties.getWebClientConfiguration().getRefreshTokenValidityInSecondsForRememberMe();
        refreshTokenValidity = Math.max(refreshTokenValidity, accessTokenValidity);
        /*
        For a better client design, this should be done by a ClientDetailsService (similar to UserDetailsService).
         */
        clients.inMemory()
            .withClient(uaaProperties.getWebClientConfiguration().getClientId())
            .secret(passwordEncoder.encode(uaaProperties.getWebClientConfiguration().getSecret()))
            .scopes("openid")
            .autoApprove(true)
            .authorizedGrantTypes("implicit","refresh_token", "password", "authorization_code")
            .accessTokenValiditySeconds(accessTokenValidity)
            .refreshTokenValiditySeconds(refreshTokenValidity)
            .and()
            .withClient(applicationProperties.getSecurity().getClientAuthorization().getClientId())
            .secret(passwordEncoder.encode(applicationProperties.getSecurity().getClientAuthorization().getClientSecret()))
            .scopes("web-app")
            .authorities("ROLE_GA")
            .autoApprove(true)
            .authorizedGrantTypes("client_credentials")
            .accessTokenValiditySeconds((int) jHipsterProperties.getSecurity().getAuthentication().getJwt().getTokenValidityInSeconds())
            .refreshTokenValiditySeconds((int) jHipsterProperties.getSecurity().getAuthentication().getJwt().getTokenValidityInSecondsForRememberMe());
    }

服务1、服务2...

这将是管理业务逻辑和需求的微服务,通常称为资源服务器,可以使用ResourceServerConfigurerAdapter进行配置。

图表

enter image description here


管理访问和刷新令牌

如前所述,API网关是请求的通用入口点。我们可以在API网关中管理登录/注销API。当用户执行登录时,我们可以使用身份验证服务和org.springframework.security.oauth2.common.OAuth2AccessToken中的OAuth2TokenEndpointClient来管理授权授予类型,并使用OAuth2AccessToken sendPasswordGrant(String username, String password);OAuth2AccessToken sendRefreshGrant(String refreshTokenValue); 方法。

身份验证服务将基于配置和登录用户提供OAuth2AccessToken。 在OAuth2AccessToken中,您将获得access_tokenrefresh_tokenOAuth2expires_inscope

在认证时,将创建两个JWT - access_tokenrefresh_token。 Refresh token将具有较长的有效期。 这两个令牌都将写入cookies,以便在每个后续请求中发送它们。

在每个REST API调用上,将从HTTP标头检索令牌。 如果access_token未过期,请检查用户的权限并相应地允许访问。 如果access_token已过期refresh_token仍然有效,则重新创建新的access token和refresh token,并通过Cookies发送回去。

/**
     * Authenticate the user by username and password.
     *
     * @param request  the request coming from the client.
     * @param response the response going back to the server.
     * @param loginVM   the params holding the username, password and rememberMe.
     * @return the {@link OAuth2AccessToken} as a {@link ResponseEntity}. Will return {@code OK (200)}, if successful.
     * If the UAA cannot authenticate the user, the status code returned by UAA will be returned.
     */
    public ResponseEntity<OAuth2AccessToken> authenticate(HttpServletRequest request, HttpServletResponse response,
                                                          LoginVM loginVM) {
        try {
            String username = loginVM.getUsername();
            String password = loginVM.getPassword();
            boolean rememberMe = loginVM.isRememberMe();
            OAuth2AccessToken accessToken = authorizationClient.sendPasswordGrant(username, password);
            OAuth2Cookies cookies = new OAuth2Cookies();
            cookieHelper.createCookies(request, accessToken, rememberMe, cookies);
            cookies.addCookiesTo(response);
            if (log.isDebugEnabled()) {
                log.debug("successfully authenticated user {}", username);
            }
            return ResponseEntity.ok(accessToken);
        } catch (HttpStatusCodeException in4xx) {
            throw new UAAException(ErrorConstants.BAD_CREDENTIALS);
        }
        catch (ResourceAccessException in5xx) {
            throw new UAAException(ErrorConstants.UAA_APPLICATION_IS_NOT_RESPONDING);
        }
    }

    /**
     * Try to refresh the access token using the refresh token provided as cookie.
     * Note that browsers typically send multiple requests in parallel which means the access token
     * will be expired on multiple threads. We don't want to send multiple requests to UAA though,
     * so we need to cache results for a certain duration and synchronize threads to avoid sending
     * multiple requests in parallel.
     *
     * @param request       the request potentially holding the refresh token.
     * @param response      the response setting the new cookies (if refresh was successful).
     * @param refreshCookie the refresh token cookie. Must not be null.
     * @return the new servlet request containing the updated cookies for relaying downstream.
     */
    public HttpServletRequest refreshToken(HttpServletRequest request, HttpServletResponse response, Cookie
        refreshCookie) {
        //check if non-remember-me session has expired
        if (cookieHelper.isSessionExpired(refreshCookie)) {
            log.info("session has expired due to inactivity");
            logout(request, response);       //logout to clear cookies in browser
            return stripTokens(request);            //don't include cookies downstream
        }
        OAuth2Cookies cookies = getCachedCookies(refreshCookie.getValue());
        synchronized (cookies) {
            //check if we have a result from another thread already
            if (cookies.getAccessTokenCookie() == null) {            //no, we are first!
                //send a refresh_token grant to UAA, getting new tokens
                String refreshCookieValue = OAuth2CookieHelper.getRefreshTokenValue(refreshCookie);
                OAuth2AccessToken accessToken = authorizationClient.sendRefreshGrant(refreshCookieValue);
                boolean rememberMe = OAuth2CookieHelper.isRememberMe(refreshCookie);
                cookieHelper.createCookies(request, accessToken, rememberMe, cookies);
                //add cookies to response to update browser
                cookies.addCookiesTo(response);
            } else {
                log.debug("reusing cached refresh_token grant");
            }
            //replace cookies in original request with new ones
            CookieCollection requestCookies = new CookieCollection(request.getCookies());
            requestCookies.add(cookies.getAccessTokenCookie());
            requestCookies.add(cookies.getRefreshTokenCookie());
            return new CookiesHttpServletRequestWrapper(request, requestCookies.toArray());
        }
    }


微服务之间的安全通信

我们可以使用FeignClient进行服务之间的通信,并且可以通过自定义配置来保护通信。 参见Class<?>[] configuration() default OAuth2UserClientFeignConfiguration.class;

这里我们通过增强默认的@FeignClient,实现了AuthorizedUserFeignClient接口,该接口包含自定义配置:OAuth2UserClientFeignConfiguration,其中包括@Bean用于管理使用头部进行身份验证的UserFeignClientInterceptor

AuthorizedUserFeignClient.java

@Retention(RetentionPolicy.RUNTIME)
@Target(ElementType.TYPE)
@Documented
@FeignClient
public @interface AuthorizedUserFeignClient {

    @AliasFor(annotation = FeignClient.class, attribute = "name")
    String name() default "";

    /**
     * A custom {@code @Configuration} for the feign client.
     *
     * Can contain override {@code @Bean} definition for the pieces that make up the client, for instance {@link
     * feign.codec.Decoder}, {@link feign.codec.Encoder}, {@link feign.Contract}.
     *
     * @see FeignClientsConfiguration for the defaults.
     */
    @AliasFor(annotation = FeignClient.class, attribute = "configuration")
    Class<?>[] configuration() default OAuth2UserClientFeignConfiguration.class;

    /**
     * An absolute URL or resolvable hostname (the protocol is optional).
     */
    String url() default "";

    /**
     * Whether 404s should be decoded instead of throwing FeignExceptions.
     */
    boolean decode404() default false;

    /**
     * Fallback class for the specified Feign client interface. The fallback class must implement the interface
     * annotated by this annotation and be a valid Spring bean.
     */
    Class<?> fallback() default void.class;

    /**
     * Path prefix to be used by all method-level mappings. Can be used with or without {@code @RibbonClient}.
     */
    String path() default "";
}

UserFeignClientInterceptor.java

public class UserFeignClientInterceptor implements RequestInterceptor{

    private static final String AUTHORIZATION_HEADER = "Authorization";

    private static final String BEARER_TOKEN_TYPE = "Bearer";

    @Override
    public void apply(RequestTemplate template) {

        SecurityContext securityContext = SecurityContextHolder.getContext();
        Authentication authentication = securityContext.getAuthentication();

        if (authentication != null && authentication.getDetails() instanceof OAuth2AuthenticationDetails) {

            OAuth2AuthenticationDetails details = (OAuth2AuthenticationDetails) authentication.getDetails();
            template.header(AUTHORIZATION_HEADER, String.format("%s %s", BEARER_TOKEN_TYPE, details.getTokenValue()));
        }
    }
}

可能会有帮助

架构概述

管理认证服务


4
需要区分基于JWT令牌的身份验证(似乎是您要实现的内容)和OAuth2身份验证,后者是更复杂的主题。
对于OAuth2身份验证,Spring框架提供了Spring Security OAuth项目的支持,但我最好的建议是,如果您确实需要OAuth2在您的项目中使用第三方OAuth2提供程序,例如OktaAuth0,或云中提供的提供程序 - 例如,GCP OAuth客户端、AWS Cognito、Azure AD应用等,或像Keycloak这样的产品。所有这些产品都将为您提供强大的OAuth2实现以及帮助您集成的库和机制。
但是,根据您问题的最后几段,似乎您实际上需要使用JWT令牌对微服务进行身份验证。
首先让我们谈谈服务器端的要求。
为了完成此任务,您需要的第一件事是生成和验证JWT令牌的服务。也许是这样的东西:
import org.springframework.security.core.Authentication;
import org.springframework.security.core.GrantedAuthority;
import org.springframework.security.core.userdetails.User;
import org.springframework.security.web.authentication.preauth.PreAuthenticatedAuthenticationToken;

import io.jsonwebtoken.Claims;
import io.jsonwebtoken.Jwts;

// ...

@Component
public class JWTService {

  // Get itfrom a configuration property, for instance
  @Value("${secretKey}")
  private String secretKey;

  @Value("${tokenValidityInMillis}")
  private Long tokenValidityInMillis;

  public String createToken(Authentication authentication) {
    long now = (new Date()).getTime();
    Date validity = new Date(now + this.tokenValidityInMillis);

    // Modify it as per your needs, defining claims, etcetera. For instance
    String authorities = authentication.getAuthorities().stream()
      .map(GrantedAuthority::getAuthority)
      .collect(Collectors.joining(","));

    return Jwts.builder()
      .setSubject(authentication.getName())
      .claim("authorities", authorities)
      // The signature algorithm you consider appropriate
      .signWith(SignatureAlgorithm.HS256, secretKey) 
      .setExpiration(validity)
      .compact();
  }

  public Authentication getAuthentication(String token) {
    try {
      Claims claims = Jwts.parser()
        .setSigningKey(secretKey)
        .parseClaimsJws(token)
        .getBody();

      // Get the authorities back
      Collection<? extends GrantedAuthority> authorities =
        Arrays.stream(claims.get("authorities").toString().split(","))
          .map(SimpleGrantedAuthority::new)
          .collect(Collectors.toList());

      User principal = new User(claims.getSubject(), "", authorities);

      return new PreAuthenticatedAuthenticationToken(principal, token, authorities);
    } catch (Exception e) {
      // Handle exceptions (expiration, invalid signature, etcetera)  as you wish
    }
    return null;
  }
}

你有几个处理实际JWT令牌的库。示例使用jjwt
然后,定义一个控制器来交换提供的凭据以获取访问令牌:

import org.springframework.security.authentication.AuthenticationManager;

//...

@RestController
public class AuthController {

  private final JWTService jwtService;

  private final AuthenticationManager authenticationManager;

  public AuthRestController(final JWTService jwtService, final AuthenticationManager authenticationManager) {
    this.jwtService = jwtService;
    this.authenticationManager = authenticationManager;
  }

  @PostMapping("/access-token")
  public ResponseEntity<JWTToken> swapAccessToken(@RequestBody LoginDTO loginDTO) {
    // Note we are passing a JSON object with two fields, username and password,
    // not actual HTTP parameters. Modify it according to your needs
    UsernamePasswordAuthenticationToken authenticationToken =
      new UsernamePasswordAuthenticationToken(loginDTO.getUsername(), loginDTO.getPassword());

    Authentication authentication = authenticationManager.authenticate(authenticationToken);
    String jwt = jwtService.createToken(authentication);
    return new ResponseEntity.ok(new JWTToken(jwt));
  }
}  

LoginDTO是一个简单的POJO,用于存储usernamepassword

public class LoginDTO {

  private String username;

  private String password;

  // Getters and setters omitted for brevity
}
< p >而JWTToken只是将生成的令牌以JSON格式返回而不是纯文本的方便方式:

public class JWTToken {

  private String idToken;

  JWTToken(String idToken) {
    this.idToken = idToken;
  }

  @JsonProperty("id_token")
  String getIdToken() {
    return idToken;
  }
}

下一步,您需要一些机制在必要时验证令牌。我认为实现一个自定义过滤器来检查JWT令牌并执行用户身份验证是最好的方法。例如:

public class JWTFilter extends GenericFilterBean {

  private final JWTService jwtService;

  public JWTFilter(final JWTService jwtService) {
    this.jwtService = jwtService;
  }

  @Override
  public void doFilter(ServletRequest servletRequest, ServletResponse servletResponse, FilterChain filterChain)
    throws IOException, ServletException {
    HttpServletRequest httpServletRequest = (HttpServletRequest) servletRequest;
    String jwt = getTokenFromHttpRequest(httpServletRequest);
    if (jwt != null) {
      // We have a token, perform actual authentication
      Authentication authentication = this.jwtService.getAuthentication(jwt);
      // If success
      if (authentication != null) {
        SecurityContextHolder.getContext().setAuthentication(authentication);
      }
    }

    // Unsuccesful authentication, let the spring security chain continue and fail if necessary
    filterChain.doFilter(servletRequest, servletResponse);
  }

  // Look for token in an Authorization Bearer header
  private String getTokenFromHttpRequest(HttpServletRequest request){
    String bearerToken = request.getHeader("Authorization");
    if (bearerToken != null && bearerToken.startsWith("Bearer")) {
      return bearerToken.substring(7, bearerToken.length());
    }
    return null;
  }
}

所有这些组件都必须为Spring Security进行配置。它可能需要进一步适应,但请理解其思想:
@Configuration
@RequiredArgsConstructor
public class SecurityConfigurer extends WebSecurityConfigurerAdapter {
    private final DemoApiConfiguration apiConfig;

    private final JWTService jwtService;

    private UserDetailsService userDetailsService;

    @Override
    protected void configure(HttpSecurity http) throws Exception {
      // Probably you need to handle more stuff like configuring exception 
      // handling endpoints for access denied, stateless sessions, CORS, think about it...
      http
        .csrf().disable()
        .authorizeRequests()
          // Allow to swap the credentials for access token
          .antMatchers("/access-token").permitAll()
          // Require authentication for the rest of your API
          .anyRequest().authenticated();

      // Include your filter somewhere the Spring Security filter chain
      final JWTFilter jwtFilter = new JWTFilter(jwtService);
      http.addFilterBefore(jwtFilter, UsernamePasswordAuthenticationFilter.class);    
    }

    // This is an important step: as we are providing both username an
    // password and preauthenticated credentials, so we need to configure
    // AuthenticationManager that actually supports both authentication types
    // It will use your userDetailsService for validating 
    // the original provided credentials
    @Bean
    @Override
    public AuthenticationManager authenticationManager() {
      // Username and password validation
      DaoAuthenticationProvider daoAuthenticationProvider = new DaoAuthenticationProvider();
      daoAuthenticationProvider.setPasswordEncoder(passwordEncoder());
      daoAuthenticationProvider.setUserDetailsService(userDetailsService());
      PreAuthenticatedAuthenticationProvider preAuthProvider = new PreAuthenticatedAuthenticationProvider();
      preAuthProvider.setPreAuthenticatedUserDetailsService(new UserDetailsByNameServiceWrapper<>(userDetailsService()));
      return new ProviderManager(Arrays.<AuthenticationProvider> asList(daoAuthenticationProvider, preAuthProvider));
    }

    @Bean
    public UserDetailsService userDetailsService() {
        if (userDetailsService == null) {
          userDetailsService = this.initUserDetailsService(passwordEncoder());
        }

        return userDetailsService;
    }

    @Bean
    public PasswordEncoder passwordEncoder() {
        return new BCryptPasswordEncoder();
    }

    private UserDetailsService initUserDetailsService(PasswordEncoder passwordEncoder) {
        UserDetails theUser = User.withUsername(apiConfig.getUsername())
                .password(passwordEncoder.encode(apiConfig.getPassword())).roles("USER").build();

        InMemoryUserDetailsManager userDetailsManager = new InMemoryUserDetailsManager();
        userDetailsManager.createUser(theUser);

        return userDetailsManager;
    }
}

您的客户端微服务只需要交换配置的凭据以获取访问令牌,并在调用受保护的端点时将返回的JWT作为Bearer HTTP Authorization头的值使用。这应该很简单,但如果您需要进一步帮助,请告诉我。

网页内容由stack overflow 提供, 点击上面的
可以查看英文原文,
原文链接