使用Python和PIL库,我希望能够以不同的角度绘制文本。
例如,假设您要在时钟表盘上绘制数字。数字3将如预期显示,而12将逆时针旋转90度绘制。
因此,我需要能够以多种不同的角度绘制许多不同的字符串。
使用Python和PIL库,我希望能够以不同的角度绘制文本。
例如,假设您要在时钟表盘上绘制数字。数字3将如预期显示,而12将逆时针旋转90度绘制。
因此,我需要能够以多种不同的角度绘制许多不同的字符串。
将文本绘制在临时空白图像上,旋转该图像,然后将其粘贴到原始图像中。您可以将这些步骤封装到一个函数中。祝你好运,确定要使用的确切坐标——我现在的头脑不太清晰。
此演示在图像上倾斜写黄色文本:
# Demo to add rotated text to an image using PIL

import Image
import ImageFont, ImageDraw, ImageOps

im=Image.open("stormy100.jpg")

f = ImageFont.load_default()
txt=Image.new('L', (500,50))
d = ImageDraw.Draw(txt)
d.text( (0, 0), "Someplace Near Boulder",  font=f, fill=255)
w=txt.rotate(17.5,  expand=1)

im.paste( ImageOps.colorize(w, (0,0,0), (255,255,84)), (242,60),  w)
在创建Image对象之前,了解文本的像素大小也很有用。我在绘制图表时使用了这样的代码。然后,我就不会遇到数据标签对齐等问题(图像与文本完全一样大)。
(...)
img_main = Image.new("RGB", (200, 200))
font = ImageFont.load_default()

# Text to be rotated...
rotate_text = u'This text should be rotated.'

# Image for text to be rotated
img_txt = Image.new('L', font.getsize(rotate_text))
draw_txt = ImageDraw.Draw(img_txt)
draw_txt.text((0,0), rotate_text, font=font, fill=255)
t = img_value_axis.rotate(90, expand=1)
将两张图片合并的其余步骤已在本页面上描述。 当您以“非常规”角度旋转时,需要稍微改进此代码。它实际上适用于90、180、270度...
from PIL import Image, ImageFont, ImageDraw

text = 'TEST'
font = ImageFont.truetype(r'C:\Windows\Fonts\Arial.ttf', 50)
width, height = font.getsize(text)

image1 = Image.new('RGBA', (200, 150), (0, 128, 0, 92))
draw1 = ImageDraw.Draw(image1)
draw1.text((0, 0), text=text, font=font, fill=(255, 128, 0))

image2 = Image.new('RGBA', (width, height), (0, 0, 128, 92))
draw2 = ImageDraw.Draw(image2)
draw2.text((0, 0), text=text, font=font, fill=(0, 255, 128))

image2 = image2.rotate(30, expand=1)

px, py = 10, 10
sx, sy = image2.size
image1.paste(image2, (px, py, px + sx, py + sy), image2)

image1.show()
前面的答案会绘制一个新的图像,旋转它,并将其重新绘制到源图像中。这会留下文本伪影。我们不希望出现这种情况。
这里是一个版本,它会裁剪即将绘制的源图像区域,对其进行旋转,然后在其中绘制,并将其旋转回来。这意味着我们可以立即绘制在最终的表面上,而不必使用蒙版。
def draw_text_90_into (text: str, into, at):
    # Measure the text area
    font = ImageFont.truetype (r'C:\Windows\Fonts\Arial.ttf', 16)
    wi, hi = font.getsize (text)

    # Copy the relevant area from the source image
    img = into.crop ((at[0], at[1], at[0] + hi, at[1] + wi))

    # Rotate it backwards
    img = img.rotate (270, expand = 1)

    # Print into the rotated area
    d = ImageDraw.Draw (img)
    d.text ((0, 0), text, font = font, fill = (0, 0, 0))

    # Rotate it forward again
    img = img.rotate (90, expand = 1)

    # Insert it back into the source image
    # Note that we don't need a mask
    into.paste (img, at)
支持其他角度、颜色等很容易添加。
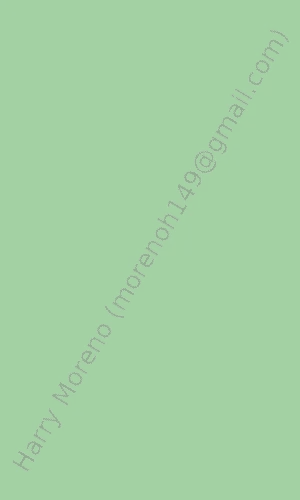
这是一个更完整的对角线水印示例。通过计算对角线的角度和字体大小,处理任意图像比例、大小和文本长度。
from PIL import Image, ImageFont, ImageDraw
import math

# sample dimensions
pdf_width = 1000
pdf_height = 1500

#text_to_be_rotated = 'Harry Moreno'
text_to_be_rotated = 'Harry Moreno (morenoh149@gmail.com)'
message_length = len(text_to_be_rotated)

# load font (tweak ratio based on your particular font)
FONT_RATIO = 1.5
DIAGONAL_PERCENTAGE = .5
diagonal_length = int(math.sqrt((pdf_width**2) + (pdf_height**2)))
diagonal_to_use = diagonal_length * DIAGONAL_PERCENTAGE
font_size = int(diagonal_to_use / (message_length / FONT_RATIO))
font = ImageFont.truetype(r'./venv/lib/python3.7/site-packages/reportlab/fonts/Vera.ttf', font_size)
#font = ImageFont.load_default() # fallback

# target
image = Image.new('RGBA', (pdf_width, pdf_height), (0, 128, 0, 92))

# watermark
opacity = int(256 * .5)
mark_width, mark_height = font.getsize(text_to_be_rotated)
watermark = Image.new('RGBA', (mark_width, mark_height), (0, 0, 0, 0))
draw = ImageDraw.Draw(watermark)
draw.text((0, 0), text=text_to_be_rotated, font=font, fill=(0, 0, 0, opacity))
angle = math.degrees(math.atan(pdf_height/pdf_width))
watermark = watermark.rotate(angle, expand=1)

# merge
wx, wy = watermark.size
px = int((pdf_width - wx)/2)
py = int((pdf_height - wy)/2)
image.paste(watermark, (px, py, px + wx, py + wy), watermark)

image.show()
这是在Colab中的链接,您应该向Colab提供一个示例图像。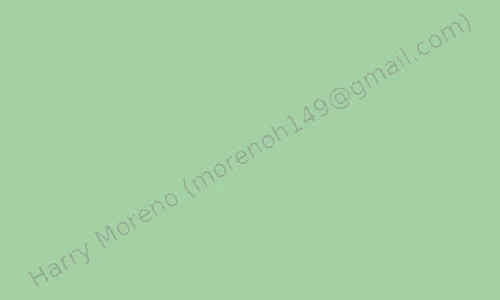
I'm not saying this is going to be easy, or that this solution will necessarily be perfect for you, but look at the documentation here:
http://effbot.org/imagingbook/pil-index.htm
and especially pay attention to the Image, ImageDraw, and ImageFont modules.
Here's an example to help you out:
import Image
im = Image.new("RGB", (100, 100))
import ImageDraw
draw = ImageDraw.Draw(im)
draw.text((50, 50), "hey")
im.rotate(45).show()
To do what you really want you may need to make a bunch of separate correctly rotated text images and then compose them all together with some more fancy manipulation. And after all that it still may not look great. I'm not sure how antialiasing and such is handled for instance, but it might not be good. Good luck, and if anyone has an easier way, I'd be interested to know as well.
# Matrix operations
def translate(x, y):
    return np.array([[1, 0, x], [0, 1, y], [0, 0, 1]])


def rotate(angle):
    c, s = np.cos(angle), np.sin(angle)
    return np.array([[c, -s, 0], [s, c, 0], [0, 0, 1]])


def draw_text(image, text, font, x, y, angle):
    """Draw text at x,y and rotated angle radians on the given PIL image"""
    m = np.matmul(translate(x, y), rotate(angle))
    transform = [m[0][0], m[0][1], m[0][2], m[1][0], m[1][1], m[1][2]]
    draw = aggdraw.Draw(image)
    draw.settransform(transform)
    draw.text((tx, ty), text, font)
    draw.settransform()
    draw.flush()
from PIL import Image, ImageDraw, ImageFont

# Create the original image
img = Image.new( 'RGB', (400, 600), color='#D0D0D0')

# Create a second image with the title
img_title = Image.new( 'RGB', (600,60), color='#E0FFFF')
draw_title = ImageDraw.Draw(img_title)
font = ImageFont.truetype("arialbd.ttf", size = 40)
draw_title.text( (590, 30), 'Rotate title on the left',
    font=font, anchor="rm", fill="#80E0C0")

# Rotate the image containing the title
img_title = img_title.transpose(Image.Transpose.ROTATE_90)

# Paste rotated title over the original image
img.paste( img_title, (0,0))

# Save the original image
img.save('Image with rotated title.png')