HTML5画布的strokeStyle是什么?

25

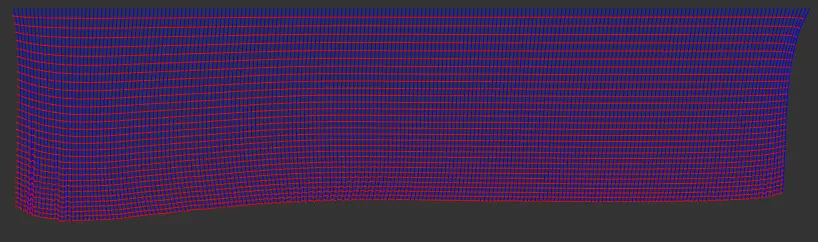
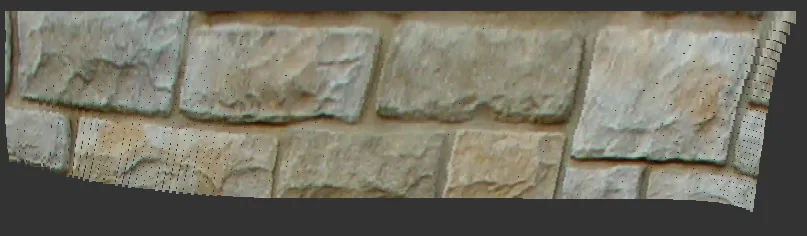
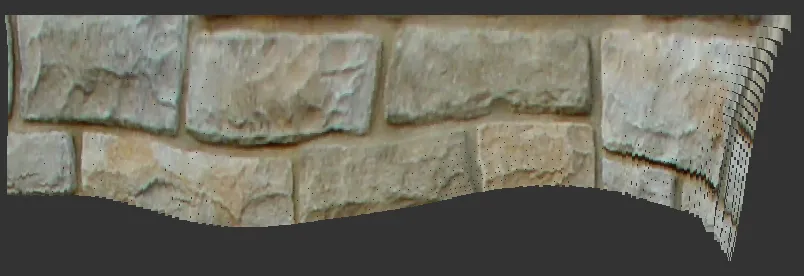
我正在尝试使用strokeStyle和canvas将一张图片映射到模拟布料的“3D”网格上,我已经将图片包含在内,但它目前作为背景图像而不是随着“布料”的波纹实际流动,即图片在网格流动时是静态的。 这里是jsfiddle,可以自行了解(仅适用于Chrome)。 非常感谢任何帮助。 以下是将图像渲染到背景中的javascript代码,如何防止其作为背景图像呈现,并仅使其填充网格:

function update() {

    var img = new Image();
    img.src = 'http://free-textures.got3d.com/architectural/free-stone-wall-   textures/images/free-stone-wall-texture-002.jpg';
    img.onload = function() {

        // create pattern
        var ptrn = ctx.createPattern(img, 'repeat');

        ctx.clearRect(0, 0, canvas.width, canvas.height);

        physics.update();

        ctx.strokeStyle = ptrn;
        ctx.beginPath();
        var i = points.length;
        while (i--) points[i].draw();
        ctx.stroke();

        requestAnimFrame(update);
    }
}
这是我正在使用的原始codepen。 更新后的fiddle将图像放在update()函数之外: 目前似乎实际填充单元格并将其应用作背景图像。有没有办法阻止它变成背景图像,只将其应用于填充网格?我尝试过这个:
ctx.fillStyle = ptrn; 并删除了第260行:
ctx.strokeStyle = ptrn; 但它似乎仅将其显示为黑色网格而非背景图像... 再次感谢您的耐心。

我不期望任何人调试我的代码,我的确切问题是:如何将图像映射到网格中,函数update() { var img = new Image(); img.src = 'file:///C:/Users/CL%20Ceintuurbaan/Desktop/texture_2.jpg'; img.onload = function(){// 创建图案 var ptrn = ctx.createPattern(img,'repeat'); ctx.clearRect(0, 0, canvas.width, canvas.height); physics.update(); ctx.strokeStyle = ptrn; ctx.beginPath(); var i = points.length; while(i--) points[i].draw(); ctx.stroke(); requestAnimFrame(update); } }这个函数是否处理图像渲染。 - vimes1984
请注意,通过不在更新函数中初始化图像,我可以获得更快的动画:http://jsfiddle.net/MdbLB/。 - Denys Séguret
谢谢,这很有道理,它目前似乎实际上填充了单元格并将其应用为背景图像。有没有办法阻止它成为背景图像,只将其应用于填充网格?我尝试过这个: ctx.fillStyle = ptrn; 但它似乎不能移除背景图像。再次感谢您的耐心。 - vimes1984
谢谢,你说得完全正确,这样会更加流畅。 - vimes1984
2
抱歉,我没有示例。将大图切割成小图并将它们附加到点上非常简单(也很无聊)。根据约束条件绘制小图可能会有点困难,特别是当每个点的约束条件数量不为4时。这里可能有一些标准实践,但我不知道它(应该使用WebGL吗?)。 - Denys Séguret
显示剩余5条评论
1个回答

33

哦,好问题!

那么让我们看看我们拥有的内容。这是一个具有大量“约束”的系统,这些约束是2个点的集合。约束本身成对出现,它们形成两条线,形成一个 形状(框的右下角)。

如果我们将每个约束线单独绘制出来,我们会看到这个:

boxes!

这都是水平的红线和垂直的蓝线。绘制单个图形时,我们只会看到那个形状,而每条长红线实际上是数百条小线,每个形状的底部,端点对端点连接而成。这里有几百个,它们一起看起来像一个连贯的网格。每个已经是单独的,这使得它变得容易。

那个形状就是我们需要确定的一种类似边界框的形状。而且似乎每个约束中的Point都带有原始值,因此我们将其保存为sxsy

如果我们知道盒子在其新位置的边界以及原始边界,因为我们已经保存了Contraints的所有Point值,那么我们应该就可以了。

一旦我们有了约束的原始边界框和当前边界框,我们只需调用drawImage两个框即可:ctx.drawImage(img, sx, sy, sw, sh, dx, dy, dw, dh);

我编写了一个新的Constraint.prototype.draw例程,它看起来像这样:

yeah!

more yeah!

等等。

您可以以几种方式“修补”这些孔洞,这取决于您,否则您将不得不使用转换技巧。

查看代码。我没有改变太多内容。在代码中寻找!!!(我的编辑)和DEBUG:(调试代码,以防图像未加载或您想要查看线框)。

http://jsfiddle.net/simonsarris/Kuw6P/

由于代码很长,我不想在这里粘贴所有代码,但是这里是备份,以防jsfiddle崩溃:https://gist.github.com/simonsarris/5405304

这是最相关的部分:

// !!! new super awesome draw routine! So cool we skipped naming it draw2!
Constraint.prototype.draw3 = function(otherP2) {

  // NOW dear friends consider what we have. Each box is made out of two lines,
  // the bottom and rightmost ones.
  // From these lines we can deduce the topleft and bottom-right points
  // From these points we can deduce rectangles
  // From the skewed rectangle vs the original rectangle we can "stretch"
  // an image, using drawImage's overloaded goodness.

  // AND WE'RE OFF:

  // destination rect has 2 points:
  //top left: Math.min(this.p2.x, otherP2.x), Math.min(this.p2.y, otherP2.y)
  //bottom right: (this.p1.x, this.p1.y)

  // image destination rectangle, a rect made from the two points
  var dx = Math.min(this.p1.x,  Math.min(this.p2.x, otherP2.x));
  var dy = Math.min(this.p1.y,  Math.min(this.p2.y, otherP2.y));
  var dw = Math.abs(this.p1.x - Math.min(this.p2.x, otherP2.x));
  var dh = Math.abs(this.p1.y - Math.min(this.p2.y, otherP2.y));
  // DEBUG: IF THERE IS NO IMAGE TURN THIS ON:
  //ctx.strokeStyle = 'lime';
  //ctx.strokeRect(dx, dy, dw, dh);

  // source rect 2 points:
  //top left: Math.min(this.p2.sx, otherP2.sx), Math.min(this.p2.sy, otherP2.sy)
  //bottom right: (this.p1.sx, this.p1.sy)

  // these do NOT need to be caluclated every time,
  // they never change for a given constraint
  // calculate them the first time only. I could do this earlier but I'm lazy
  // and its past midnight. See also: http://www.youtube.com/watch?v=FwaQxDkpcHY#t=64s
  if (this.sx === undefined) {
    this.sx = Math.min(this.p1.sx,  Math.min(this.p2.sx, otherP2.sx));
    this.sy = Math.min(this.p1.sy,  Math.min(this.p2.sy, otherP2.sy));
    this.sw = Math.abs(this.p1.sx - Math.min(this.p2.sx, otherP2.sx));
    this.sh = Math.abs(this.p1.sy - Math.min(this.p2.sy, otherP2.sy));
  }
  var sx = this.sx;
  var sy = this.sy;
  var sw = this.sw;
  var sh = this.sh;
  // DEBUG: IF THERE IS NO IMAGE TURN THIS ON:
  //ctx.strokeStyle = 'red';
  //ctx.strokeRect(sx, sy, sw, sh);


  // IF we have a source and destination rectangle, then we can map an image
  // piece using drawImage(img, sx, sy, sw, sh, dx, dy, dw, dh)
  // Only problem, we're not exactly dealing with rectangles....
  // But we'll deal. Transformations have kooties anyways.
  ctx.drawImage(img, sx, sy, sw, sh, dx, dy, dw, dh);
};

网页内容由stack overflow 提供, 点击上面的
可以查看英文原文,
原文链接