如何使用GDI绘制具有透明度的文本?

3

我的目标是在运行时将任意文本动态地放入HICON图像中。我正在使用以下代码:

//Error checks are omitted for brevity

//First create font
LOGFONT lf = {0};
lf.lfHeight = -58;
lf.lfWeight = FW_NORMAL;
lf.lfOutPrecision = OUT_TT_PRECIS;  //Use TrueType fonts for anti-alliasing
lf.lfQuality = CLEARTYPE_QUALITY;
lstrcpy(lf.lfFaceName, L"Segoe UI");

HFONT hFont = ::CreateFontIndirect(&lf);


//HICON hIcon = original icon to use as a source
//I'm using a large 256x256 pixel icon
hIcon = (HICON)::LoadImage(theApp.m_hInstance, MAKEINTRESOURCE(IDI_ICON_GREEN_DIAMOND), IMAGE_ICON, 256, 256, LR_DEFAULTCOLOR);

ICONINFO ii = {0};
::GetIconInfo(hIcon, &ii);

BITMAP bm = {0};
::GetObject(ii.hbmColor, sizeof(bm), &bm);
SIZE szBmp = {bm.bmWidth, bm.bmHeight};

HDC hDc = ::GetDC(hWnd);
HDC hMemDC = ::CreateCompatibleDC(hDc);

HGDIOBJ hOldBmp = ::SelectObject(hMemDC, ii.hbmColor);
HGDIOBJ hOldFont = ::SelectObject(hMemDC, hFont);

::SetBkMode(hMemDC, TRANSPARENT);
::SetTextColor(hMemDC, RGB(255, 0, 0));     //Red text

//Draw text
//NOTE that DrawText API behaves in a similar way
::TextOut(hMemDC, 0, 0, L"Hello", 5);

::SelectObject(hMemDC, hOldFont);
::SelectObject(hMemDC, hOldBmp);


//We need a simple mask bitmap for the icon
HBITMAP hBmpMsk = ::CreateBitmap(szBmp.cx, szBmp.cy, 1, 1, NULL);

ICONINFO ii2 = {0};
ii2.fIcon = TRUE;
ii2.hbmColor = ii.hbmColor;
ii2.hbmMask = hBmpMsk;

//Create updated icon
HICON hIcon2 = ::CreateIconIndirect(&ii2);


//Cleanup
::DeleteObject(hBmpMsk);
::DeleteDC(hMemDC);
::ReleaseDC(hWnd, hDc);
::DeleteObject(ii.hbmColor);
::DeleteObject(ii.hbmMask);

::DeleteObject(hFont);

然后我可以在OnPaint()处理程序中显示图标(以便我可以看到它的效果):

::DrawIconEx(dc.GetSafeHdc(), 0, 0,
    hIcon2, 
    256, 256, NULL, 
    ::GetSysColorBrush(COLOR_BTNFACE),
    DI_NORMAL);

所以这是我得到的:

enter image description here

为了查看我的
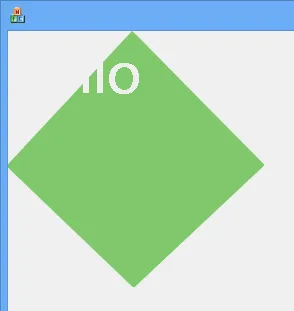
hIcon2中每个像素的情况,我从上面的代码中调用了GetDIBits函数,并传入了它的ii.hbmColor参数。最终得到的像素数组,应该显示我的单词“Hello”,但实际上是这样的:

enter image description here

这个内存转储中像素的编码格式是 
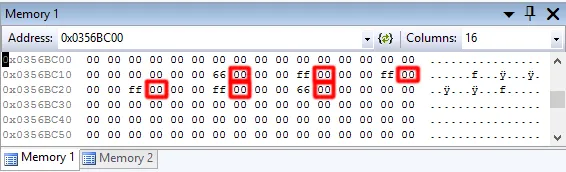
BGRA,因此每个 DWORD 中的第四个字节表示透明度:0=透明,FF=不透明。但在这种情况下,TextOut 没有填充透明度,或者将其保留为 0,这被解释为“完全透明”。相反,它似乎将其预先乘以 RGB 颜色本身。
请注意,如果我继续查看同一位图向下滚动到绿色菱形开始的位置,图像像素似乎正确设置了透明度字节:

enter image description here

你有没有想过如何绘制文本,使API可以设置透明度字节?

编辑:如下方所建议,我尝试了以下GDI+方法:

HGDIOBJ hOldBmp = ::SelectObject(hMemDC, ii.hbmColor);

Graphics grpx(hMemDC);

RectF rcfTxt(0.0f, 0.0f, (REAL)szBmp.cx, (REAL)szBmp.cy);
Font gdiFont(L"Segoe UI", 58.0f, FontStyleRegular, UnitPixel);

SolidBrush gdiBrush(Color(255, 0, 0));

StringFormat gdiSF;
gdiSF.SetAlignment(StringAlignmentNear);
gdiSF.SetFormatFlags(StringFormatFlagsNoWrap);
gdiSF.SetHotkeyPrefix(HotkeyPrefixNone);

//The reason I was using GDI was because I was setting
//spacing between letters using SetTextCharacterExtra()
//Unfortunately with GDI+ this does not work!
HDC hTmpDC = grpx.GetHDC();
::SetTextCharacterExtra(hTmpDC, -4);  //This doesn't do anything!
grpx.ReleaseHDC(hTmpDC);

grpx.DrawString(L"Hello", 5, &gdiFont, rcfTxt, &gdiSF, &gdiBrush);

::SelectObject(hMemDC, hOldBmp);

除了不能像使用GDI时使用SetTextCharacterExtra设置字符间距之外,这是我得到的东西(稍微放大以便查看):

enter image description here

显然透明度仍然存在问题。


GDI不支持透明度;请考虑使用gdiplus。 - Jonathan Potter
@JonathanPotter:谢谢。是的,看起来GDI+是唯一支持Alpha通道的方法。虽然我之所以选择普通的GDI是因为它提供了SetTextCharacterExtra函数来改变字符间距。你知道我是否仍然可以在GDI+中使用它吗? - c00000fd
3个回答

3

这篇文章摘自微软MVP Mike D Sutton的一篇旧帖子,链接在此

When you create a DC it initially has default 'stock' objects selected into it, including the stock 1*1*1 Bitmap. Since there is a Bitmap already selected into the DC when you call DrawText() it will still try and render to it even though pretty much everything (apart from one pixel) will be clipped.

What you need to do is to create a Bitmap, either DDB or DIBSection, and select that into your DC before drawing to it.

First though you need to find the size of your Bitmap since you want it large enough to display your text in, so for that you use the DrawText() call again on the initial DC but include the DT_CALCRECT flag. What this does is rather than drawing anything it simply measures how large the text is and dumps that into the RECT you pass the call. From here you can go ahead and create your DIBSection using those dimensions and select it into your DC. Finally perform your existing DrawText ()call (you may also want to use SetBkMode/Color()) which will render the text to the DIBSection from which you can get at the data.

This seems to work pretty well here:

HBITMAP CreateAlphaTextBitmap(LPCSTR inText, HFONT inFont, COLORREF inColour) {
    int TextLength = (int)strlen(inText);
    if (TextLength <= 0) return NULL;

    // Create DC and select font into it
    HDC hTextDC = CreateCompatibleDC(NULL);
    HFONT hOldFont = (HFONT)SelectObject(hTextDC, inFont);
    HBITMAP hMyDIB = NULL;

    // Get text area
    RECT TextArea = {0, 0, 0, 0};
    DrawText(hTextDC, inText, TextLength, &TextArea, DT_CALCRECT);

    if ((TextArea.right > TextArea.left) && (TextArea.bottom > TextArea.top)) {
        BITMAPINFOHEADER BMIH;
        memset(&BMIH, 0x0, sizeof(BITMAPINFOHEADER));

        void *pvBits = NULL;

        // Specify DIB setup
        BMIH.biSize = sizeof(BMIH);
        BMIH.biWidth = TextArea.right - TextArea.left;
        BMIH.biHeight = TextArea.bottom - TextArea.top;
        BMIH.biPlanes = 1;
        BMIH.biBitCount = 32;
        BMIH.biCompression = BI_RGB;

        // Create and select DIB into DC
        hMyDIB = CreateDIBSection(hTextDC, (LPBITMAPINFO)&BMIH, 0, (LPVOID*)&pvBits, NULL, 0);
        HBITMAP hOldBMP = (HBITMAP)SelectObject(hTextDC, hMyDIB);

        if (hOldBMP != NULL) {
            // Set up DC properties
            SetTextColor(hTextDC, 0x00FFFFFF);
            SetBkColor(hTextDC, 0x00000000);
            SetBkMode(hTextDC, OPAQUE);

            // Draw text to buffer
            DrawText(hTextDC, inText, TextLength, &TextArea, DT_NOCLIP);

            BYTE* DataPtr = (BYTE*)pvBits;
            BYTE FillR = GetRValue(inColour);
            BYTE FillG = GetGValue(inColour);
            BYTE FillB = GetBValue(inColour);
            BYTE ThisA;

            for (int LoopY = 0; LoopY < BMIH.biHeight; LoopY++) {
                for (int LoopX = 0; LoopX < BMIH.biWidth; LoopX++) {
                    ThisA = *DataPtr; // Move alpha and pre-multiply with RGB
                    *DataPtr++ = (FillB * ThisA) >> 8;
                    *DataPtr++ = (FillG * ThisA) >> 8;
                    *DataPtr++ = (FillR * ThisA) >> 8;
                    *DataPtr++ = ThisA; // Set Alpha
                }
            }

            // De-select bitmap
            SelectObject(hTextDC, hOldBMP);
        }
    }

    // De-select font and destroy temp DC
    SelectObject(hTextDC, hOldFont);
    DeleteDC(hTextDC);

    // Return DIBSection
    return hMyDIB;
}

If you need an example of how to call it then try something like this (inDC is the DC to render to):

void TestAlphaText(HDC inDC, int inX, int inY) {
    const char *DemoText = "Hello World!\0";

    RECT TextArea = {0, 0, 0, 0};
    HFONT TempFont = CreateFont(50, 0, 0, 0, 0, 0, 0, 0, 0, 0, 0, 0, 0, "Arial\0");
    HBITMAP MyBMP = CreateAlphaTextBitmap(DemoText, TempFont, 0xFF);
    DeleteObject(TempFont);

    if (MyBMP) { // Create temporary DC and select new Bitmap into it
        HDC hTempDC = CreateCompatibleDC(inDC);
        HBITMAP hOldBMP = (HBITMAP)SelectObject(hTempDC, MyBMP);

        if (hOldBMP) {
            BITMAP BMInf; // Get Bitmap image size
            GetObject(MyBMP, sizeof(BITMAP), &BMInf);

            // Fill blend function and blend new text to window
            BLENDFUNCTION bf;
            bf.BlendOp = AC_SRC_OVER;
            bf.BlendFlags = 0;
            bf.SourceConstantAlpha = 0x80;
            bf.AlphaFormat = AC_SRC_ALPHA;
            AlphaBlend(inDC, inX, inY, BMInf.bmWidth, BMInf.bmHeight,
                hTempDC, 0, 0, BMInf.bmWidth, BMInf.bmHeight, bf);

            // Clean up
            SelectObject(hTempDC, hOldBMP);
            DeleteObject(MyBMP);
            DeleteDC(hTempDC);
        }
    }
}

所有的答案和代码都归原帖作者所有,我只是转载了它,以便如果链接失效,这个答案仍然有效。


它并没有真正回答这个问题。看起来他在做的事情是(在Google帖子中)用纯色背景对文本进行预乘。而我的背景是透明的。 - c00000fd
@c00000fd,我认为是这样的。您需要将文本呈现为具有预乘 alpha 的不同 HBitmap。然后使用 AlphaBlend (https://msdn.microsoft.com/en-us/library/windows/desktop/dd183351(v=vs.85).aspx) 将其混合到最终位图上。 - Ani

1
这篇回复是在问题发布后将近3年才出现的,但人们仍然长期咨询这些事情。所以我会解释发生了什么。
DrawText(和其他GDI文本函数)将在透明位图上工作。尽管文本以这种方式显示,但文本并不是黑色的。文本绘制到的所有像素的alpha通道都设置为0,覆盖了先前设置的任何alpha值。如果在SetTextColor中设置alpha值,文本将被渲染成全黑。如果你感到有雄心壮志,你可以逐个像素地运行并针对不是填充颜色(需要单个填充颜色)的任何东西,但问题变成了清晰度被覆盖的性质,并且所有alpha都被设置为你设置的值。文本最终看起来非常奇怪。如果您为背景填充使用恒定的alpha,则可以在绘制文本后对整个位图的位进行一次全面运行,并重新设置所有alpha值。由于您必须读取一个字节以确定它是否是背景,因此您可能会将每个像素的alpha直接设置为该图像的标准alpha,并绕过缓慢的比较。这个方法效果还算不错,我发现这很可接受。在今天和时代,微软应该早就解决了这个问题,但事实并非如此。

0

https://learn.microsoft.com/en-us/windows/win32/gdiplus/-gdiplus-antialiasing-with-text-use

    Gdiplus::Bitmap bmp( your_Width, your_Height, PixelFormat64bppARGB);
//PixelFormat64bppARGB ARGB needed

FontFamily      fontFamily(L"Arial");
    Font            font(&fontFamily, 29, FontStyleRegular, UnitPoint);
    Gdiplus::RectF  rectF(00.0f, 10.0f, your_Width, your_Height);
    StringFormat    stringFormat;
    SolidBrush      solidBrush(Color(63, 0, 0, 255));
    stringFormat.SetAlignment(StringAlignmentCenter);
//solidBrush Color(63, 0, 0, 255) ARGB neede

graphics.SetTextRenderingHint(TextRenderingHintAntiAlias);
    graphics.DrawString("your_text", -1, &font, rectF, &stringFormat, &solidBrush);
//TextRenderingHintAntiAlias this needed 

网页内容由stack overflow 提供, 点击上面的
可以查看英文原文,
原文链接