注意:我使用的是64位Windows 10。但是这里解释的大部分内容也适用于Linux系统。请以管理员身份打开所有命令终端。这可以避免出现许多问题。
1. 构建软件
第一个"任务"完成了。我现在能够通过命令行将我的软件编译和链接成二进制
.bin和.elf映像。成功的关键是找到Eclipse为特定项目放置其make文件的位置。一旦你知道它们在哪里,你所要做的就是打开一个命令终端,并键入GNU make命令。
 这样你就不再需要Eclipse了!尤其是当你的项目不断发展时,如果你能阅读(并理解)makefile并调整它以满足你的需求。
请注意,我在安装STM32系统工作台(SW4STM32)后,在以下文件夹中找到了GNU工具(编译器、链接器、make实用程序、GDB等)。
C:\Ac6\SystemWorkbench\plugins\fr.ac6.mcu.externaltools.arm-none.win32_1.7.0.201602121829\tools\compiler\
接下来我在我的硬盘上创建了一个新文件夹,并将所有这些GNU工具复制到其中:
C:\Apps\AC6GCC
           |-> arm-none-eabi
           |-> bin
           '-> lib
我将这些条目添加到"环境变量"中的路径:
 - C:\Apps\AC6GCC\bin
 - C:\Apps\AC6GCC\lib\gcc\arm-none-eabi\5.2.1
太好了,现在我系统上所有的GNU工具都运行良好!我把以下build.bat文件放在与makefile相同的文件夹中:
@echo off
echo.
echo."--------------------------------"
echo."-           BUILD              -"
echo."--------------------------------"
echo.

make -j8 -f makefile all

echo.
运行这个批处理文件应该就可以了!如果一切顺利,编译结果应该会得到一个 .bin 和一个 .elf 二进制文件。
2. 烧录和调试固件
自然的下一步是烧录固件到芯片并开始调试。在Eclipse中,只需点击一个按钮 - 至少如果Eclipse为您的微控制器正确配置。但背后发生了什么呢? 我曾经阅读了Dominic Rath的硕士论文(OpenOCD开发人员的一部分)。您可以在这里找到它:http://openocd.net/。这是我学到的:
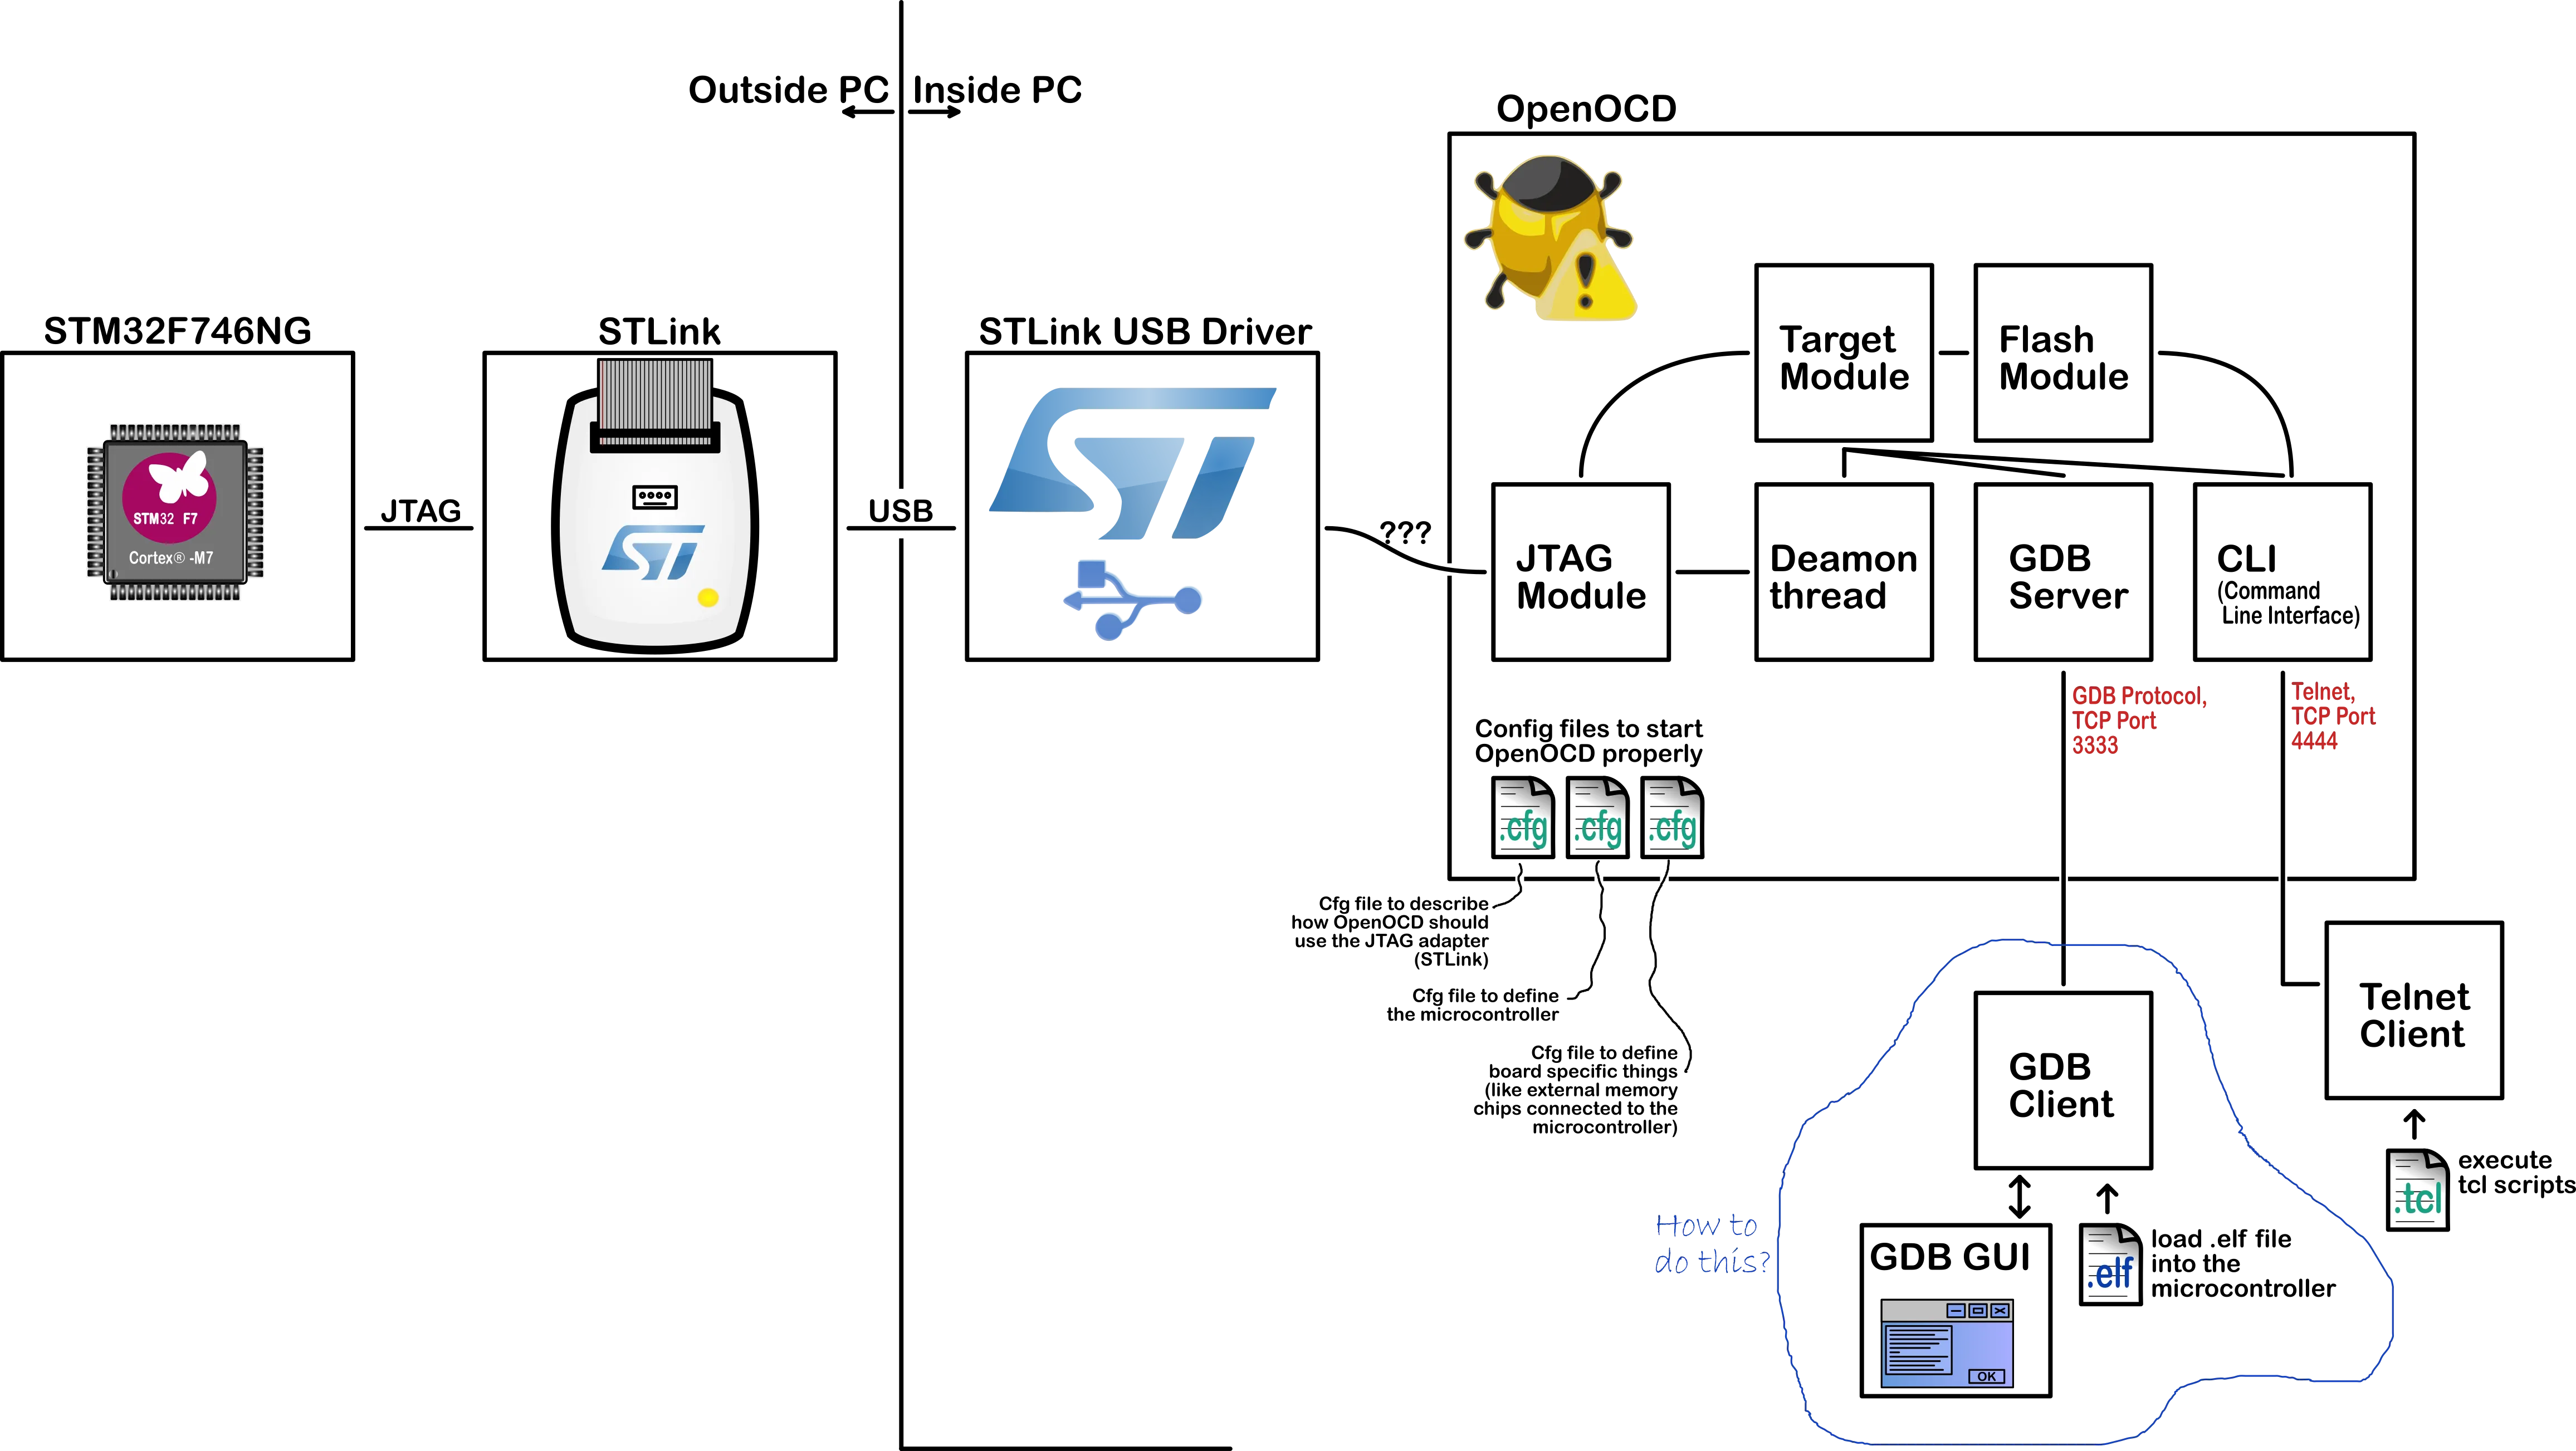
当您单击“调试”图标时,Eclipse启动OpenOCD软件。Eclipse还向OpenOCD提供了一些配置文件,以便OpenOCD知道如何连接到您的微控制器。'如何连接'并不是一件简单的事情。 OpenOCD需要找到适当的USB驱动程序来连接JTAG适配器(例如STLink)。 JTAG适配器及其USB驱动程序通常由您的芯片制造商(例如STMicroelectronics)提供。 Eclipse还将一个描述微控制器规格的配置文件传递给OpenOCD。一旦OpenOCD知道了所有这些事情,它就可以与目标设备建立可靠的JTAG连接。
OpenOCD启动两个服务器。第一个是TCP端口4444上的Telnet服务器。它提供对OpenOCD CLI(命令行界面)的访问。Telnet客户端可以连接并向OpenOCD发送命令。那些命令可能是简单的“停止”,“运行”,“设置断点”等。
这些命令可能足以调试您的微控制器,但是许多人已经熟悉GNU调试器(GDB)。这就是为什么OpenOCD还会在TCP端口3333上启动GDB服务器的原因。GDB客户端可以连接到该端口,并开始调试微控制器!
GNU调试器是一种命令行软件。许多人更喜欢可视化界面。这正是Eclipse所做的。 Eclipse启动一个连接到OpenOCD的GDB客户端 - 但对用户来说这一切都是隐藏的。 Eclipse提供一个图形界面,用于与幕后的GDB客户端交互。
我制作了一张图片来解释所有这些:
>> 启动OpenOCD
我成功从命令行启动了OpenOCD。我会解释一下如何操作。
- First make sure that your STLink-V2 JTAG programmer is properly installed. You can test the installation with the "STLink Utility tool" from STMicroelectronics. It has a nice GUI, and you simply click the connect button.

- Next download the OpenOCD software executable from this website: http://gnutoolchains.com/arm-eabi/openocd/ . Install it, and put it in a folder on your harddrive, like "C:\Apps\".
Open a command terminal, and start OpenOCD. You will need to give OpenOCD a few configuration files, such that it knows where to look for your microcontroller. Typically you need to give a configuration file that describes the JTAG programmer, and a configuration file that defines your microcontroller. Pass those files to OpenOCD with the
-fargument in the command line. You will also need to give OpenOCD access to thescriptsfolder, by passing it with the-sargument. This is how I start OpenOCD on my computer with the command line:> "C:\Apps\OpenOCD-0.9.0-Win32\bin\openocd" -f "C:\Apps\OpenOCD-0.9.0-Win32\share\openocd\scripts\interface\stlink-v2.cfg" -f "C:\Apps\OpenOCD-0.9.0-Win32\share\openocd\scripts\target\stm32f7x.cfg" -s "C:\Apps\OpenOCD-0.9.0-Win32\share\openocd\scripts"If you started OpenOCD properly (with the correct arguments), it will startup with the following message:
Open On-Chip Debugger 0.9.0 (2015-08-15-12:41)
Licensed under GNU GPL v2
For bug reports, read
        http://openocd.org/doc/doxygen/bugs.html
Info : auto-selecting first available session transport "hla_swd". To override use 'transport select <transport>'.
Info : The selected transport took over low-level target control. The results might differ compared to plain JTAG/SWD
adapter speed: 2000 kHz
adapter_nsrst_delay: 100
srst_only separate srst_nogate srst_open_drain connect_deassert_srst
Info : Unable to match requested speed 2000 kHz, using 1800 kHz
Info : Unable to match requested speed 2000 kHz, using 1800 kHz
Info : clock speed 1800 kHz
Info : STLINK v2 JTAG v24 API v2 SWIM v4 VID 0x0483 PID 0x3748
Info : using stlink api v2
Info : Target voltage: 3.231496
Info : stm32f7x.cpu: hardware has 8 breakpoints, 4 watchpoints
Info : accepting 'gdb' connection on tcp/3333
Info : flash size probed value 1024
Notice that your terminal window is now blocked. You can no longer type commands. But that's normal. OpenOCD is running in the background, and it blocks the terminal. Now you've got two options to interact with OpenOCD: you start a Telnet session in another terminal, and you log on to TCP port
localhost:4444, so you can give commands to OpenOCD and receive feedback. Or you start a GDB client session, and connect it to TCP portlocalhost:3333.
>> 启动Telnet会话与OpenOCD进行交互
以下是与正在运行的OpenOCD程序进行交互的Telnet会话启动方式:
> dism /online /Enable-Feature /FeatureName:TelnetClient

> telnet 127.0.0.1 4444
如果一切正常,您的终端将显示以下消息:
Open On-Chip Debugger
> ..
现在您已经可以向OpenOCD发送命令了!但是我将切换到GDB会话,因为这是与OpenOCD交互最方便的方式。
>> 启动一个GDB客户端会话以与OpenOCD交互
打开另一个终端窗口,并输入以下命令:
> "C:\Apps\AC6GCC\bin\arm-none-eabi-gdb.exe"
这个命令只是启动了
arm-none-eabi-gdb.exe GDB客户端。如果一切顺利,GDB会启动并显示以下信息: GNU gdb (GNU Tools for ARM Embedded Processors) 7.10.1.20151217-cvs
Copyright (C) 2015 Free Software Foundation, Inc.
License GPLv3+: GNU GPL version 3 or later <http://gnu.org/licenses/gpl.html>
This is free software: you are free to change and redistribute it.
There is NO WARRANTY, to the extent permitted by law. Type "show copying"
and "show warranty" for details.
This GDB was configured as "--host=i686-w64-mingw32 --target=arm-none-eabi".
Type "show configuration" for configuration details.
For bug reporting instructions, please see:
<http://www.gnu.org/software/gdb/bugs/>.
Find the GDB manual and other documentation resources online at:
<http://www.gnu.org/software/gdb/documentation/>.
For help, type "help".
Type "apropos word" to search for commands related to "word".
(gdb)..
现在将这个GDB客户端连接到OpenOCD内部的GDB服务器:
(gdb) target remote localhost:3333
现在您已连接到OpenOCD!需要注意的是:如果您想使用本机OpenOCD命令(就像在Telnet会话中一样),只需在命令前加上关键字
monitor。这样,OpenOCD内部的GDB服务器将不会自己处理该命令,而是传递给本机OpenOCD守护程序。现在,是时候重置芯片、擦除并停止了:
    (gdb) monitor reset halt
       target state: halted
       target halted due to debug-request, current mode: Thread
       xPSR: 0x01000000 pc: 0xfffffffe msp: 0xfffffffc
    (gdb) monitor halt

    (gdb) monitor flash erase_address 0x08000000 0x00100000
       erased address 0x08000000 (length 1048576) in 8.899024s (115.069 KiB/s)
    (gdb) monitor reset halt
       target state: halted
       target halted due to debug-request, current mode: Thread
       xPSR: 0x01000000 pc: 0xfffffffe msp: 0xfffffffc
    (gdb) monitor halt
芯片现在已准备好接受我们的指令。首先,我们将告诉芯片它的闪存区段0到7(即我的1Mb芯片中的所有闪存区段)不应受到保护:
    (gdb) monitor flash protect 0 0 7 off

    (gdb) monitor flash info 0
       #0 : stm32f7x at 0x08000000, size 0x00100000, buswidth 0, chipwidth 0
            #  0: 0x00000000 (0x8000 32kB) not protected
            #  1: 0x00008000 (0x8000 32kB) not protected
            #  2: 0x00010000 (0x8000 32kB) not protected
            #  3: 0x00018000 (0x8000 32kB) not protected
            #  4: 0x00020000 (0x20000 128kB) not protected
            #  5: 0x00040000 (0x40000 256kB) not protected
            #  6: 0x00080000 (0x40000 256kB) not protected
            #  7: 0x000c0000 (0x40000 256kB) not protected
接下来,我再次停止芯片。只是为了确保一下..
(gdb) monitor halt
最后我将二进制文件.elf交给GDB:
    (gdb) file C:\\..\\myProgram.elf
       A program is being debugged already.
       Are you sure you want to change the file? (y or n) y
       Reading symbols from C:\..\myProgram.elf ...done.
现在是真正的时刻。 我要求GDB将此二进制文件加载到芯片中。 手指交叉:
    (gdb) load
       Loading section .isr_vector, size 0x1c8 lma 0x8000000
       Loading section .text, size 0x39e0 lma 0x80001c8
       Loading section .rodata, size 0x34 lma 0x8003ba8
       Loading section .init_array, size 0x4 lma 0x8003bdc
       Loading section .fini_array, size 0x4 lma 0x8003be0
       Loading section .data, size 0x38 lma 0x8003be4
       Error finishing flash operation
可惜没有成功。在 OpenOCD 中,我收到了以下信息:
    Error: error waiting for target flash write algorithm
    Error: error writing to flash at address 0x08000000 at offset 0x00000000
编辑:硬件问题已解决。
显然这是一个硬件问题。我从未想过芯片会有缺陷,因为使用STLink Utility工具将二进制文件加载到芯片上时没有问题。只有OpenOCD在抱怨和出错。所以自然而然地我责怪了OpenOCD - 而不是芯片本身。请参阅下面的答案获取更多详细信息。
编辑:另一种优雅的闪存芯片方法 - 使用makefile!
问题得到解决后,我现在将专注于执行芯片的闪存和调试的另一种替代方式。我相信这对社区来说非常有趣!
您可能已经注意到,我使用Windows cmd命令来执行所有必要的步骤。这可以在批处理文件中自动化处理。但是有一种更优雅的方式:在makefile中自动化处理一切!Othane先生/女士已经为他/她的Cortex-M?芯片提供了以下makefile。我想Cortex-M7芯片的程序非常相似:
            #################################################
            #        MAKEFILE FOR BUILDING THE BINARY       #
            #        AND EVEN FLASHING THE CHIP!            #
            # Author: Othane                                #
            #################################################

    # setup compiler and flags for stm32f373 build
    SELF_DIR := $(dir $(lastword $(MAKEFILE_LIST)))


    CROSS_COMPILE ?= arm-none-eabi-
    export CC = $(CROSS_COMPILE)gcc
    export AS = $(CROSS_COMPILE)gcc -x assembler-with-cpp
    export AR = $(CROSS_COMPILE)ar
    export LD = $(CROSS_COMPILE)ld
    export OD   = $(CROSS_COMPILE)objdump
    export BIN  = $(CROSS_COMPILE)objcopy -O ihex
    export SIZE = $(CROSS_COMPILE)size
    export GDB = $(CROSS_COMPILE)gdb


    MCU = cortex-m4
    FPU = -mfloat-abi=hard -mfpu=fpv4-sp-d16 -D__FPU_USED=1 -D__FPU_PRESENT=1 -DARM_MATH_CM4
    DEFS = -DUSE_STDPERIPH_DRIVER -DSTM32F37X -DRUN_FROM_FLASH=1 -DHSE_VALUE=8000000
    OPT ?= -O0
    MCFLAGS = -mthumb -mcpu=$(MCU) $(FPU)


    export ASFLAGS  = $(MCFLAGS) $(OPT) -g -gdwarf-2 $(ADEFS)
    CPFLAGS += $(MCFLAGS) $(OPT) -gdwarf-2 -Wall -Wno-attributes -fverbose-asm
    CPFLAGS += -ffunction-sections -fdata-sections $(DEFS)
    export CPFLAGS
    export CFLAGS += $(CPFLAGS)


    export LDFLAGS  = $(MCFLAGS) -nostartfiles -Wl,--cref,--gc-sections,--no-warn-mismatch $(LIBDIR)


    HINCDIR += ./STM32F37x_DSP_StdPeriph_Lib_V1.0.0/Libraries/CMSIS/Include/ \
        ./STM32F37x_DSP_StdPeriph_Lib_V1.0.0/Libraries/CMSIS/Device/ST/STM32F37x/Include/ \
        ./STM32F37x_DSP_StdPeriph_Lib_V1.0.0/Libraries/STM32F37x_StdPeriph_Driver/inc/ \
        ./
    export INCDIR = $(patsubst %,$(SELF_DIR)%,$(HINCDIR))


    # openocd variables and targets
    OPENOCD_PATH ?= /usr/local/share/openocd/
    export OPENOCD_BIN = openocd
    export OPENOCD_INTERFACE = $(OPENOCD_PATH)/scripts/interface/stlink-v2.cfg
    export OPENOCD_TARGET = $(OPENOCD_PATH)/scripts/target/stm32f3x_stlink.cfg


    OPENOCD_FLASH_CMDS = ''
    OPENOCD_FLASH_CMDS += -c 'reset halt'
    OPENOCD_FLASH_CMDS += -c 'sleep 10'
    OPENOCD_FLASH_CMDS += -c 'stm32f1x unlock 0'
    OPENOCD_FLASH_CMDS += -c 'flash write_image erase $(PRJ_FULL) 0 ihex'
    OPENOCD_FLASH_CMDS += -c shutdown
    export OPENOCD_FLASH_CMDS


    OPENOCD_ERASE_CMDS = ''
    OPENOCD_ERASE_CMDS += -c 'reset halt'
    OPENOCD_ERASE_CMDS += -c 'sleep 10'
    OPENOCD_ERASE_CMDS += -c 'sleep 10'
    OPENOCD_ERASE_CMDS += -c 'stm32f1x mass_erase 0'
    OPENOCD_ERASE_CMDS += -c shutdown
    export OPENOCD_ERASE_CMDS


    OPENOCD_RUN_CMDS = ''
    OPENOCD_RUN_CMDS += -c 'reset halt'
    OPENOCD_RUN_CMDS += -c 'sleep 10'
    OPENOCD_RUN_CMDS += -c 'reset run'
    OPENOCD_RUN_CMDS += -c 'sleep 10'
    OPENOCD_RUN_CMDS += -c shutdown
    export OPENOCD_RUN_CMDS


    OPENOCD_DEBUG_CMDS = ''
    OPENOCD_DEBUG_CMDS += -c 'halt'
    OPENOCD_DEBUG_CMDS += -c 'sleep 10'


    .flash:
        $(OPENOCD_BIN) -f $(OPENOCD_INTERFACE) -f $(OPENOCD_TARGET) -c init $(OPENOCD_FLASH_CMDS)


    .erase:
        $(OPENOCD_BIN) -f $(OPENOCD_INTERFACE) -f $(OPENOCD_TARGET) -c init $(OPENOCD_ERASE_CMDS)


    .run:
        $(OPENOCD_BIN) -f $(OPENOCD_INTERFACE) -f $(OPENOCD_TARGET) -c init $(OPENOCD_RUN_CMDS)


    .debug:
        $(OPENOCD_BIN) -f $(OPENOCD_INTERFACE) -f $(OPENOCD_TARGET) -c init $(OPENOCD_DEBUG_CMDS)
尊敬的Othane先生/女士:
能否请您解释一下如何使用这个makefile来完成以下步骤:
- 从源代码编译二进制文件
- 刷写芯片
我对makefile有一些基本了解,但是您的makefile确实很深奥。您似乎使用了GNU make工具的很多功能。请给我们一些更多的解释,我会给您额外的奖励;-)