我有一个 `Fragment`,其中包含自定义适配器(继承自 `BaseAdapter`),管理着一个 `GridView`。
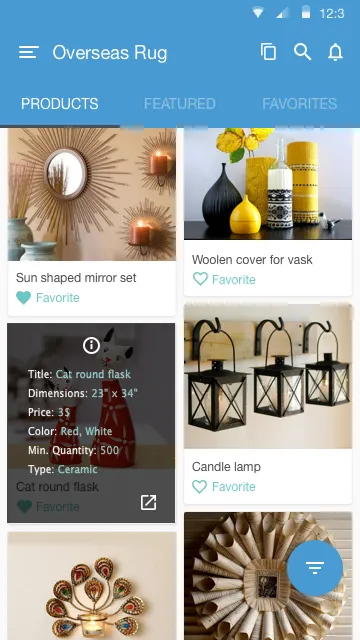
我想在每一行的 `GridView` 上显示图像,并且在单击每个单元格时,我想要打开一个半透明视图,它将显示图像详细信息。
问题是,当我单击图像时,一个半透明视图出现在图像的顶部,但当我单击下一个图像时,前一个图像上打开的半透明视图没有隐藏,仍然出现在第一个图像上。
请参考以下代码
我的 Fragment:
public class ProductFragment extends Fragment {

    String ss = null;
    GridView gridView;
    ArrayList<ProductParameterBO> productlist;
    GridViewCustomAdapter gridViewCustomAdapter;


    @Nullable
    @Override
    public View onCreateView(LayoutInflater inflater, ViewGroup container, Bundle savedInstanceState) {

        if (savedInstanceState!=null){
            View rootView =  inflater.inflate(R.layout.empty_catalog_item,null);

            TextView configure = (TextView)rootView.findViewById(R.id.text_conf);

            configure.setOnClickListener(new View.OnClickListener() {
                @Override
                public void onClick(View v) {

                    Intent intent = new Intent(getActivity(),SplitViewActivity.class);
                    intent.putExtra("firstTab","1stTabs");
                    startActivity(intent);

                }
            });

            TextView text_here = (TextView)rootView.findViewById(R.id.text_here);
            text_here.setOnClickListener(new View.OnClickListener() {
                @Override
                public void onClick(View v) {

                }
            });

            FloatingActionButton fab = (FloatingActionButton)rootView.findViewById(R.id.fab);
            fab.setOnClickListener(new View.OnClickListener() {
                @Override
                public void onClick(View view) {

                    Intent intent = new Intent(getActivity(), EditUploadActivity.class);
                    startActivity(intent);

                }
            });

            return rootView;
        } else {
            View rootView =  inflater.inflate(R.layout.fragment_product,null);

            gridView =(GridView)rootView.findViewById(R.id.gridView);

            productlist = new ArrayList<ProductParameterBO>();

            productlist.add(new ProductParameterBO("Type","Numeric","yes","yes"));
            productlist.add(new ProductParameterBO("Typess","Numericss","yesss","yesss"));
            productlist.add(new ProductParameterBO("Typess","Numericss","yesss","yesss"));
            productlist.add(new ProductParameterBO("Typess","Numericss","yesss","yesss"));
            gridViewCustomAdapter = new GridViewCustomAdapter(getActivity(),productlist);
            gridView.setAdapter(gridViewCustomAdapter);
            gridViewCustomAdapter.notifyDataSetChanged();

            return rootView;
        }

        // return inflater.inflate(R.layout.fragment_product,null);
    }
}
我的适配器
public class GridViewCustomAdapter extends BaseAdapter {

    private List<ProductParameterBO> availList;

    private LayoutInflater inflater;

    Context context;

    public GridViewCustomAdapter(Context ctx,List<ProductParameterBO> list){
        this.context = ctx;
        this.availList = list;
    }

    @Override
    public int getCount() {
        return availList.size();
    }

    @Override
    public Object getItem(int position) {
        return availList.get(position);
    }

    @Override
    public long getItemId(int position) {
        ProductParameterBO c = availList.get(position);
        // long id = c.getTimeId();
        return 0;
    }

    @Override
    public View getView(int position,View convertView,final ViewGroup parent) {

        View row = convertView;
        final TeeTimeHolder holder;

        if (row == null){
            inflater = (LayoutInflater)context.getSystemService(Context.LAYOUT_INFLATER_SERVICE);
            row = inflater.inflate(R.layout.grid_row,parent,false);
            holder = new TeeTimeHolder();
            holder.myImage =(ImageView)row.findViewById(R.id.imageView10);
            holder.name =(TextView)row.findViewById(R.id.textView47);
            holder.edit =(TextView)row.findViewById(R.id.textView49);
            holder.rl =(RelativeLayout)row.findViewById(R.id.img_ovrly);
            row.setTag(holder);
        } else {
            holder =(TeeTimeHolder)row.getTag();
        }

        holder.name.setText(availList.get(position).getParameterName());
        holder.myImage.setImageResource(R.drawable.toi);
        holder.rl.setVisibility(View.GONE);

        holder.myImage.setOnClickListener(new View.OnClickListener() {
            @Override
            public void onClick(View v) {
                View rows = null;
                inflater = (LayoutInflater)context.getSystemService(Context.LAYOUT_INFLATER_SERVICE);
                rows = inflater.inflate(R.layout.image_overlay,parent,false);
                // holder.rl = (RelativeLayout)rows.findViewById(R.id.img_ovrly);
                holder.rl.setVisibility(View.VISIBLE);

            }
        });

        return row;
    }

    static class TeeTimeHolder {
        ImageView myImage;

        TextView name,edit;

        RelativeLayout rl;

        //TextView descriptions;

        /*  TextView coursefee;

        TextView viewdetils;*/
    }
}
我的 XML 布局 grid_row.xml
<?xml version="1.0" encoding="utf-8"?>
<RelativeLayout  xmlns:android="http://schemas.android.com/apk/res/android"
    android:layout_width="match_parent"
    android:layout_height="wrap_content">

    <ImageView
        android:layout_width="wrap_content"
        android:layout_height="wrap_content"
        android:id="@+id/imageView10"
        android:src="@drawable/toi"/>

    <TextView
        android:layout_width="wrap_content"
        android:layout_height="wrap_content"
        android:text="Image Name"
        android:id="@+id/textView47"
        android:layout_below="@+id/imageView10"
        android:layout_alignParentLeft="true"
        android:layout_alignParentStart="true"
        android:layout_marginTop="10dp"
        android:layout_marginLeft="10dp" />

    <TextView
        android:layout_width="wrap_content"
        android:layout_height="wrap_content"
        android:text="Edit"
        android:id="@+id/textView49"
        android:layout_below="@+id/textView47"
        android:layout_alignParentLeft="true"
        android:layout_alignParentStart="true"
        android:layout_marginTop="5dp"
        android:layout_marginLeft="10dp" />

    <RelativeLayout
        android:layout_width="match_parent"
        android:layout_height="match_parent"
        android:id="@+id/img_ovrly"
        android:background="@color/opacity">

        <ImageView
            android:layout_width="wrap_content"
            android:layout_height="wrap_content"
            android:background="@drawable/mail"
            android:layout_marginTop="10dp"
            android:id="@+id/image_i"
            android:layout_centerHorizontal="true"/>
        <TextView
            android:layout_width="wrap_content"
            android:layout_height="wrap_content"
            android:text="Title :"
            android:id="@+id/text_ttle"
            android:layout_below="@+id/image_i"
            android:layout_marginLeft="20dp"
            android:layout_marginTop="20dp"
            android:textColor="#ffffff"/>
        <TextView
            android:layout_width="wrap_content"
            android:layout_height="wrap_content"
            android:layout_toRightOf="@+id/text_ttle"
            android:text="hmmmm"
            android:layout_below="@+id/image_i"
            android:layout_marginTop="20dp"
            android:textColor="#6ec6c5"/>
        <TextView
            android:layout_width="wrap_content"
            android:layout_height="wrap_content"
            android:text="Dimensions :"
            android:id="@+id/text_dimen"
            android:layout_below="@+id/text_ttle"
            android:layout_marginLeft="20dp"
            android:layout_marginTop="10dp"
            android:textColor="#ffffff"/>
        <TextView
            android:layout_width="wrap_content"
            android:layout_height="wrap_content"
            android:layout_toRightOf="@+id/text_dimen"
            android:text="32*23"
            android:layout_below="@+id/text_ttle"
            android:layout_marginTop="10dp"
            android:textColor="#6ec6c5"/>
        <TextView
            android:layout_width="wrap_content"
            android:layout_height="wrap_content"
            android:text="Price :"
            android:id="@+id/text_prce"
            android:layout_below="@+id/text_dimen"
            android:layout_marginLeft="20dp"
            android:layout_marginTop="10dp"
            android:textColor="#ffffff"/>
        <TextView
            android:layout_width="wrap_content"
            android:layout_height="wrap_content"
            android:layout_toRightOf="@+id/text_prce"
            android:text="32*23"
            android:layout_below="@+id/text_dimen"
            android:layout_marginTop="10dp"
            android:textColor="#6ec6c5"/>
        <TextView
            android:layout_width="wrap_content"
            android:layout_height="wrap_content"
            android:text="Color :"
            android:id="@+id/text_clr"
            android:layout_below="@+id/text_prce"
            android:layout_marginLeft="20dp"
            android:layout_marginTop="10dp"
            android:textColor="#ffffff"/>
        <TextView
            android:layout_width="wrap_content"
            android:layout_height="wrap_content"
            android:layout_toRightOf="@+id/text_clr"
            android:text="red,white"
            android:layout_below="@+id/text_prce"
            android:layout_marginTop="10dp"
            android:textColor="#6ec6c5"/>
        <TextView
            android:layout_width="wrap_content"
            android:layout_height="wrap_content"
            android:text="Min. Quantity :"
            android:id="@+id/text_minq"
            android:layout_below="@+id/text_clr"
            android:layout_marginLeft="20dp"
            android:layout_marginTop="10dp"
            android:textColor="#ffffff"/>
        <TextView
            android:layout_width="wrap_content"
            android:layout_height="wrap_content"
            android:layout_toRightOf="@+id/text_minq"
            android:text="1000"
            android:layout_below="@+id/text_clr"
            android:layout_marginTop="10dp"
            android:textColor="#6ec6c5"/>
        <TextView
            android:layout_width="wrap_content"
            android:layout_height="wrap_content"
            android:text="Type :"
            android:id="@+id/text_typ"
            android:layout_below="@+id/text_minq"
            android:layout_marginLeft="20dp"
            android:layout_marginTop="10dp"
            android:textColor="#ffffff"/>
        <TextView
            android:layout_width="wrap_content"
            android:layout_height="wrap_content"
            android:layout_toRightOf="@+id/text_typ"
            android:text="creamic"
            android:layout_below="@+id/text_minq"
            android:layout_marginTop="10dp"
            android:textColor="#6ec6c5"/>
        <ImageView
            android:layout_width="wrap_content"
            android:layout_height="wrap_content"
            android:id="@+id/img_flp"
            android:background="@drawable/flip"
            android:layout_below="@+id/text_typ"
            android:layout_alignParentRight="true"
            android:layout_marginRight="20dp"
            android:layout_marginTop="20dp"/>

    </RelativeLayout>

</RelativeLayout>
我有点不明白,希望你能帮助我解决这个问题。我想要一个屏幕看起来像那样。我是否正确地在图像上方打开半透明屏幕,以及如何隐藏或在单击我的Adater类中的其他图像时使其不可见。非常感谢您提供的任何帮助。