在Node SceneKit中获取顶点位置

4
我有一个通过程序创建的平面,我想要获取其中一个顶点的坐标。类似这样: 
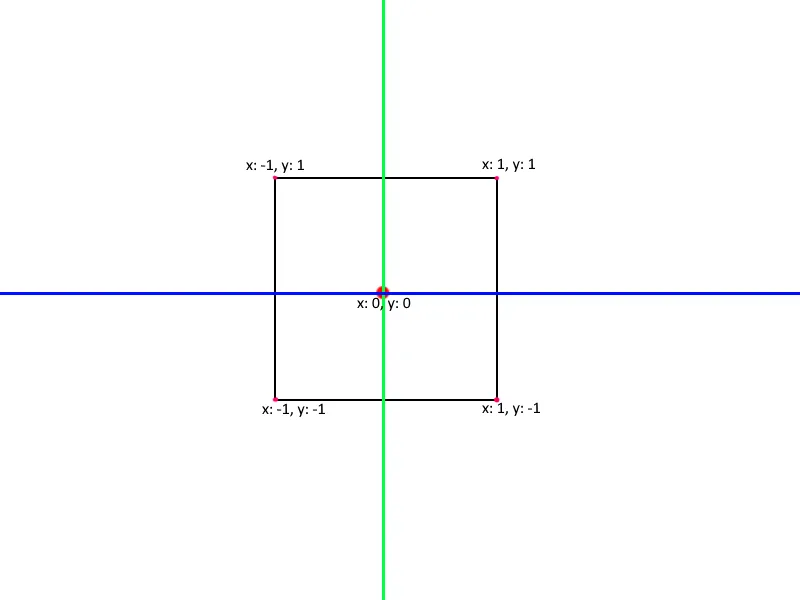
print(Plane.vertices[1].position) 它可能会打印出像这样的结果:(x: 1, y: 1),而print(Plane.vertices[2].position)则会打印 (x - 1, y: 1)。
这是我创建平面的方式:enter image description here
let positions = [SCNVector3Make(  0, -0.1,  0),
                         SCNVector3Make(  0.3, -0.1,  0),

                         SCNVector3Make(  0,  0.1,  0),
                         SCNVector3Make(  0.3,  0.1,  0),
                         ]
        let indices :[UInt16] = [

            0, 1, 2,
            1, 3, 2,
            ]

        let vertexSource = SCNGeometrySource(vertices: positions, count: 4)
        let indexData = NSData(bytes: indices, length: MemoryLayout<CInt>.size * indices.count)


        let newElement = SCNGeometryElement(data: NSData(bytes: indices, length: indices.count * MemoryLayout<Int16>.size) as Data, primitiveType: .triangles , primitiveCount: 2, bytesPerIndex: MemoryLayout<Int16>.size)

        let geometry = SCNGeometry(sources: [vertexSource], elements: [newElement])
        custom = SCNNode(geometry: geometry)
        scene.rootNode.addChildNode(custom!)
        custom?.position = SCNVector3Make(0, 0, 0)

我认为可以通过transform来实现,但是自定义transform有很多奇怪的东西,比如m11、m12、m13,我不理解。


我已经谷歌了这个问题并查看了许多关于变换的堆栈溢出问题,但它们并没有解释scnmatrix m的含义。这篇文章可能听起来像是我没有阅读过有关SceneKit的任何内容,因为英语不是我的母语,有些事情很难用英语描述。 - Asphys
1
从你关于飞机顶点的另一个问题和这个问题来看,我仍然不明白你想要看到什么效果。你能画一个粗略的铅笔草图并上传吗? - Hal Mueller
1
@HalMueller 我认为他是想获得他创建的每个顶点的场景坐标来构建他的平面对象。 - Confused
我使用的是Mac电脑,无法进行绘图,但我有一个平面(SCNPlane或者是通过编程创建的平面),它有4个顶点,也就是4个角落。现在我想要获取该平面上某个顶点的坐标。类似这样:print(Plane.vertices[1].position),它可能会打印出像这样的内容:(x: 1, y: 1),而print(Plane.vertices[2].position)则会打印出(x - 1, y: 1)。 - Asphys
@HalMueller 示例 - Asphys
1个回答

7
这个问题比表面看起来的要复杂得多。
SceneKit将存储用于生成节点的几何体的坐标在原始比例/基础上。一旦创建了对象,这些坐标就不会改变。对于像SCNPlane或SCNBox这样的基元,这些几何图形在场景中是共享的。因此,如果您有许多不同的平面或盒子,它们都处于不同的位置、旋转和缩放状态,那么当您查询SCNGeometrySource时,您将得到相同的顶点。关于该检索的讨论可在此处找到:从scenekit中提取顶点。但是,这种方法不会为您提供本地坐标空间中的角落。
我们有两个函数可以用于 SCNNodeSCNGeometry>: boundingBoxboundingSphere(它们在协议 SCNBoundingVolume 中定义)。boundingBox 给出了两个点,最小值和最大值。通过这两个相对的立方体角落,您可以找出平面的角顶点。然而,还有一个问题。这两个函数都在本地坐标系中返回它们的答案,即节点本身使用的坐标系。所以我们还是困在了同样的境地:我的每个平面或盒子都将具有相同的边界框。

我想到的解决方法是使用 SCNNode 的 convertPosition(_, to: node),传递场景的根节点。这最终给我了根节点坐标空间中的边界框。

for node in [custom1, custom2, plainPlane1, plainPlane2] {
    print(node.name!)
    print(node.boundingBox.max)
    print(node.boundingBox.min)
    print(node.convertPosition(node.boundingBox.min, to: scene.rootNode))
    print(node.convertPosition(node.boundingBox.max, to: scene.rootNode))
}

生产

自定义1
SCNVector3(x: 0.300000011920929, y: 0.100000001490116, z: 0.0)
SCNVector3(x: 0.0, y: -0.100000001490116, z: 0.0)
SCNVector3(x: 0.0, y: -0.100000001490116, z: -1.0)
SCNVector3(x: 0.300000011920929, y: 0.100000001490116, z: -1.0)
自定义2
SCNVector3(x: 0.300000011920929, y: 0.100000001490116, z: 0.0)
SCNVector3(x: 0.0, y: -0.100000001490116, z: 0.0)
SCNVector3(x: 0.200000002980232, y: 0.429289322037836, z: -1.07071067796216)
SCNVector3(x: 0.500000014901161, y: 0.570710677962164, z: -0.929289322037836)
简单平面1
SCNVector3(x: 0.5, y: 1.0, z: 0.0)
SCNVector3(x: -0.5, y: -1.0, z: 0.0)
SCNVector3(x: -0.5, y: -1.0, z: -2.0)
SCNVector3(x: 0.5, y: 1.0, z: -2.0)
简单平面2
SCNVector3(x: 0.5, y: 1.0, z: 0.0)
SCNVector3(x: -0.5, y: -1.0, z: 0.0)
SCNVector3(x: -9.18485139438876e-18, y: -0.300000011920929, z: -1.84999999403954)
SCNVector3(x: 9.18485139438876e-18, y: 0.300000011920929, z: -2.15000000596046)

针对这个场景:

enter image description here

以下是完整的 macOS playground:

//:游乐场 - 名词:人们可以玩耍的地方
导入Cocoa 导入SceneKit 导入PlaygroundSupport let positions = [SCNVector3Make(0,-0.1,0), SCNVector3Make(0.3,-0.1,0), SCNVector3Make(0,0.1,0), SCNVector3Make(0.3,0.1,0), ] let indices: [UInt16] = [ 0, 1, 2, 1, 3, 2, ] let vertexSource = SCNGeometrySource(vertices: positions, count: 4) let indexData = NSData(bytes: indices, length: MemoryLayout.size * indices.count) let newElement = SCNGeometryElement(data: NSData(bytes: indices, length: indices.count * MemoryLayout.size) as Data, primitiveType: .triangles , primitiveCount: 2, bytesPerIndex: MemoryLayout.size) let sceneView = SCNView(frame: CGRect(x: 0, y: 0, width: 600, height: 400)) sceneView.allowsCameraControl = true sceneView.autoenablesDefaultLighting = true sceneView.backgroundColor = NSColor.darkGray sceneView.showsStatistics = true PlaygroundPage.current.liveView = sceneView let scene = SCNScene() sceneView.scene = scene let geometry = SCNGeometry(sources: [vertexSource], elements: [newElement]) geometry.firstMaterial?.diffuse.contents = NSColor.red geometry.firstMaterial?.isDoubleSided = true let custom1 = SCNNode(geometry: geometry) custom1.position = SCNVector3Make(0, 0, -1) custom1.name = "自定义1" scene.rootNode.addChildNode(custom1) let custom2 = SCNNode(geometry: geometry) custom2.position = SCNVector3Make(0.2, 0.5, -1) custom2.rotation = SCNVector4Make(1, 0, 0, CGFloat(M_PI_4)) custom2.name = "自定义2" scene.rootNode.addChildNode(custom2) let plainPlaneGeometry = SCNPlane(width: 1, height: 2) plainPlaneGeometry.firstMaterial?.diffuse.contents = NSColor.yellow plainPlaneGeometry.firstMaterial?.isDoubleSided = true let plainPlane1 = SCNNode(geometry: plainPlaneGeometry) plainPlane1.position = SCNVector3Make(0, 0, -2) plainPlane1.name = "平面1" scene.rootNode.addChildNode(plainPlane1) let plainPlane2 = SCNNode(geometry: plainPlaneGeometry) plainPlane2.position = SCNVector3Make(0, 0, -2) plainPlane2.rotation = SCNVector4Make(0, 1, 0, CGFloat(M_PI_2)) plainPlane2.scale = SCNVector3Make(0.3, 0.3, 0.3) plainPlane2.name = "平面2" scene.rootNode.addChildNode(plainPlane2)
for node in [custom1, custom2, plainPlane1, plainPlane2] { print(node.name!) print(node.boundingBox.max) print(node.boundingBox.min) // print(node.transform) print(node.convertPosition(node.boundingBox.min, to: scene.rootNode)) print(node.convertPosition(node.boundingBox.max, to: scene.rootNode)) }
你提到了变换矩阵。在需要更好、更简单的理解CATransform3D中有一个很好的解释,介绍了它的外观和工作原理(引用了两篇优秀的维基百科文章),而在http://sketchytech.blogspot.com/2014/12/explaining-catransform3d-matrix.html上有一个易于理解的概述。请注意保留HTML标签。

网页内容由stack overflow 提供, 点击上面的
可以查看英文原文,
原文链接