这里是分段选择器功能的手动实现:
@ViewBuilder func viewSegmentedButtons(arr: [String], selIndex: Int, baseColor: Color, closure:@escaping (_ selectedIndex: Int) -> Void) -> some View {

    let columns = Array(repeating: GridItem(spacing: 1), count:arr.count)
    LazyVGrid(columns: columns, spacing: 1.0) {
        ForEach(Array(arr.enumerated()), id: \.element) { index, translation in
            Button {
                closure(index)
            } label: {
                ZStack {
                    Rectangle()
                        .foregroundColor(index == selIndex ? baseColor : Color(.systemBackground))
                        .cornerRadius(radius: index==0 ? cRadius : 0, corners: [.topLeft, .bottomLeft])
                        .cornerRadius(radius: index==arr.count-1 ? cRadius : 0, corners: [.topRight, .bottomRight])
                    Text(translation)
                        .padding(.vertical, 10)
                        .font(.footnote)
                        .foregroundColor(index != selIndex ? baseColor : Color(.systemBackground) )
                }
            }
        }
    }
    .foregroundColor(baseColor)
    .overlay(
        RoundedRectangle(cornerRadius: cRadius)
            .stroke(baseColor, lineWidth: 2)
    )
    .font(.callout)
    .background(baseColor)
    .cornerRadius(cRadius)
    .padding(.bottom, 10)
}
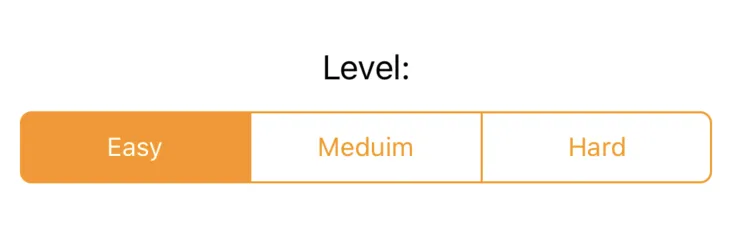
使用示例:
@State private var levelIndex: Int = 0
var body: some View {
    VStack {
        Text("Level:")

        viewSegmentedButtons(arr: ["Easy", "Meduim", "Hard"], selIndex: levelIndex, baseColor: .orange) { selectedIndex in
            withAnimation {
                levelIndex = selectedIndex
            }
        }
    }
}
结果: