只在底部UIView上设置阴影

49

我希望在UIView底部创建阴影,但现在使用这个函数将在顶部、底部、左侧和右侧创建阴影。

func setCardView(view : UIView){
    view.layer.masksToBounds = false
    view.layer.shadowOffset = CGSize(width: 0, height: 0)
    view.layer.shadowRadius = 2
    view.layer.shadowOpacity = 0.5
}

有没有什么方法只在底部创建阴影?任何帮助都将不胜感激。谢谢!

9个回答

78

我认为正确的理解阴影的方式是,阴影属于物体本身,即按钮、UI视图,而不仅仅是它的一部分。可以想象一个虚拟光源。你不能只为一个侧面创建阴影。

话虽如此,阴影始终将是整个视图的阴影。但是,您可以更改阴影偏移量使其朝向底部。

view.layer.shadowOffset = CGSize(width: 0, height: 3)
这意味着您希望光源从顶部发出光线,使阴影形成在底部。您仍然能看到一些顶部的阴影是因为阴影半径。阴影半径是为了模拟光的漫反射效果。光的漫反射越强,阴影就越柔和,因此您会看到仍有顶部的阴影。
view.layer.shadowRadius = 1 or 0.5

尝试减小半径,这样可以获得更好的视觉效果。

如果需要了解本影、半影和反影,请查看https://en.wikipedia.org/wiki/Umbra,_penumbra_and_antumbra


3
顶上去以表支持解释。 - Sourabh Shekhar
1
我也是 :-) - Reckoner
是的,我也是。讲解得很好。 - ANeme
精彩的解释几乎清楚了阴影概念。 - Tushar J.

24

这将仅向底部添加阴影。作为UIView的扩展实现。

extension UIView {
func addBottomShadow() {
    layer.masksToBounds = false
    layer.shadowRadius = 4
    layer.shadowOpacity = 1
    layer.shadowColor = UIColor.gray.cgColor
    layer.shadowOffset = CGSize(width: 0 , height: 2)
    layer.shadowPath = UIBezierPath(rect: CGRect(x: 0,
                                                 y: bounds.maxY - layer.shadowRadius,
                                                 width: bounds.width,
                                                 height: layer.shadowRadius)).cgPath
}
}

在此输入图片描述


20

这段代码适用于Swift 4,并且将阴影应用于视图底部:

view.layer.masksToBounds = false
view.layer.shadowRadius = 4
view.layer.shadowOpacity = 1
view.layer.shadowColor = UIColor.gray.cgColor
view.layer.shadowOffset = CGSize(width: 0 , height:2)

此代码适用于 Swift 4,并应用于视图的底部阴影。 - Srinivasan.M
11
请将此解释添加到您的答案中,而不是评论中。阅读答案的人将更好地理解您的代码。 - Enea Dume

17

如果您想让UIView的阴影仅出现在一侧,您应将view.layer.shadowPath设置为UIBezierPath

以下是一个示例,它仅会在视图底部显示阴影:

view.layer.shadowPath = UIBezierPath(rect: CGRect(x: 0,
                                                  y: bounds.maxY - layer.shadowRadius,
                                                  width: bounds.width,
                                                  height: layer.shadowRadius)).cgPath

拆解CGRect值,你可以得到:

  • xwidth确保阴影占据视图的全部水平宽度(您可能希望调整它们,例如使用layer.shadowRadius值作为偏移量的基础)
  • yheight确保阴影尽可能地低,并且只有半径那么大

当然,有些情况下这种方法无法奏效,例如当您需要的shadowRadius超过视图的height时。在这些情况下,我建议使用图像视图或遮罩层。

希望这可以帮助到您,


16

更改你的shadowOffset

 view.layer.shadowOffset = CGSize(width: 0, height: 3)

4
那个景色仍让我心中有一丝阴影。 - Sonic Master
2
你能试着把“height”值增大一些吗? - Luan Tran
2
添加高度10后正常工作。谢谢。 - Vineesh TP

12

这里是在Swift中应用阴影的正确方式:

yourView.layer.shadowOffset = CGSize(width: 0, height: 3)
yourView.layer.shadowOpacity = 0.6
yourView.layer.shadowRadius = 3.0
yourView.layer.shadowColor = UIColor.red.cgColor

7

虽然之前的回答可以在较低的 shadowRadius 下工作,但实际上并没有真正地实现“阴影”效果。

你可以使用 UIBezierPath 仅在底部添加阴影。

方法如下 -

    let shadowWidth: CGFloat = 1.2 // Shadow width, will be the width furthest away from the view, this is equivalent to 120% of the views width
    let shadowHeight: CGFloat = 0.3 // Shadow height, again this is equivalent to 30%
    let shadowRadius: CGFloat = 5 
    let width = someView.frame.width
    let height = someView.frame.height // Get width and height of the view

    // Plot the path
    let shadowPath = UIBezierPath()
    shadowPath.move(to: CGPoint(x: shadowRadius / 2, y: height - shadowRadius / 2))
    shadowPath.addLine(to: CGPoint(x: width - shadowRadius / 2, y: height - shadowRadius / 2))
    shadowPath.addLine(to: CGPoint(x: width * shadowWidth, y: height + (height * shadowHeight)))
    shadowPath.addLine(to: CGPoint(x: width * -(shadowWidth - 1), y: height + (height * shadowHeight)))
    // Add shadow
    someView.layer.shadowPath = shadowPath.cgPath
    someView.layer.shadowRadius = shadowRadius
    someView.layer.shadowOffset = .zero
    someView.layer.shadowOpacity = 0.2
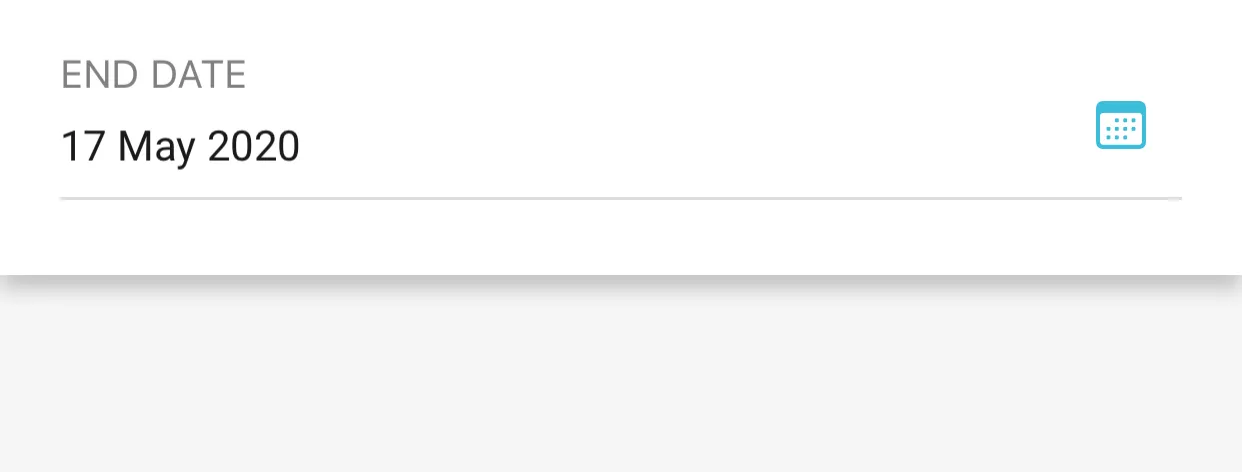
这将输出以下内容

输入图像描述

或者如果你想要一个更简单的解决方案,带有较少选项,你可以选择这个

   let buttonHeight = someButton.frame.height
    let buttonWidth = someButton.frame.width

    let shadowSize: CGFloat = 15
    let contactRect = CGRect(x: -shadowSize, y: buttonHeight - (shadowSize * 0.2), width: buttonWidth + shadowSize * 2, height: shadowSize)
    someButton.layer.shadowPath = UIBezierPath(ovalIn: contactRect).cgPath
    someButton.layer.shadowRadius = 5
    someButton.layer.shadowOpacity = 0.6

这将输出以下内容

输入图像描述

示例在此处

https://github.com/hemo87/ExampleShadow/tree/master


从技术上讲,这是在您使用UIBezierPath绘制的形状上创建阴影,而不是在UIView底部创建阴影。它纯粹是绘制一个与原始UIView无关的新图形。但这可能正是操作者想要实现的。 - Elvin

3
class ViewBottomShadow: UIView {
  init() {
    super.init(frame: .zero)
    backgroundColor = .white
    layer.masksToBounds = false
    layer.shadowRadius = 2
    layer.shadowOpacity = 1
    layer.shadowColor = UIColor.gray.cgColor
    layer.shadowOffset = CGSize(width: 0 , height:2)
  }

  required init?(coder: NSCoder) {
    fatalError("init(coder:) has not been implemented")
  }
}

enter image description here


1

只需绘制常规阴影并将其翻转,就像这样简单。

@objc func shadowView() -> UIView {
        let shadowView = UIView(frame: .zero)
        shadowView.backgroundColor = .white
        shadowView.layer.shadowColor = UIColor.grey.cgColor
        shadowView.layer.shadowOffset = CGSize(width: 0, height: 2)
        shadowView.layer.shadowOpacity = 1.0
        shadowView.layer.shadowRadius = 4
        shadowView.layer.compositingFilter = "multiplyBlendMode"
        return shadowView
    }

func idtm_addBottomShadow() {
        let shadow = shadowView()
        shadow.transform = transform.rotated(by: 180 * CGFloat(Double.pi))
        shadow.transform = transform.rotated(by: -1 * CGFloat(Double.pi))
        shadow.translatesAutoresizingMaskIntoConstraints = false
        addSubview(shadow)
        NSLayoutConstraint.activate([
            shadow.leadingAnchor.constraint(equalTo: leadingAnchor),
            shadow.trailingAnchor.constraint(equalTo: trailingAnchor),
            shadow.bottomAnchor.constraint(equalTo: bottomAnchor),
            shadow.heightAnchor.constraint(equalToConstant: 1),
            ])
    }

网页内容由stack overflow 提供, 点击上面的
可以查看英文原文,
原文链接