如何为UINavigationBar设置一个高度为1像素的不透明阴影图像?

9

在我的应用程序委托 didFinishLaunchingWithOptions 函数中,我尝试自定义导航栏的外观。

[UINavigationBar appearance].translucent = NO;
[[UINavigationBar appearance] 
    setBackgroundImage:[UIImage 
        imageWithColor:[UIColor whiteColor] 
        size:CGSizeMake(1.0f, 1.0f)
    ] 
    forBarMetrics:UIBarMetricsDefault
];
[UINavigationBar appearance].shadowImage = [UIImage 
    imageWithColor:[UIColor redColor] 
    size:CGSizeMake(0.5f, 0.5f)
];

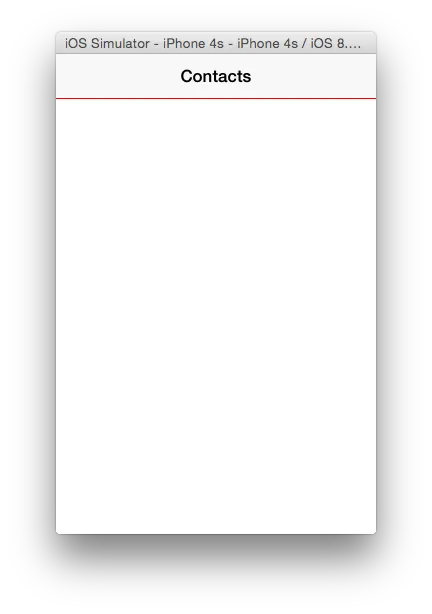
我希望看到一个高度为1像素、红色不透明的阴影,但实际上我得到了一个高度为2像素、红色半透明的阴影。我该如何让它完全按照我的要求显示?我已经按照UITabBar的类似外观设置进行了设置,但它表现得很奇怪。
动态创建图像的类别函数定义如下:
+ (UIImage*)imageWithColor:(UIColor *)color size:(CGSize)size
{
    CGRect rect = CGRectMake(0.0f, 0.0f, size.width, size.height);
    UIGraphicsBeginImageContext(rect.size);
    CGContextRef context = UIGraphicsGetCurrentContext();
    CGContextSetFillColorWithColor(context, [color CGColor]);
    CGContextFillRect(context, rect);
    UIImage *image = UIGraphicsGetImageFromCurrentImageContext();
    UIGraphicsEndImageContext();
    return image;
}

你有考虑过只是给CALayer添加一个阴影吗?请参考https://dev59.com/EXRA5IYBdhLWcg3w1BuW。 - cmyr
@cmyr [UINavigationBar appearance].layer.borderWidth = 0.5f; [UINavigationBar appearance].layer.borderColor = [UIColor redColor].CGColor; 在导航栏下面没有显示任何内容。 - Pwner
你是否将图层的 clipsToBounds 属性设置为 NO? - cmyr
2个回答

17
您需要创建一个支持Retina的图形上下文:
let pixelScale = UIGraphicsBeginImageContextWithOptions(fillRect.size, false, UIScreen.main.scale)

接下来,你的阴影图像将变成1个物理像素的高度。

以下是完整代码:

extension UIImage {

    static func imageWithColor(color: UIColor) -> UIImage {
        let pixelScale = UIScreen.main.scale
        let pixelSize = 1 / pixelScale
        let fillSize = CGSize(width: pixelSize, height: pixelSize)
        let fillRect = CGRect(origin: CGPoint.zero, size: fillSize)
        UIGraphicsBeginImageContextWithOptions(fillRect.size, false, pixelScale)
        let graphicsContext = UIGraphicsGetCurrentContext()
        CGContextSetFillColorWithColor(graphicsContext, color.CGColor)
        CGContextFillRect(graphicsContext, fillRect)
        let image = UIGraphicsGetImageFromCurrentImageContext()
        UIGraphicsEndImageContext()
        return image
    }

}

在GitHub上:

https://github.com/salutis/swift-image-with-color


我建议将填充大小设置为{1,pixelSize}而不是{pixelSize,pixelSize},否则会在我的情况下创建水平渐变效果,并且该线在右端点处变得透明。 - Can Poyrazoğlu

-2

嗯...这是你想要的吗?

screenshot

在我的视图控制器中,我只是添加了一个高度为1像素且偏移量为44像素的UIView:
- (void)viewDidLoad {
    [super viewDidLoad];
    // Do any additional setup after loading the view, typically from a nib.

    self.view.backgroundColor = [UIColor whiteColor];

    [self setupNavBar];
}

-(void)setupNavBar
{
    self.navigationItem.title = @"Contacts";

    CGRect applicationFrame = [[UIScreen mainScreen] applicationFrame];

    UIView *bar = [[UIView alloc] initWithFrame:CGRectMake(0, 44, applicationFrame.size.width, 1.0)];
    bar.backgroundColor = [UIColor redColor];

    [self.navigationController.navigationBar addSubview:bar];
}

你可以将颜色更改为任何你想要的。


3
在我看来,将子视图添加到导航栏可能不是最佳的解决方案。这种方法似乎容易出错(例如当多个视图控制器尝试添加视图或者在iOS更新后导航条的视图层次结构可能发生变化时)。我认为更加安全的方法是使用公开可用的功能、自定义背景图像和UIAppearance设置。 - auco

网页内容由stack overflow 提供, 点击上面的
可以查看英文原文,
原文链接