SwiftUI TextField 触摸区域

39

SwiftUI布局与我们习惯的布局非常不同。目前我正在对抗TextField。具体来说,是它们的可触摸区域。

TextField(
    .constant(""),
    placeholder: Text("My text field")
    )
        .padding([.leading, .trailing])
        .font(.body)

这会导致非常小的TextField(高度方面)。

输入图像描述

添加框架修饰符可以解决问题(在视觉上)。

TextField(
    .constant(""),
    placeholder: Text("My text field")
    ).frame(height: 60)
        .padding([.leading, .trailing])
        .font(.body)

但可点击区域保持不变。

我知道,frame修饰符除了用指定的高度将textField包装在另一个视图中之外,什么也没有做。

是否有类似于resizable()的东西适用于 Image,能够允许更高的TextField以及更宽的可点击区域?


1
我遇到了同样的问题。 - Rohit Makwana
你解决这个问题了吗? - Pranav Wadhwa
没有,我向苹果公司提交了一个雷达报告。他们说已经修复了,但实际上并没有...最终我放弃了。 - Giuseppe Lanza
@GiuseppeLanza 你说的“他们说已经修好了”是什么意思?应该通过应用框架还是填充来使其工作? - damirstuhec
1
除了在Swift v2(2020)中使用UIViewRepresentable来表示UITextField之外,仍然没有解决方案。 - Daniel
SwiftUI v3(2021)仍然存在问题:( Apple应该修复这个基本问题,而不是让开发人员进行黑客攻击。请提交反馈报告:https://feedbackassistant.apple.com 提交的报告越多,Apple就越有可能解决问题。现在是一个好时机,因为SwiftUI v3仍处于测试版阶段。 - Daniel
9个回答

28
这个解决方案只需要一个@FocusState和一个onTapGesture,以及一个带有颜色的.background,允许用户在任何地方点击,包括填充区域,来聚焦该字段。已在iOS 15上进行了测试。
struct MyView: View {
    @Binding var text: String
    @FocusState private var isFocused: Bool
    var body: some View {
        TextField("", text: $text)
            .padding()
            .background(Color.gray)
            .focused($isFocused)
            .onTapGesture {
                isFocused = true
            }
    }
}

奖励:

如果你发现自己在多个文本字段上都这样做,创建一个自定义的TextFieldStyle会让事情变得更容易:

struct TappableTextFieldStyle: TextFieldStyle {
    @FocusState private var textFieldFocused: Bool
    func _body(configuration: TextField<Self._Label>) -> some View {
        configuration
            .padding()
            .background(Color.gray)
            .focused($textFieldFocused)
            .onTapGesture {
                textFieldFocused = true
            }
    }
}

然后使用以下代码将其应用到您的文本字段中:
TextField("", text: $text)
    .textFieldStyle(TappableTextFieldStyle())

这也是我的解决方案。不幸的是,由于@FocusState,这仅适用于iOS15。 - lopes710
1
这个解决方案非常完美! - wildcard
这个解决方案几乎完美。缺少的是当用户点击前导填充时将光标移动到文档开头。我尝试过的所有方法似乎都不起作用。我甚至使用了内省库将所选范围设置为文档开头,但出于某种原因它不起作用。 - yspreen
这个方法是有效的,但只有在你也添加.background(.white)或者你需要的其他颜色时才能生效。请更新答案。 - undefined
@Christoffer 我已经为 TappableTextFieldStyle 添加了颜色。 - undefined

7

按钮解决方案

如果你不介意使用Introspect,你可以保存UITextField并在按下按钮时调用becomeFirstResponder()来实现。

extension View {
    public func textFieldFocusableArea() -> some View {
        TextFieldButton { self.contentShape(Rectangle()) }
    }
}

fileprivate struct TextFieldButton<Label: View>: View {
    init(label: @escaping () -> Label) {
        self.label = label
    }
    
    var label: () -> Label
    
    private var textField = Weak<UITextField>(nil)
    
    var body: some View {
        Button(action: {
            self.textField.value?.becomeFirstResponder()
        }, label: {
            label().introspectTextField {
                self.textField.value = $0
            }
        }).buttonStyle(PlainButtonStyle())
    }
}

/// Holds a weak reference to a value
public class Weak<T: AnyObject> {
    public weak var value: T?
    public init(_ value: T?) {
        self.value = value
    }
}

使用示例:

TextField(...)
    .padding(100)
    .textFieldFocusableArea()

使用ResponderChain的新解决方案

按钮的解决方案会添加样式和动画,这可能并不是需要的,因此我现在使用一种新方法,使用我的ResponderChain包

由于我自己也在使用它,所以我会在github上保持更新:https://gist.github.com/Amzd/d7d0c7de8eae8a771cb0ae3b99eab73d

import ResponderChain

extension View {
    public func textFieldFocusableArea() -> some View {
        self.modifier(TextFieldFocusableAreaModifier())
    }
}

fileprivate struct TextFieldFocusableAreaModifier: ViewModifier {
    @EnvironmentObject private var chain: ResponderChain
    @State private var id = UUID()
    
    func body(content: Content) -> some View {
        content
            .contentShape(Rectangle())
            .responderTag(id)
            .onTapGesture {
                chain.firstResponder = id
            }
    }
}

您需要将ResponderChain设置为SceneDelegate的环境对象,请查看ResponderChain的README获取更多信息。


1
我可以确认这是一个好的解决方案。虽然使用第三方软件包并不理想,但在苹果发布本地方法之前,它足以很好地工作。 - tyirvine

4

不需要第三方解决方案

可以通过以下方法来增加可点击区域,而无需使用第三方工具:

步骤1:创建一个修改过的TextField。这样做是为了定义我们新的TextField的填充:

代码取自 - https://dev59.com/t18e5IYBdhLWcg3wyM0r#27066764

class ModifiedTextField: UITextField {
  let padding = UIEdgeInsets(top: 20, left: 5, bottom: 0, right: 5)

  override open func textRect(forBounds bounds: CGRect) -> CGRect {
    bounds.inset(by: padding)
  }

  override open func placeholderRect(forBounds bounds: CGRect) -> CGRect {
    bounds.inset(by: padding)
  }

  override open func editingRect(forBounds bounds: CGRect) -> CGRect {
    bounds.inset(by: padding)
  }
}

步骤2:将新的ModifiedTexField转换为UIViewRepresentable,以便我们可以在SwiftUI中使用它:

struct EnhancedTextField: UIViewRepresentable {
  @Binding var text: String
  
  
  init(text: Binding<String>) {
    self._text = text
  }

  func makeUIView(context: Context) -> ModifiedTextField {
    let textField = ModifiedTextField(frame: .zero)
    textField.delegate = context.coordinator
    
    return textField
  }
  

  func updateUIView(_ uiView: ModifiedTextField, context: Context) {
    uiView.text = text
  }


  func makeCoordinator() -> Coordinator {
    Coordinator(self)
  }
  
  
  class Coordinator: NSObject, UITextFieldDelegate {
    let parent: EnhancedTextField

    init(_ parent: EnhancedTextField) {
      self.parent = parent
    }
  

    func textFieldDidChangeSelection(_ textField: UITextField) {
      parent.text = textField.text ?? ""
    }
  }
} 

步骤3:在需要的地方使用新的EnhancedTextField

EnhancedTextField(placeholder: placeholder, text: $binding)

注意:要增加或减少可点击区域,只需在ModifiedTextField中更改填充即可。

let padding = UIEdgeInsets(top: 20, left: 5, bottom: 0, right: 5)  

1
一个小技巧,但是有效。
  struct CustomTextField: View {
@State var name = ""
@State var isFocused = false
let textFieldsize : CGFloat = 20
var textFieldTouchAbleHeight : CGFloat = 200
var body: some View {
        ZStack {
            HStack{
                Text(name)
                    .font(.system(size: textFieldsize))
                    .lineLimit(1)
                    .foregroundColor(isFocused ? Color.clear : Color.black)
                    .disabled(true)
                Spacer()
            }
            .frame(alignment: .leading)
            TextField(name, text: $name , onEditingChanged: { editingChanged in
                isFocused = editingChanged
            })
            .font(.system(size: isFocused ? textFieldsize :  textFieldTouchAbleHeight ))
            .foregroundColor(isFocused ? Color.black  : Color.clear)
            .frame( height: isFocused ? 50 :  textFieldTouchAbleHeight , alignment: .leading)
             
        }.frame(width: 300, height: textFieldTouchAbleHeight + 10,alignment: .leading)
        .disableAutocorrection(true)
        .background(Color.white)
        .padding(.horizontal,10)
        .padding(.vertical,10)
        .border(Color.red, width: 2) 
    
      }

    }

我已经点赞了,但后来意识到它并非百分之百可用——如果先前输入过文本,则必须点击两次文本字段才能出现光标。 - Nelu

1
首先,我们使用一个内容从右到左对齐的空TextField。然后,我们在其上方叠加一个HStack。这个HStack包含一个显示内容为"$"的Text视图和另一个显示输入文本的Text视图。
HStack {
    Text("Amount")
    ZStack(alignment: .trailing) {
        TextField("", text: $cost)
            .multilineTextAlignment(.trailing)
            .keyboardType(.decimalPad)
            .overlay(
                HStack {
                    Text("$")
                    Text(cost).foregroundColor(.clear)
                },
                alignment: .trailing
            )
    }
}

0
尝试使用带有间隔符的覆盖层来创建更大的可点击区域。
创建一个名为myText的变量:
    @State private var myText = ""

接下来,使用以下示例格式和覆盖层创建您的TextField

    TextField("Enter myText...", text: $myText)
        .padding()
        .frame(maxWidth: .infinity)
        .padding(.horizontal)
        .shadow(color: Color(.gray), radius: 3, x: 3, y: 3)
        .overlay(
            HStack {
                Spacer()
            })

希望这对你有用!

0

iOS 15解决方案:TextFieldStyle和额外的标题(如果需要可以删除)

extension TextField {
    func customStyle(_ title: String) -> some View {
        self.textFieldStyle(CustomTextFieldStyle(title))
    }
}
extension SecureField {
    func customStyle(_ title: String, error) -> some View {
        self.textFieldStyle(CustomTextFieldStyle(title))
    }
}

struct CustomTextFieldStyle : TextFieldStyle {
    @FocusState var focused: Bool
    let title: String

    init(_ title: String) {
        self.title = title
    }
    
    public func _body(configuration: TextField<Self._Label>) -> some View {
        VStack(alignment: .leading) {
            Text(title)
                .padding(.horizontal, 12)
            configuration
                .focused($focused)
                .frame(height: 48)
                .padding(.horizontal, 12)
                .background(
                    RoundedRectangle(cornerRadius: 8, style: .continuous)
                        .foregroundColor(.gray)
                )
        }.onTapGesture {
            focused = true
        }
    }
}

0

我不知道哪个对你更好。 所以,我发布两个解决方案。

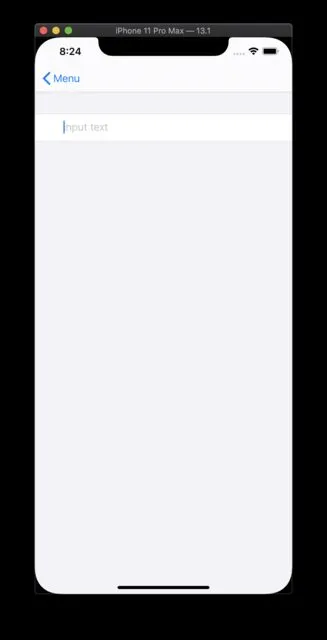
1)如果您只想缩小输入区域。

enter image description here

  var body: some View {
     Form {
        HStack {
           Spacer().frame(width: 30)
           TextField("input text", text: $inputText)
           Spacer().frame(width: 30)
        }
     }
   }

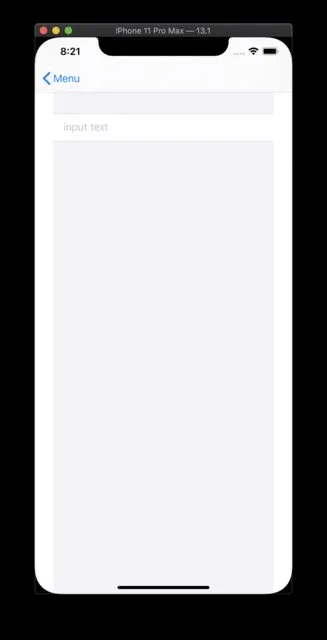
2) 缩小整个表单区域

enter image description here

  var body: some View {
    HStack {
        Spacer().frame(width: 30)
        Form {
            TextField("input text", text: $restrictInput.text)
        }
        Spacer().frame(width: 30)
    }
 }

但我不想把我的文本框放在一个表单里。我想要的是一个视图上的文本框,我希望它有我选择的活动尺寸。就像你可以用UIKit做的那样:创建一个文本框,给它框架并将它放在屏幕上。现在,虽然我可以添加框架修改器,但是文本框被包装在一个视图内,文本框的可触摸区域仍然包裹在字段内容中,非常小。 - Giuseppe Lanza

-2
一个快速的解决方法是将TextField放在一个按钮中,这样无论您在按钮中的任何位置点击,键盘都会打开;我知道这不是最终解决方案,但它可以完成工作(某种程度上)。

1
这是一个不错的解决方法... 但是需要一个按钮来使用textField的想法相当烦人。虽然这个方法可以运行,但我仍然认为一定有另一种方法。我不相信苹果没有考虑到在表单之外使用textField的可能性。 - Giuseppe Lanza
2
我完全同意;老实说,我很惊讶居然没有一个可以调整可点击区域大小的属性,或者让可点击区域自动与框架/边框大小相同。 - Thomas Bahmandeji
1
@ThomasBahmandeji 你是怎么做到的?我真的想不出来。 - George
3
对我没有用。按钮可以点击,但文本框不能成为第一个响应者。 - Ben Patch
基于这个答案:https://dev59.com/9FMH5IYBdhLWcg3wtRjA?rq=1 我认为你是说要把文本字段放在按钮里面,对吗?我尝试了一下,但对我没用。你具体是怎么做的 @ThomasBahmandeji - Mikael Weiss
我对这个答案进行了负评,因为你没有提供任何细节和代码,也没有人声称尝试过它并表示它有效。 - Gene Loparco

网页内容由stack overflow 提供, 点击上面的
可以查看英文原文,
原文链接