以编程方式在UIAlert控制器中切换。

8

我正在使用Swift创建一个注册对话框,其中包括3个文本字段和1个开关。我已经成功地将三个文本字段添加到了警报中。以下代码显示了相同的内容。

 let alertController = UIAlertController(title: "Register", message: "", preferredStyle: .Alert)
    let cancelAction = UIAlertAction(title: "Cancel", style: .Cancel) { (action) in
        // ...

        exit(0)
    }
    alertController.addAction(cancelAction)

    let OKAction = UIAlertAction(title: "Sign UP", style: .Default) { (action) in
        // ...
        let name0 = alertController.textFields![0] as UITextField
        print("Text field: \(name0.text)")

        let email1 = alertController.textFields![1] as UITextField
        print("Text field: \(email1.text)")

        let company2 = alertController.textFields![2] as UITextField
        print("Text field: \(company2.text)")


    }

    alertController.addAction(OKAction)

    alertController.addTextFieldWithConfigurationHandler { (textField) in
        textField.placeholder = "Name"
        textField.keyboardType = .EmailAddress
    }

    alertController.addTextFieldWithConfigurationHandler { (textField) in
        textField.placeholder = "Email"
        textField.secureTextEntry = false
    }

    alertController.addTextFieldWithConfigurationHandler { (textField) in
        textField.placeholder = "Company"
        textField.secureTextEntry = false
    }


            self.presentViewController(alertController, animated: true) {
                // ...
            }

现在,我需要在Alert View中以编程方式添加一个开关。我们正在使用Swift2进行此操作。这是否可行?我对Swift还很陌生。
4个回答

10

这可能会对你有所帮助。

在上述代码中alertController.addAction(OKAction)之后添加方法调用alertController.view.addSubview(createSwitch())

func createSwitch () -> UISwitch{


    let switchControl = UISwitch(frame:CGRectMake(10, 20, 0, 0));
    switchControl.on = true
    switchControl.setOn(true, animated: false);
    switchControl.addTarget(self, action: "switchValueDidChange:", forControlEvents: .ValueChanged);
    return switchControl
}

func switchValueDidChange(sender:UISwitch!){

    print("Switch Value : \(sender.on))")
}

输出:

在这里输入图片描述


谢谢您的回答。但是是否有任何方法可以在最后一个文本字段(公司)下面显示开关?就像一个开关,帮助同意或不同意条款。 - Ebin Joy
1
我尝试了很多次,将开关放在最后一个文本字段下面。但是没有成功。如果您找到了,请发布您的代码。谢谢。 - technerd
你知道是否有办法在两个文本字段之间加入一个小空格吗? - Ebin Joy
1
我找到了另一种方法:http://radar.oreilly.com/2014/01/transcending-uialertview-on-ios-7.html - Ebin Joy
更新您的代码:func createSwitch () -> UISwitch{ let switchControl = UISwitch(frame: CGRect(x:10, y:10, width:0, height:0)); switchControl.isOn = true switchControl.setOn(true, animated: false); switchControl.addTarget(self, action: #selector(switchValueDidChange), for: .valueChanged); return switchControl } @objc func switchValueDidChange(sender: UISwitch!){ print("开关状态 : \(sender.isOn))") } - user2153553

7
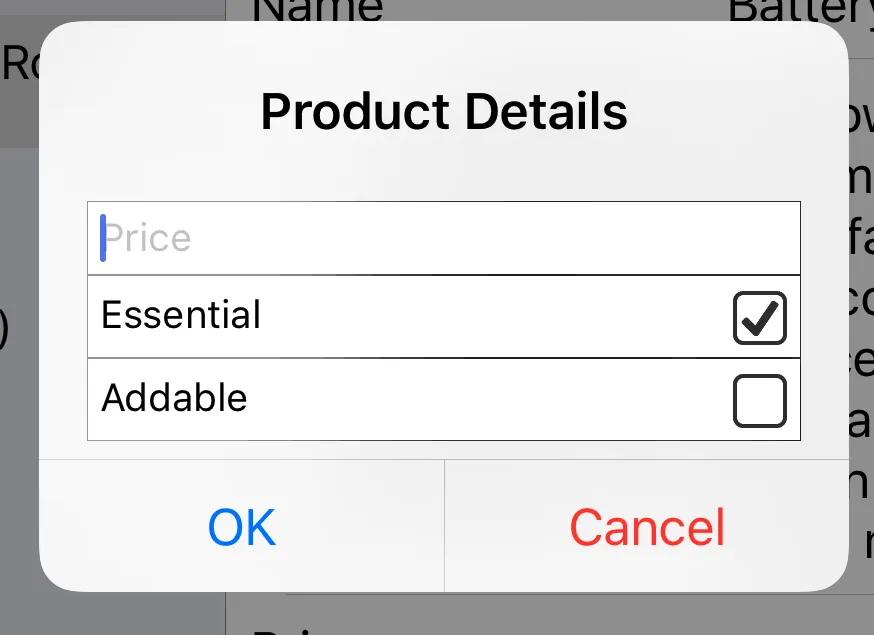
你可以使用TextField的RightView添加一个按钮。添加一个开关会更好,但是开关无法适应TextField的高度,也无法更改高度。因此,您可以添加一个按钮,并使用图像制作TickBox。

AlertController with TickBox

我从一个项目中提取了这个,所以示例图像比下面的要多一些。

在ViewController头文件中添加TextField Delegate。

@interface CustomTableViewController : UITableViewController <UITextFieldDelegate>

然后创建您的AlertController并添加TextField。
// create an alert controller
UIAlertController *alertWithText = [UIAlertController alertControllerWithTitle:title message:body preferredStyle:UIAlertControllerStyleAlert];

// create the actions handled by each button
UIAlertAction *action1 = [UIAlertAction actionWithTitle:@"OK" style:UIAlertActionStyleDefault handler:^(UIAlertAction * _Nonnull action) {

}];

UIAlertAction *action2 = [UIAlertAction actionWithTitle:@"Cancel" style:UIAlertActionStyleDestructive handler:^(UIAlertAction * _Nonnull action) {

}];

// add the actions to the alert
[alertWithText addAction:action1];
[alertWithText addAction:action2];

// Establish the weak self reference
__weak typeof(self) weakSelf = self;

[alertWithText addTextFieldWithConfigurationHandler:^(UITextField * _Nonnull textField) {

    // Create button
    UIButton *checkbox = [UIButton buttonWithType:UIButtonTypeCustom];
    [checkbox setFrame:CGRectMake(2 , 2, 18, 18)];  // Not sure about size
    [checkbox setTag:1];
    [checkbox addTarget:weakSelf action:@selector(buttonPressed:) forControlEvents:UIControlEventTouchUpInside];

    // Setup image for button
    [checkbox.imageView setContentMode:UIViewContentModeScaleAspectFit];
    [checkbox setImage:[UIImage imageNamed:@"unchecked_checkbox.png"] forState:UIControlStateNormal];
    [checkbox setImage:[UIImage imageNamed:@"checked_checkbox.png"] forState:UIControlStateSelected];
    [checkbox setImage:[UIImage imageNamed:@"checked_checkbox.png"] forState:UIControlStateHighlighted];
    [checkbox setAdjustsImageWhenHighlighted:TRUE];

    // Setup the right view in the text field
    [textField setClearButtonMode:UITextFieldViewModeAlways];
    [textField setRightViewMode:UITextFieldViewModeAlways];
    [textField setRightView:checkbox];

    // Setup Tag so the textfield can be identified
    [textField setTag:-1];
    [textField setDelegate:weakSelf];

    // Setup textfield
    [textField setText:@"Essential"];  // Could be place holder text

}];

[self presentViewController:alertWithText animated:YES completion:nil];

如果你只想让某行成为一个勾选框,那么你需要阻止文本框的编辑。

- (BOOL)textFieldShouldBeginEditing:(UITextField *)textField{
    if(textField.tag == -1){
        return NO;
    }

    return YES;
} 

您的按钮操作

-(void)buttonPressed:(UIButton*)sender {

    if(sender.selected){
        [sender setSelected:FALSE];
    } else {
        [sender setSelected:TRUE];
    }
}

这里还有一些复选框图片(有很多种,你甚至可以尝试制作开关并进行动画处理)。

Unchecked BoxChecked Box


3
这个答案是针对Objective C的。它不使用文本字段,但确实像主要问题所要求的那样向UIAlertController添加了UISwitch。我在SO上没有找到完全符合要求的内容,因此我在这里发布了这个答案,而不是发布另一个问题,会被认为是重复的。
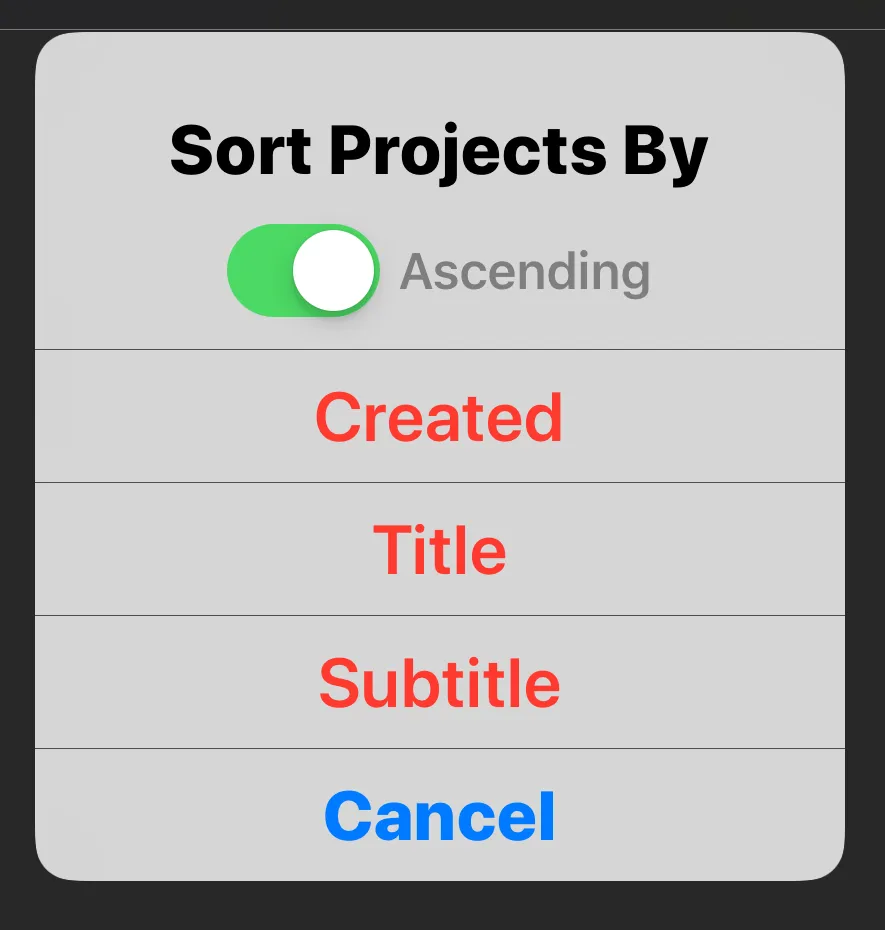
这个解决方案用于启用用户对UITableView菜单进行排序(项目列表...)。
感谢@technerd的答案,我还让UISwitch更改了同一UIAlertController视图上的UILabel文本。它使用KVC(键值编码)在层中传递UILabel id到目标操作,当UISwitch值改变时。(请参见代码中的setOrderLabelText方法)
我还试图通过使用约束来避免将新行(“\n\n\n\n”)添加到标题或消息中以人工移动事物的技巧。
我使用水平的UIStackView来容纳UISwitch和其对应的UILabel,然后使用约束设置UIStack的顶部锚点和UIAlertController视图的高度约束,使其足够大以包含UIStackView和UIAlertController标题。

我认为不可能获取UIAlertController标题或操作按钮的高度。因此,我想出了在iPhone X和iPad 2上效果良好的值。就像其他SO答案一样,我可能会想出一个自制(或在GitHub上找到)解决方案,使其更加健壮。但是既然我已经做到了这一步并且从其他很棒的SO答案中获得了很多东西,我想回馈一下并分享我的结果。

这是一张截图:

enter image description here

这是代码:

// using KVC, set the label text based on the label tag and toggle the tag
- (void)setOrderLabelText:(UISwitch *)orderSwitch {
    UILabel *label = (UILabel *)[orderSwitch.layer valueForKey:@"label"];

    label.text = label.tag ? @"Ascending" : @"Descending";

    label.tag = label.tag ? 0 : 1;

}

// sort the data based on the user's selections
- (IBAction)sort:(UIButton *)sortButton {    
    UILabel *label = [[UILabel alloc] init];
    label.text = @"Ascending";
    label.textColor = UIColor.grayColor;
    label.tag = 0;
    [label sizeToFit];

    UISwitch *orderSwitch = [[UISwitch alloc] init];
    orderSwitch.on = YES;
    [orderSwitch setOn:YES animated:YES];

    // allow the switch to change the text in the label using KVC (key-value coding)
    [orderSwitch addTarget:self action:@selector(setOrderLabelText:) forControlEvents:UIControlEventValueChanged];
    [orderSwitch.layer setValue:label forKey:@"label"];

    UIStackView *stackView = [[UIStackView alloc] init];
    stackView.axis = UILayoutConstraintAxisHorizontal;
    stackView.spacing = 8;

    [stackView addArrangedSubview:orderSwitch];
    [stackView addArrangedSubview:label];

    UIAlertController *alert = [UIAlertController
                                alertControllerWithTitle: @"Sort Projects By"
                                message: nil
                                preferredStyle:UIAlertControllerStyleAlert];

    UIAlertAction *createdButton = [UIAlertAction
                                  actionWithTitle:@"Created"
                                  style:UIAlertActionStyleDestructive
                                  handler:^(UIAlertAction * action) {
                                      [self sortBy:@"created" ascending:orderSwitch.isOn];
                                  }];
    UIAlertAction *titleButton = [UIAlertAction
                                  actionWithTitle:@"Title"
                                  style:UIAlertActionStyleDestructive
                                  handler:^(UIAlertAction * action) {
                                      [self sortBy:@"title" ascending:orderSwitch.isOn];
                                  }];
    UIAlertAction *subtitleButton = [UIAlertAction
                                  actionWithTitle:@"Subtitle"
                                  style:UIAlertActionStyleDestructive
                                  handler:^(UIAlertAction * action) {
                                      [self sortBy:@"subtitle" ascending:orderSwitch.isOn];
                                  }];
    UIAlertAction *cancelButton = [UIAlertAction
                                   actionWithTitle:@"Cancel"
                                   style:UIAlertActionStyleCancel
                                   handler:^(UIAlertAction * action) {
                                   }];

    // add action buttons to the alert
    [alert addAction:createdButton];
    [alert addAction:titleButton];
    [alert addAction:subtitleButton];
    [alert addAction:cancelButton];

    [alert.view addSubview:stackView];

    // center the stack in the alert
    [stackView.centerXAnchor constraintEqualToAnchor:alert.view.centerXAnchor].active = YES;

    // turn off the autoresizing mask or things get weird
    stackView.translatesAutoresizingMaskIntoConstraints = NO;

    // use a topAnchor constraint to place the stackview, just below the title
    // TODO:  figure out how to get the height of the alert title (use 64 for now)
    [stackView.topAnchor constraintEqualToAnchor:alert.view.topAnchor constant:64].active = YES;

    // layout now to set the view bounds so far - NOTE this does not include the action buttons
    [alert.view layoutIfNeeded];

    // use a height constraint to make the alert view big enough to hold my stack view
    // NOTE:  strange, but this must include the header view AND all the action buttons
    // TODO:  figure out how to get the height of the action buttons (use 52 for each action button for now)
    CGFloat height = alert.view.bounds.size.height + alert.actions.count * 52 + stackView.bounds.size.height;
    [alert.view.heightAnchor constraintEqualToConstant:height].active = YES;

    [self presentViewController:alert animated:YES completion:nil];
}

0

如果您在iOS 13上使用Recycled Steel答案,您可以使用SF Symbols代替PNG。这将解决您可能遇到的任何缩放问题。

    checkbox.imageView.tintColor = UIColor.blackColor;
    if (@available(iOS 13.0, *)) {
        [checkbox setImage: [UIImage systemImageNamed:@"square"] forState: UIControlStateNormal];
        [checkbox setImage: [UIImage systemImageNamed:@"checkmark.square"] forState: UIControlStateHighlighted];
        [checkbox setImage: [UIImage systemImageNamed:@"checkmark.square"] forState: UIControlStateSelected];
    }

网页内容由stack overflow 提供, 点击上面的
可以查看英文原文,
原文链接