透明ActionBar下部分显示ImageView

36

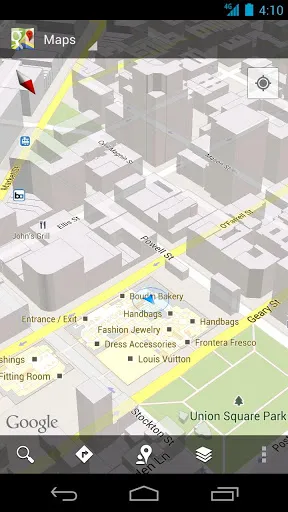
谷歌地图应用程序具有透明的ActionBar,通过它可以看到地图。

输入图像描述

我可以使用以下方法设置ActionBar的透明度:

<style name="Theme.MyTheme" parent="android:style/Theme.Holo.Light">
    <item name="android:actionBarStyle">@style/ActionBar</item>
</style>

<style name="ActionBar" parent="@android:style/Widget.Holo.ActionBar">
    <item name="android:background">#64000000</item>
</style>

但是我该如何将我的ImageView显示在ActionBar后面?


@ Niek:你做好了吗? - hguser
4个回答

43

您可以启用ActionBar的覆盖模式。要实现此目的,您需要将主题中的(android:)windowActionBarOverlay项目设置为true

<style name="MyTheme" parent="Theme.Sherlock">
    ...
    <item name="windowActionBarOverlay">true</item> <!-- for ActionBarSherlock -->
    <item name="android:windowActionBarOverlay">true</item>
</style>

2
我尝试了这个,但是我只得到一个灰色的条(曾经是白色的),内容不会出现在该条后面。我的内容是这样的布局,我缺少什么?谢谢<LinearLayout xmlns:android ="http://schemas.android.com/apk/res/android" android:layout_width ="match_parent" android:layout_height ="match_parent" android:orientation ="vertical"
<ScrollView android:id ="@+id/documentPickerGridViewScroll" android:layout_width ="match_parent" android:layout_height ="match_parent"
- Mariano Latorre

26

您也可以在运行时设置它:

requestWindowFeature(Window.FEATURE_ACTION_BAR_OVERLAY);

这将使ActionBar成为一个半透明的浮动栏。

和任何requestWindowFeature...一样,在添加内容之前调用此方法。

setContentView之后,您可以使用以下代码从Drawable设置背景:

getActionBar().setBackgroundDrawable(getResources().getDrawable(R.drawable.actionbar_bg));

getActionBar改为getSupportActionBar,用于ActionBarSherlock。

actionbar_bg.xml的根元素为shape

<solid android:color="#64000000" />

虽然我认为Tomik的解决方案很棒,但这只适用于少数几个活动的临时情况,而不是整体风格。


尽管Tomik的解决方案正是我所寻找的,但这肯定值得一提!谢谢! - nhaarman
这是正确的,我已经尝试过了,但由于某种原因,在基于Sherlock自定义操作栏的2.3上无法正常工作。奇怪。 - Soham
你还可以通过创建一个无窗口覆盖样式并将其分配给你不想要窗口覆盖的活动,从清单中完成这个任务。 - Mariano Latorre
@MarianoLatorre:感谢您指出这一点。;-) 话虽如此,我的建议是当您有一个奇怪的活动或者可能只有几个活动不值得创建“样式”时,可以使用Java解决方案。但还是谢谢。:-) - Siddharth Lele
在我的情况下,我需要在许多不同的活动之间快速切换窗口叠加和无窗口叠加,所以与其他人分享这个选项会很好。 - Mariano Latorre
@MarianoLatorre:我同意。在某些情况下,您提出的建议可能是实现所需功能的更好方法。不过,当问到这个问题时,我只是提供了一个替代接受答案的方案。正如您正确观察到的那样,要求将决定解决方案。您也应考虑将您的替代方案发布为答案。;-) - Siddharth Lele

10

如果有些人需要透明的工具栏,但只在某些活动中使用实心工具栏,那么创建两种不同的样式并使用清单控制可能是值得的:

<style name="MyThemeOverlay" parent="Theme.Sherlock">
    ...
    <item name="windowActionBarOverlay">true</item> <!-- for ActionBarSherlock -->
    <item name="android:windowActionBarOverlay">true</item>
    <!-- any stuff common here, colours, etc -->

    <!-- define the style for native ActionBar for Android 4 and higher -->
    <item name="android:actionBarStyle">@style/myActionbarTransparent</item>
    <!-- define the style for ActionBarSherlock -->
    <item name="actionBarStyle">@style/myActionbarTransparent</item>
</style>

<style name="MyThemeNoOverlay" parent="MyTheme">
    <item name="windowActionBarOverlay">false</item> <!-- for ActionBarSherlock -->
    <item name="android:windowActionBarOverlay">false</item>
    <!-- any stuff specific for no overlay activity action bars -->

    <!-- define the style for native ActionBar for Android 4 and higher -->
    <item name="android:actionBarStyle">@style/myActionbar</item>
    <!-- define the style for ActionBarSherlock -->
    <item name="actionBarStyle">@style/myActionbar</item>
</style>

<style name="myActionbar" parent="@android:style/Widget.Holo.ActionBar">
    <item name="android:background">@color/white</item>
</style>
<style name="myActionbarTransparent" parent="@android:style/Widget.Holo.ActionBar">
    <item name="android:background">@color/transparent</item>
</style>

然后在你的 AndroidManifest.xml 中,你可以使用其中一个作为默认值,并通过执行以下操作将另一个用于某些特定的活动:

<application
    ...
    android:theme="@style/MyThemeOverlay">
    ...
    <activity
      android:name=".Activity1"       
      />
    <activity
      android:name=".Activity2"    
      android:theme="@style/MyThemeNoOverlay"   
      />
    <activity
      android:name=".Activity3"       
      />
    <activity
      android:name=".Activity4"       
      android:theme="@style/MyThemeNoOverlay"
      />

...


1
干得好。为你的努力加一分。 :-) - Siddharth Lele

1

enter image description here

在styles.xml中:
<style name="AppTheme.AppBarOverlay" parent="ThemeOverlay.AppCompat.Dark.ActionBar">
    <item name="colorPrimary">@color/semiTransparent5</item>
</style>

<style name="AppTheme.PopupOverlay" parent="ThemeOverlay.AppCompat.Light" >
    <item name="windowActionBarOverlay">true</item>
</style>

在activity_main.xml中:
<androidx.coordinatorlayout.widget.CoordinatorLayout xmlns:android="http://schemas.android.com/apk/res/android"
xmlns:app="http://schemas.android.com/apk/res-auto"
android:layout_width="match_parent"
android:layout_height="match_parent">

<com.google.android.material.appbar.AppBarLayout
    android:layout_width="match_parent"
    android:layout_height="wrap_content"
    android:theme="@style/AppTheme.AppBarOverlay">

    <androidx.appcompat.widget.Toolbar
        android:id="@+id/toolbar"
        android:layout_width="match_parent"
        android:layout_height="?attr/actionBarSize"
        app:layout_scrollFlags="scroll|enterAlways"
        app:popupTheme="@style/AppTheme.PopupOverlay" />

</com.google.android.material.appbar.AppBarLayout>

<include layout="@layout/content_main" />


网页内容由stack overflow 提供, 点击上面的
可以查看英文原文,
原文链接