像SliverAppBar一样隐藏TabBar

10
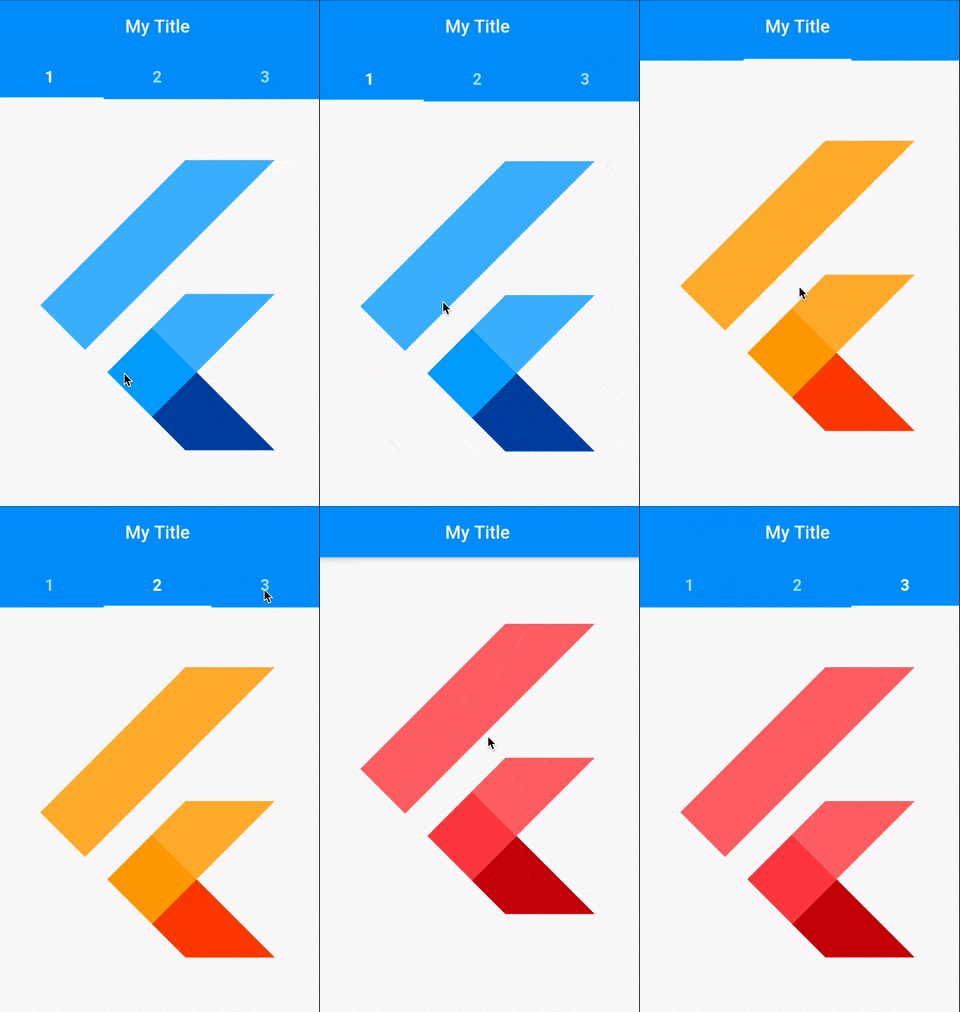
因此,在网络上有很多示例可用,您可以使用SliverAppBar在滚动时隐藏,下面的TabBar仍在显示。 我找不到任何相反的东西:当我向上滚动时,只想隐藏TabBar,使AppBar始终保持可见。 有人知道如何实现这一点吗? 这是一个带有AppBar隐藏效果的示例(这不是我想要的,只是帮助更好地理解我想要的)。
更新
这是我到目前为止尝试过的,我认为它有效,但问题是我无法获得Positioned字段中的AppBar具有正确的高度(例如,在iPhone X上,其高度要大得多,并覆盖选项卡栏)。
// this sliver app bar is only use to hide/show the tabBar, the AppBar  
// is invisible at all times. The to the user visible AppBar is below
return Scaffold(
  body: Stack(
    children: <Widget>[
      NestedScrollView(
        headerSliverBuilder:
            (BuildContext context, bool innerBoxIsScrolled) {
          return <Widget>[
            SliverAppBar(
              floating: true,
              snap: true,
              pinned: false,
              bottom: TabBar(
                tabs: [
                  Tab(
                    child: Text(
                      "1",
                      textAlign: TextAlign.center,
                    ),
                  ),
                  Tab(
                    child: Text(
                      "2",
                      textAlign: TextAlign.center,
                    ),
                  ),
                  Tab(
                    child: Text(
                      "3",
                      textAlign: TextAlign.center,
                    ),
                  ),
                ],
                controller: _tabController,
              ),
            ),
          ];
        },
        body: TabBarView(
          children: [
            MyScreen1(),
            MyScreen2(),
            MyScreen3(),
          ],
          controller: _tabController,
          physics: new NeverScrollableScrollPhysics(),
        ),
      ),


      // Here is the AppBar the user actually sees. The SliverAppBar 
      // above will slide the TabBar underneath this one. However,
      // I can´t figure out how to give it the correct height.
      Container(
        child: Positioned(
          top: 0.0,
          left: 0.0,
          right: 0.0,
          child: AppBar(
            iconTheme: IconThemeData(
              color: Colors.red, //change your color here
            ),
            automaticallyImplyLeading: true,
            elevation: 0,
            title: Text("My Title"),
            centerTitle: true,

          ),
        ),
      ),

    ],

  ),
);
3个回答

7

以下是方法:使用GlobalKeypostframecallback来预先计算appBar高度,并添加一个exapandedHeight,示例如下:

import 'package:flutter/material.dart';
import 'package:flutter/scheduler.dart';

void main() => runApp(MyApp());

class MyApp extends StatelessWidget {
  // This widget is the root of your application.
  @override
  Widget build(BuildContext context) {
    return MaterialApp(
      title: 'Flutter Demo',
      theme: ThemeData(

        primarySwatch: Colors.blue,
      ),
      home: MyHomePage(title: 'Flutter Demo Home Page'),
    );
  }
}

class MyHomePage extends StatefulWidget {
  MyHomePage({Key key, this.title}) : super(key: key);


  final String title;

  @override
  _MyHomePageState createState() => _MyHomePageState();
}

class _MyHomePageState extends State<MyHomePage> with SingleTickerProviderStateMixin  {

  TabController _tabController;
  GlobalKey _appBarKey;
  double _appBarHight;
  @override
  void initState() {
    _appBarKey = GlobalKey();
    _tabController = TabController(length: 3, vsync: this);
    SchedulerBinding.instance.addPostFrameCallback(_calculateAppBarHeight);
    super.initState();
  }
  _calculateAppBarHeight(_){
    final RenderBox renderBoxRed = _appBarKey.currentContext.findRenderObject();
     setState(() {
  _appBarHight = renderBoxRed.size.height;
});
    print("AppbarHieght = $_appBarHight");
  }

  @override
  Widget build(BuildContext context) {
    // this sliver app bar is only use to hide/show the tabBar, the AppBar
    // is invisible at all times. The to the user visible AppBar is below
    return Scaffold(
      body: Stack(
        children: <Widget>[
          NestedScrollView(
            headerSliverBuilder:
                (BuildContext context, bool innerBoxIsScrolled) {
              return <Widget>[
                SliverAppBar(
                  floating: true,
                  expandedHeight: _appBarHight,
                  snap: true,
                  pinned: false,
                  bottom: TabBar(
                    tabs: [
                      Tab(
                        child: Text(
                          "1",
                          textAlign: TextAlign.center,
                        ),
                      ),
                      Tab(
                        child: Text(
                          "2",
                          textAlign: TextAlign.center,
                        ),
                      ),
                      Tab(
                        child: Text(
                          "3",
                          textAlign: TextAlign.center,
                        ),
                      ),
                    ],
                    controller: _tabController,
                  ),
                ),
              ];
            },
            body: TabBarView(
              children: [
                MyScreen1(),
                MyScreen2(),
                MyScreen3(),
              ],
              controller: _tabController,
              physics: new NeverScrollableScrollPhysics(),
            ),
          ),


          // Here is the AppBar the user actually sees. The SliverAppBar
          // above will slide the TabBar underneath this one. However,
          // I can¥t figure out how to give it the correct height.
          Container(
            key: _appBarKey,
            child: Positioned(
              top: 0.0,
              left: 0.0,
              right: 0.0,
              child: AppBar(

                backgroundColor: Colors.red,
                iconTheme: IconThemeData(
                  color: Colors.red, //change your color here
                ),
                automaticallyImplyLeading: true,
                elevation: 0,
                title: Text("My Title"),
                centerTitle: true,

              ),
            ),
          ),

        ],

      ),
    );

  }

}

class MyScreen1 extends StatelessWidget {
  @override
  Widget build(BuildContext context) {
    return Container(
      child: Center(
        child: Text("My Screen 1"),
      ),
    );
  }
}
class MyScreen2 extends StatelessWidget {
  @override
  Widget build(BuildContext context) {
    return Container(
      child: Center(
        child: Text("My Screen 2"),
      ),
    );
  }
}
class MyScreen3 extends StatelessWidget {
  @override
  Widget build(BuildContext context) {
    return Container(
      child: Center(
        child: Text("My Screen 3"),
      ),
    );
  }
}

编辑:

经过更多研究,我找到了一个解决方案,不需要使用键或MediaQuery "东西",只需使用SafeArea小部件即可。请查看以下完整代码:

import 'package:flutter/material.dart';

void main() => runApp(MyApp());

class MyApp extends StatelessWidget {
  // This widget is the root of your application.
  @override
  Widget build(BuildContext context) {
    return MaterialApp(
      title: 'Flutter Demo',
      theme: ThemeData(

        primarySwatch: Colors.blue,
      ),
      home: MyHomePage(title: 'Flutter Demo Home Page'),
    );
  }
}

class MyHomePage extends StatefulWidget {
  MyHomePage({Key key, this.title}) : super(key: key);


  final String title;

  @override
  _MyHomePageState createState() => _MyHomePageState();
}

class _MyHomePageState extends State<MyHomePage> with SingleTickerProviderStateMixin  {

  TabController _tabController;

  @override
  void initState() {

    _tabController = TabController(length: 3, vsync: this);

    super.initState();
  }


  @override
  Widget build(BuildContext context) {
    // this sliver app bar is only use to hide/show the tabBar, the AppBar
    // is invisible at all times. The to the user visible AppBar is below
    return Scaffold(
      body: Stack(
        children: <Widget>[
          NestedScrollView(

            headerSliverBuilder:
                (BuildContext context, bool innerBoxIsScrolled) {
              return <Widget>[
                SliverAppBar(
                  primary: true,
                  floating: true,
                  backgroundColor: Colors.blue,//.withOpacity(0.3),
                  snap: true,
                  pinned: false,
                  bottom: TabBar(
                    tabs: [
                      Tab(
                        child: Text(
                          "1",
                          textAlign: TextAlign.center,
                        ),
                      ),
                      Tab(
                        child: Text(
                          "2",
                          textAlign: TextAlign.center,
                        ),
                      ),
                      Tab(
                        child: Text(
                          "3",
                          textAlign: TextAlign.center,
                        ),
                      ),
                    ],
                    controller: _tabController,
                  ),
                ),
              ];
            },
            body: TabBarView(
              children: [
                MyScreen1(),
                MyScreen2(),
                MyScreen3(),
              ],
              controller: _tabController,
              physics: new NeverScrollableScrollPhysics(),
            ),
          ),


          // Here is the AppBar the user actually sees. The SliverAppBar
          // above will slide the TabBar underneath this one. 
          // by using SafeArea it will.
          Positioned(
            top: 0.0,
            left: 0.0,
            right: 0.0,
            child: Container(
              child: SafeArea(
                top: false,
                child: AppBar(
                  backgroundColor: Colors.blue,
//                iconTheme: IconThemeData(
//                  color: Colors.red, //change your color here
//                ),
                  automaticallyImplyLeading: true,
                  elevation: 0,
                  title: Text("My Title",),
                  centerTitle: true,
                ),
              ),
            ),
          ),

        ],

      ),
    );
  }

}

class MyScreen1 extends StatelessWidget {
  @override
  Widget build(BuildContext context) {
    return Container(
      color: Colors.yellow,
      child: Center(
        child: Text("My Screen 1"),
      ),
    );
  }
}
class MyScreen2 extends StatelessWidget {
  @override
  Widget build(BuildContext context) {
    return Container(
      child: Center(
        child: Text("My Screen 2"),
      ),
    );
  }
}
class MyScreen3 extends StatelessWidget {
  @override
  Widget build(BuildContext context) {
    return Container(
      child: Center(
        child: Text("My Screen 3"),
      ),
    );
  }
}

抱歉好久没有回复了。与此同时,我找到了完全相同的解决方案:SafeArea解决了我所有的问题。干得好! - 最白目

3

屏幕截图(Android)

在此输入图片描述

屏幕截图(iPhone X)

在此输入图片描述


你很接近了,我只是修改了几行代码。我没有使用GlobalKey和其他的东西(例如postFrameCallback等)。这是一种非常简单和直接的方法。

您需要做的是将FlutterLogo替换为您自己的小部件,这些小部件是MyScreen1MyScreen2MyScreen3


代码

void main() => runApp(MaterialApp(home: HomePage()));

class HomePage extends StatefulWidget {
  @override
  _HomePageState createState() => _HomePageState();
}

class _HomePageState extends State<HomePage> with SingleTickerProviderStateMixin {
  TabController _tabController;

  @override
  void initState() {
    super.initState();
    _tabController = TabController(length: 3, vsync: this);
  }

  @override
  Widget build(BuildContext context) {
    return Scaffold(
      body: Stack(
        children: <Widget>[
          NestedScrollView(
            headerSliverBuilder: (BuildContext context, bool innerBoxIsScrolled) {
              return <Widget>[
                SliverAppBar(
                  floating: true,
                  snap: true,
                  pinned: true,
                  bottom: PreferredSize(
                    preferredSize: Size(0, kToolbarHeight),
                    child: TabBar(
                      controller: _tabController,
                      tabs: [
                        Tab(child: Text("1")),
                        Tab(child: Text("2")),
                        Tab(child: Text("3")),
                      ],
                    ),
                  ),
                ),
              ];
            },
            body: TabBarView(
              controller: _tabController,
              children: [
                FlutterLogo(size: 300, colors: Colors.blue), // use MyScreen1()
                FlutterLogo(size: 300, colors: Colors.orange), // use MyScreen2()
                FlutterLogo(size: 300, colors: Colors.red), // use MyScreen3()
              ],
              physics: NeverScrollableScrollPhysics(),
            ),
          ),
          Positioned(
            top: 0.0,
            left: 0.0,
            right: 0.0,
            child: MediaQuery.removePadding(
              context: context,
              removeBottom: true,
              child: AppBar(
                iconTheme: IconThemeData(color: Colors.red),
                automaticallyImplyLeading: true,
                elevation: 0,
                title: Text("My Title"),
                centerTitle: true,
              ),
            ),
          ),
        ],
      ),
    );
  }
}

很高兴再次见到你,我没有尝试过你的解决方案,但据我所知,iPhone X 的高度不会是 134,而应该是 100(状态栏为 44,导航栏为 56),但不确定你在说 134 时考虑了哪个高度。 - CopsOnRoad
@SaedNabil 我在 iPhone X 上运行了相同的代码,看起来你所谓的“完美世界的解决方案”在这里也完美无缺地工作了,得到了 56 的结果。 - CopsOnRoad
请比较这两张图片:图片1 https://imgur.com/CNZjfSG,图片2 https://imgur.com/w2Iey55。您可能会注意到应用栏高度的差异,红色应用栏是iPhone X的标准高度,我知道它可以工作,但问题在于它不是如我之前所解释的标准高度。 - Saed Nabil
是的,你说得对,确实有所不同,在编写代码时我没有在iOS上进行测试,而是在Android上运行(我先上传了它的截图),但你不需要处理'134',我已经使用更新的代码用'100'完成了同样的效果,现在它也可以在iOS上正常工作。 - CopsOnRoad
即使我不再使用 56,我使用了 kToolbarHeight(希望您现在不会指出这一点),你发送的屏幕截图是当您使用 appBar: AppBar() 时得到的相同结果,因此没有任何问题。 - CopsOnRoad
显示剩余6条评论

0

我认为使用嵌套脚手架非常容易,您不需要计算任何高度。只需将选项卡栏放在SilverAppBar内而不是在SilverAppBar下面。

如果这不能解决您的问题,请随时发表评论。

示例:

return Scaffold(
     appBar: AppBar(), //your appbar that doesnt need to hide
     body: Scaffold(
           appBar: SilverAppBar(

            pinned: false,
            floating: false,

            flexibleSpace: new Column(
            mainAxisAlignment: MainAxisAlignment.end,
            children: [
              new TabBar() //your tabbar that need to hide when scrolling
             ])
             )

             body: //your content goes here

             )

);

你自己试过了吗?它给我报错 The argument type 'SliverAppBar' can't be assigned to the parameter type 'PreferredSizeWidget?'。 - RDK

网页内容由stack overflow 提供, 点击上面的
可以查看英文原文,
原文链接