我正在为Android设备制作一个视频播放器,其中我使用ffmpeg进行解码和opengl es进行渲染。我在使用opengl es着色器进行YUV到RGB转换时遇到了问题。应用程序能够显示图像,但颜色不正确。在从YUV转换为RGB后,图像只显示绿色和粉色。我在谷歌上搜索过,但没有找到解决方案。请有人能帮助我吗?
我从ffmpeg获取三个不同的缓冲区(y、u、v),然后将这些缓冲区原样传递给3个纹理。
这是我正在使用的着色器。
这是输出结果: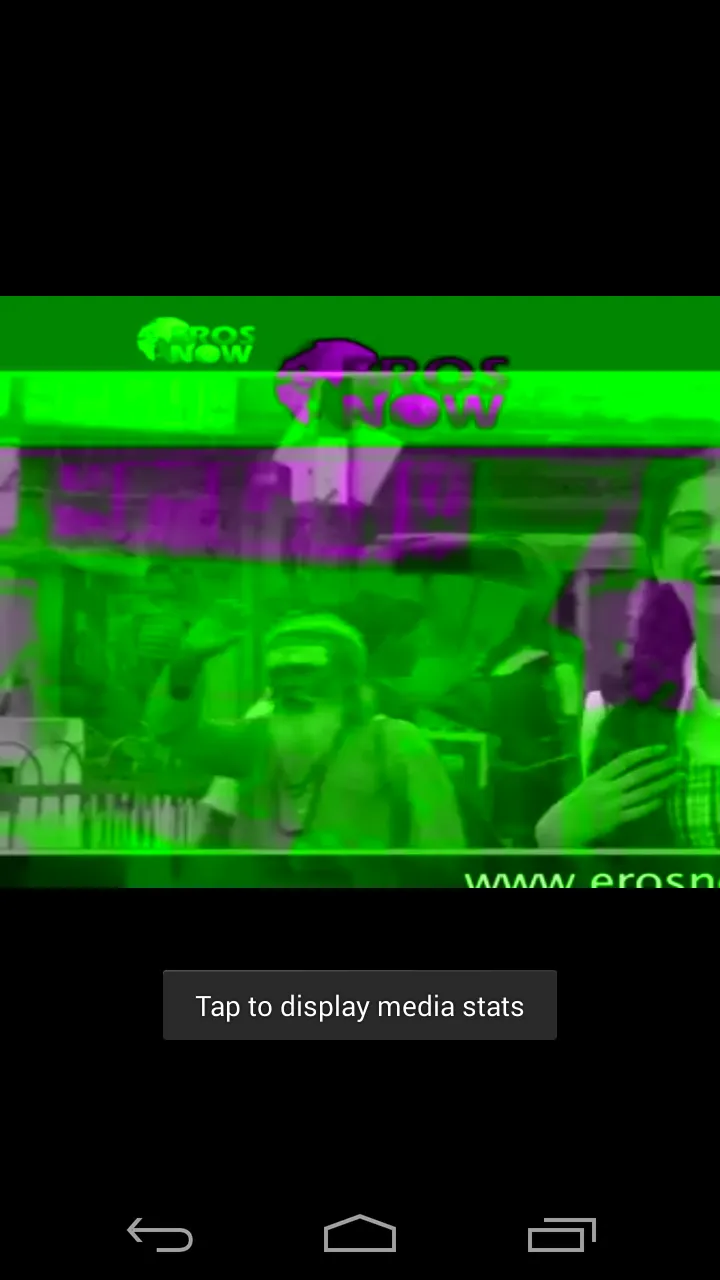
这是一个图片,用来展示代码的输出结果。
我从ffmpeg获取三个不同的缓冲区(y、u、v),然后将这些缓冲区原样传递给3个纹理。
这是我正在使用的着色器。
static const char kVertexShader[] =
"attribute vec4 vPosition;      \n"
  "attribute vec2 vTexCoord;        \n"
  "varying vec2 v_vTexCoord;        \n"
"void main() {                        \n"
    "gl_Position = vPosition;       \n"
    "v_vTexCoord = vTexCoord;       \n"
"}                                          \n";

static const char kFragmentShader[] =
    "precision mediump float;               \n"
    "varying vec2 v_vTexCoord;          \n"
    "uniform sampler2D yTexture;        \n"
    "uniform sampler2D uTexture;        \n"
    "uniform sampler2D vTexture;        \n"
    "void main() {                      \n"
        "float y=texture2D(yTexture, v_vTexCoord).r;\n"
        "float u=texture2D(uTexture, v_vTexCoord).r - 0.5;\n"
        "float v=texture2D(vTexture, v_vTexCoord).r - 0.5;\n"
        "float r=y + 1.13983 * v;\n"
        "float g=y - 0.39465 * u - 0.58060 * v;\n"
        "float b=y + 2.03211 * u;\n"
        "gl_FragColor = vec4(r, g, b, 1.0);\n"
    "}\n";

    static const GLfloat kVertexInformation[] =
    {
         -1.0f, 1.0f,           // TexCoord 0 top left
         -1.0f,-1.0f,           // TexCoord 1 bottom left
          1.0f,-1.0f,           // TexCoord 2 bottom right
          1.0f, 1.0f            // TexCoord 3 top right
    };
    static const GLshort kTextureCoordinateInformation[] =
    {
         0, 0,         // TexCoord 0 top left
         0, 1,         // TexCoord 1 bottom left
         1, 1,         // TexCoord 2 bottom right
         1, 0          // TexCoord 3 top right
    };
    static const GLuint kStride = 0;//COORDS_PER_VERTEX * 4;
    static const GLshort kIndicesInformation[] =
    {
         0, 1, 2,
         0, 2, 3
    };
这里还有另一个人问过同样的问题:使用GL着色器语言将摄像头帧YUV转换为RGB
谢谢。
更新:
ClayMontgomery的着色器。
const char* VERTEX_SHADER = "\
attribute vec4 a_position;\
attribute vec2 a_texCoord;\
varying   vec2 gsvTexCoord;\
varying   vec2 gsvTexCoordLuma;\
varying   vec2 gsvTexCoordChroma;\
\
void main()\
{\
    gl_Position = a_position;\
    gsvTexCoord = a_texCoord;\
    gsvTexCoordLuma.s = a_texCoord.s / 2.0;\
    gsvTexCoordLuma.t = a_texCoord.t / 2.0;\
    gsvTexCoordChroma.s = a_texCoord.s / 4.0;\
    gsvTexCoordChroma.t = a_texCoord.t / 4.0;\
}";


const char* YUV_FRAGMENT_SHADER = "\
precision highp float;\
uniform sampler2D y_texture;\
uniform sampler2D u_texture;\
uniform sampler2D v_texture;\
varying   vec2 gsvTexCoord;\
varying vec2 gsvTexCoordLuma;\
varying vec2 gsvTexCoordChroma;\
\
void main()\
{\
    float y = texture2D(y_texture, gsvTexCoordLuma).r;\
    float u = texture2D(u_texture, gsvTexCoordChroma).r;\
    float v = texture2D(v_texture, gsvTexCoordChroma).r;\
    u = u - 0.5;\
    v = v - 0.5;\
    vec3 rgb;\
    rgb.r = y + (1.403 * v);\
    rgb.g = y - (0.344 * u) - (0.714 * v);\
    rgb.b = y + (1.770 * u);\
    gl_FragColor = vec4(rgb, 1.0);\
}";
这是输出结果:
这是一个图片,用来展示代码的输出结果。