为什么单元测试中的代码无法找到捆绑资源?

208

我正在进行单元测试的一些代码需要加载一个资源文件。它包含以下行:

NSString *path = [[NSBundle mainBundle] pathForResource:@"foo" ofType:@"txt"];

在应用程序中,它可以正常运行,但是当通过单元测试框架运行时,pathForResource:返回nil,这意味着它找不到foo.txt

我确保在单元测试目标的Copy Bundle Resources构建阶段中包含了foo.txt,那么为什么它无法找到文件呢?

8个回答

336

当单元测试运行您的代码时,您的单元测试捆绑包不是主要捆绑包。

尽管您正在运行测试而不是应用程序,但您的应用程序捆绑包仍然是主要捆绑包。 (大致上,这可以防止您正在测试的代码搜索错误的捆绑包。)因此,如果您将资源文件添加到单元测试捆绑包中,则在搜索主要捆绑包时将找不到它。如果您将上述行替换为:

NSBundle *bundle = [NSBundle bundleForClass:[self class]];
NSString *path = [bundle pathForResource:@"foo" ofType:@"txt"];

然后你的代码将搜索包含单元测试类的捆绑包,一切都会很好。


对我来说不起作用。仍然是构建包而不是测试包。 - Chris
1
@Chris 在示例代码中,我假设 self 指的是主包中的一个类,而不是测试用例类。请将 [self class] 替换为主包中的任何一个类。我会编辑我的示例。 - benzado
@benzado 这个打包仍然是相同的(build),我认为这是正确的。因为当我使用self或者AppDelegate时,它们都位于主Bundle中。当我检查主目标的构建阶段时,这两个文件都在里面。但是我想要在运行时区分主Bundle和测试Bundle。我需要Bundle的代码位于主Bundle中。我有一个问题。我正在加载一个png文件。通常此文件不在主Bundle中,因为用户从服务器上下载它。但是为了进行测试,我想使用测试Bundle中的文件而不将其复制到主Bundle中。 - Chris
3
@Chris,我之前的编辑有误,已经进行了再次编辑。在测试时,应用包仍然是主要的包。如果您想加载单元测试包中的资源文件,则需要使用bundleForClass:和单元测试包中的一个类。您应该在单元测试代码中获取文件的路径,然后将路径字符串传递给其他代码。 - benzado
这个可以运行,但是我如何区分运行部署和测试部署?根据是否为测试,我需要在主包中的类中使用测试包中的资源。如果是常规的“运行”,我需要从主包而不是测试包中获取资源。有什么想法吗? - Chris
显示剩余4条评论

114
一个 Swift 实现:

Swift 2

let testBundle = NSBundle(forClass: self.dynamicType)
let fileURL = testBundle.URLForResource("imageName", withExtension: "png")
XCTAssertNotNil(fileURL)

Swift 3, Swift 4

let testBundle = Bundle(for: type(of: self))
let filePath = testBundle.path(forResource: "imageName", ofType: "png")
XCTAssertNotNil(filePath)

Bundle提供了发现配置的主要路径和测试路径的方法:
@testable import Example

class ExampleTests: XCTestCase {
        
    func testExample() {
        let bundleMain = Bundle.main
        let bundleDoingTest = Bundle(for: type(of: self ))
        let bundleBeingTested = Bundle(identifier: "com.example.Example")!
                
        print("bundleMain.bundlePath : \(bundleMain.bundlePath)")
        // …/Xcode.app/Contents/Developer/Platforms/MacOSX.platform/Developer/Library/Xcode/Agents
        print("bundleDoingTest.bundlePath : \(bundleDoingTest.bundlePath)")
        // …/PATH/TO/Debug/ExampleTests.xctest
        print("bundleBeingTested.bundlePath : \(bundleBeingTested.bundlePath)")
        // …/PATH/TO/Debug/Example.app
        
        print("bundleMain = " + bundleMain.description) // Xcode Test Agent
        print("bundleDoingTest = " + bundleDoingTest.description) // Test Case Bundle
        print("bundleUnderTest = " + bundleBeingTested.description) // App Bundle

在Xcode 6|7|8|9中,一个单元测试包路径将会在Developer/Xcode/DerivedData中,类似于...
/Users/
  UserName/
    Library/
      Developer/
        Xcode/
          DerivedData/
            App-qwertyuiop.../
              Build/
                Products/
                  Debug-iphonesimulator/
                    AppTests.xctest/
                      foo.txt

...这与Developer/CoreSimulator/Devices中的常规(非单元测试)捆绑路径是分开的。
/Users/
  UserName/
    Library/
    Developer/
      CoreSimulator/
        Devices/
          _UUID_/
            data/
              Containers/
                Bundle/
                  Application/
                    _UUID_/
                      App.app/

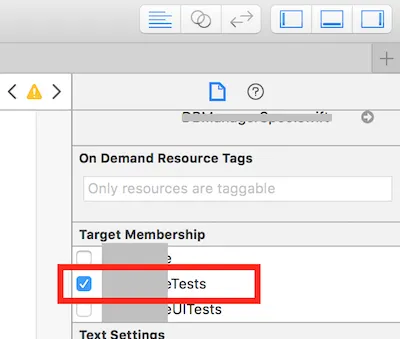
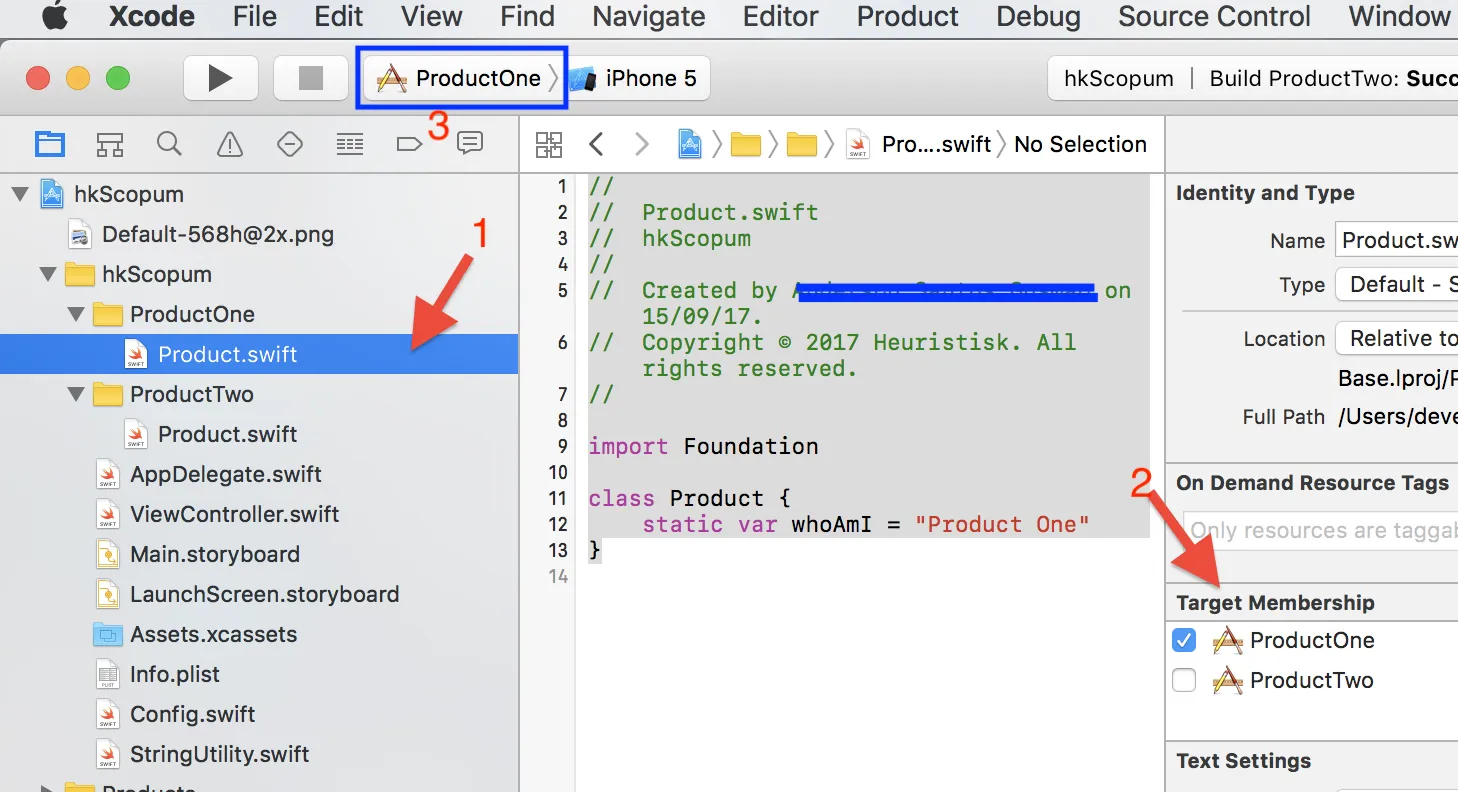
请注意,默认情况下,单元测试可执行文件与应用程序代码链接在一起。然而,单元测试代码应该仅在测试包中具有目标成员资格。应用程序代码应仅在应用程序包中具有目标成员资格。在运行时,单元测试目标包会被注入到应用程序包中进行执行

Swift Package Manager (SPM) 4:

let testBundle = Bundle(for: type(of: self)) 
print("testBundle.bundlePath = \(testBundle.bundlePath) ")

注意:默认情况下,命令行swift test将创建一个名为MyProjectPackageTests.xctest的测试包。而swift package generate-xcodeproj将创建一个名为MyProjectTests.xctest的测试包。这些不同的测试包有不同的路径此外,不同的测试包可能具有一些内部目录结构和内容差异

无论哪种情况,.bundlePath.bundleURL都将返回当前在macOS上运行的测试包的路径。然而,在Ubuntu Linux上,Bundle目前尚未实现。

此外,命令行swift buildswift test目前没有提供复制资源的机制。

然而,只要付出一些努力,就有可能在macOS的Xcode、macOS命令行和Ubuntu命令行环境中建立使用Swift Package Manager的流程。一个示例可以在这里找到:004.4'2 SW Dev Swift Package Manager (SPM) With Resources Qref
另请参阅:使用Swift Package Manager在单元测试中使用资源Swift Package Manager(SwiftPM)5.3+ Swift 5.3包括Package Manager Resources SE-0271演进提案,状态为“已实施(Swift 5.3)”。:-) 资源并不总是为软件包的客户端使用而设计;其中一种资源的用途可能是仅供单元测试所需的测试固件。这些资源不会与库代码一起添加到软件包的客户端中,只会在运行软件包的测试时使用。
在`target`和`testTarget`的API中添加一个新的`resources`参数,以允许显式声明资源文件。
SwiftPM使用文件系统约定来确定每个软件包中属于每个目标的源文件集:具体来说,目标的源文件是那些位于目标的指定“目标目录”下的文件。默认情况下,这是一个与目标同名并位于“Sources”(对于常规目标)或“Tests”(对于测试目标)的目录,但此位置可以在软件包清单中进行自定义设置。
// Get path to DefaultSettings.plist file.
let path = Bundle.module.path(forResource: "DefaultSettings", ofType: "plist")

// Load an image that can be in an asset archive in a bundle.
let image = UIImage(named: "MyIcon", in: Bundle.module, compatibleWith: UITraitCollection(userInterfaceStyle: .dark))

// Find a vertex function in a compiled Metal shader library.
let shader = try mtlDevice.makeDefaultLibrary(bundle: Bundle.module).makeFunction(name: "vertexShader")

// Load a texture.
let texture = MTKTextureLoader(device: mtlDevice).newTexture(name: "Grass", scaleFactor: 1.0, bundle: Bundle.module, options: options)

例子

// swift-tools-version:5.3
import PackageDescription

  targets: [
    .target(
      name: "CLIQuickstartLib",
      dependencies: [],
      resources: [
        // Apply platform-specific rules.
        // For example, images might be optimized per specific platform rule.
        // If path is a directory, the rule is applied recursively.
        // By default, a file will be copied if no rule applies.
        .process("Resources"),
      ]),
    .testTarget(
      name: "CLIQuickstartLibTests",
      dependencies: [],
      resources: [
        // Copy directories as-is. 
        // Use to retain directory structure.
        // Will be at top level in bundle.
        .copy("Resources"),
      ]),

当前问题

Xcode

Bundle.module是由SwiftPM生成的(参见Build/BuildPlan.swift SwiftTargetBuildDescription generateResourceAccessor()),因此在Xcode构建时不会出现在Foundation.Bundle中。

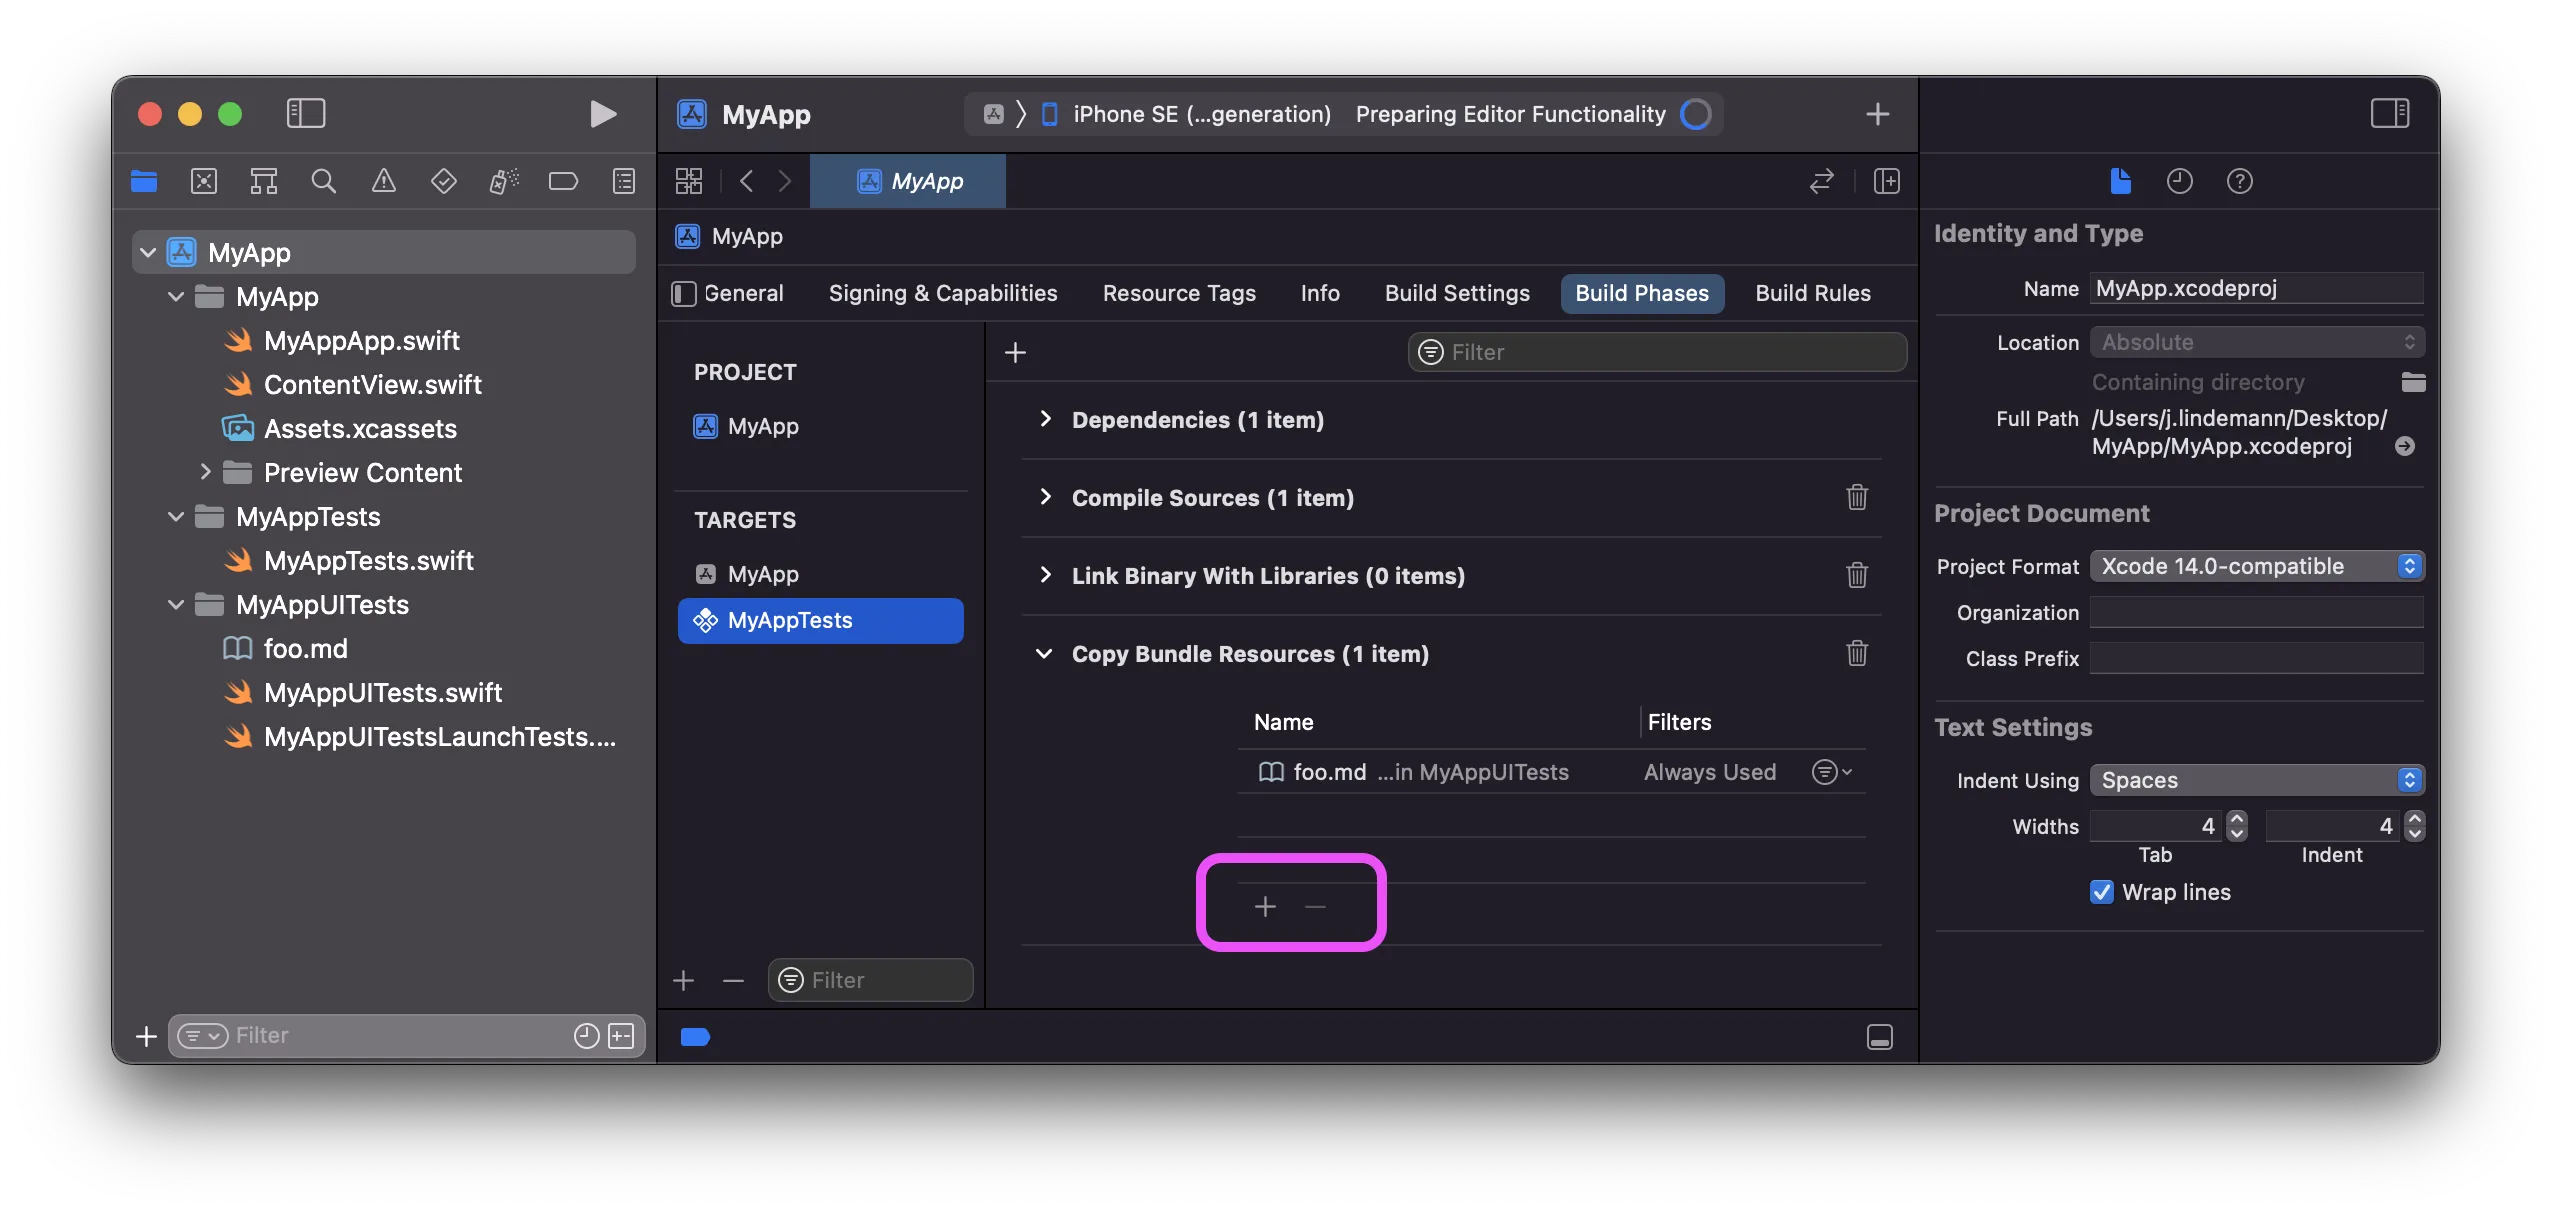
在Xcode中,一个类似的方法是手动添加一个Resources引用文件夹到模块中,然后添加一个Xcode构建阶段copy来将Resource放入某个*.bundle目录,并且添加一个#ifdef Xcode编译指令以便Xcode构建可以使用这些资源。
#if Xcode 
extension Foundation.Bundle {
  
  /// Returns resource bundle as a `Bundle`.
  /// Requires Xcode copy phase to locate files into `*.bundle`
  /// or `ExecutableNameTests.bundle` for test resources
  static var module: Bundle = {
    var thisModuleName = "CLIQuickstartLib"
    var url = Bundle.main.bundleURL
    
    for bundle in Bundle.allBundles 
      where bundle.bundlePath.hasSuffix(".xctest") {
      url = bundle.bundleURL.deletingLastPathComponent()
      thisModuleName = thisModuleName.appending("Tests")
    }
    
    url = url.appendingPathComponent("\(thisModuleName).bundle")
    
    guard let bundle = Bundle(url: url) else {
      fatalError("Bundle.module could not load: \(url.path)")
    }
    
    return bundle
  }()
  
  /// Directory containing resource bundle
  static var moduleDir: URL = {
    var url = Bundle.main.bundleURL
    for bundle in Bundle.allBundles 
      where bundle.bundlePath.hasSuffix(".xctest") {
      // remove 'ExecutableNameTests.xctest' path component
      url = bundle.bundleURL.deletingLastPathComponent()
    }
    return url
  }()
  
}
#endif

1
对于Swift 4,您也可以使用Bundle(for: type(of: self))。 - Rocket Garden

17

在快速的Swift 3中,语法self.dynamicType已被弃用,请使用此代替

let testBundle = Bundle(for: type(of: self))
let fooTxtPath = testBundle.path(forResource: "foo", ofType: "txt")
let fooTxtURL = testBundle.url(forResource: "foo", withExtension: "txt")

5

确认将资源添加到测试目标中。

输入图像描述


4
将资源添加到测试包中会导致测试结果大部分无效。毕竟,一个资源可能很容易存在于测试目标中,但却不存在于应用程序目标中,你的测试将全部通过,但应用程序将可能崩溃。 - dgatwood
就像@dgatwood所说的那样。它也没有解决问题。 - Christopher Pickslay

2
如果您的项目中有多个目标,则需要在不同的目标之间添加资源,这些资源可在“目标成员资格”中找到,并且您可能需要在不同的目标之间切换,如下图所示的3个步骤。

enter image description here


2
我需要确保勾选了这个“General Testing”复选框。this General Testing checkbox was set 最初的回答。

0

专为像我一样在原帖中错过这一点的人而设:

确保将foo.md包含在单元测试目标的复制束资源构建阶段中

enter image description here


-1

有一段代码可以在以下位置找到文件: 如何在Swift中检查文档目录中是否存在文件?

我在测试中使用它,测试我的文件是否已创建并提供其位置以进行进一步测试。

        let fileFound = XCTestExpectation (description: "Checking for DB File Found")


    let path = NSSearchPathForDirectoriesInDomains(.documentDirectory, .userDomainMask, true)[0] as String
    let url = NSURL(fileURLWithPath: path)
    if let pathComponent = url.appendingPathComponent("filename.ext") {
        let filePath = pathComponent.path
        let fileManager = FileManager.default
        if fileManager.fileExists(atPath: filePath) {
            fileFound.fulfill()
            print("DB FILE AVAILABLE")
        } else {
            print("DB FILE NOT AVAILABLE")
        }
    } else {
        print("DB FILE PATH NOT AVAILABLE")
    }
    
    wait(for: [fileFound], timeout: 5)

这并不是测试文件是否被创建在正确的位置,只是确认它被创建了。

网页内容由stack overflow 提供, 点击上面的
可以查看英文原文,
原文链接