这是我的解决方案:
from PIL import Image


def join_images(*rows, bg_color=(0, 0, 0, 0), alignment=(0.5, 0.5)):
    rows = [
        [image.convert('RGBA') for image in row]
        for row
        in rows
    ]

    heights = [
        max(image.height for image in row)
        for row
        in rows
    ]

    widths = [
        max(image.width for image in column)
        for column
        in zip(*rows)
    ]

    tmp = Image.new(
        'RGBA',
        size=(sum(widths), sum(heights)),
        color=bg_color
    )

    for i, row in enumerate(rows):
        for j, image in enumerate(row):
            y = sum(heights[:i]) + int((heights[i] - image.height) * alignment[1])
            x = sum(widths[:j]) + int((widths[j] - image.width) * alignment[0])
            tmp.paste(image, (x, y))

    return tmp


def join_images_horizontally(*row, bg_color=(0, 0, 0), alignment=(0.5, 0.5)):
    return join_images(
        row,
        bg_color=bg_color,
        alignment=alignment
    )


def join_images_vertically(*column, bg_color=(0, 0, 0), alignment=(0.5, 0.5)):
    return join_images(
        *[[image] for image in column],
        bg_color=bg_color,
        alignment=alignment
    )
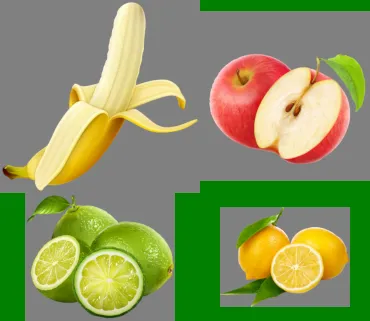
对于这些图片:
images = [
    [Image.open('banana.png'), Image.open('apple.png')],
    [Image.open('lime.png'), Image.open('lemon.png')],
]
结果将如下所示:
join_images(
    *images,
    bg_color='green',
    alignment=(0.5, 0.5)
).show()
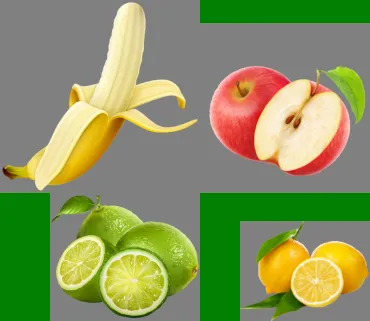
join_images(
    *images,
    bg_color='green',
    alignment=(0, 0)

).show()

join_images(
    *images,
    bg_color='green',
    alignment=(1, 1)
).show()


for i in xrange(...)?难道不应该由paste函数来处理你指定的三个图像文件吗? - mswxrange(0,444,95)。如果你将其更改为xrange(0,444,148),一切都应该没问题。这是因为你水平分割了图像,一个图像的宽度是148。 (另外,你想要组合3个图像,所以你的范围对象应该包含3个值是很合理的。) - Jonas De SchouwerImage.new('RGB', (444,95))……在这里,我指定了444,因为正如您所指出的,有三张图像,每张图像宽度为148像素,所以连接的图像宽度应该是148 X 3 = 444。无论如何,您是正确的——使用xrange是不正确的。我认为95将是最终图像的高度,这是错误的假设,因为这不是xrange的工作方式。 - edesz