以下是使用Python/OpenCV的一种方法。
- 读取输入图像
- 转换为HSV图像
- 对绿色方框进行颜色阈值处理
- 获取外轮廓
- 打印边界框
- 将图像顺时针旋转10度
- 将旋转后的图像转换为HSV图像
- 对旋转后的绿色方框进行颜色阈值处理
- 获取外轮廓
- 创建一个黑色图像,并用白色轮廓填充
- 获取白色像素坐标
- 从坐标中获取最小区域矩形
- 获取旋转矩形的顶点
- 在旋转后的图像上绘制旋转矩形轮廓
输入:

import cv2
import numpy as np
from scipy import ndimage
img = cv2.imread("berry.png")
hsv = cv2.cvtColor(img, cv2.COLOR_BGR2HSV)
range1 = (20,200,170)
range2 = (80,255,255)
thresh = cv2.inRange(hsv,range1,range2)
contours = cv2.findContours(thresh, cv2.RETR_EXTERNAL, cv2.CHAIN_APPROX_SIMPLE)
contours = contours[0] if len(contours) == 2 else contours[1]
x,y,w,h = cv2.boundingRect(contours[0])
print("bounding_box(x,y,w,h):",x,y,w,h)
rotated = img.copy()
rotated = ndimage.rotate(img, -10, cval=255)
hsv_rotated = cv2.cvtColor(rotated, cv2.COLOR_BGR2HSV)
range1 = (20,200,170)
range2 = (80,255,255)
thresh_rotated = cv2.inRange(hsv_rotated,range1,range2)
contours = cv2.findContours(thresh_rotated, cv2.RETR_EXTERNAL, cv2.CHAIN_APPROX_SIMPLE)
contours = contours[0] if len(contours) == 2 else contours[1]
mask = np.zeros_like(thresh_rotated)
cv2.drawContours(mask, [contours[0]], -1, (255), -1)
coords = np.column_stack(np.where(mask.transpose() > 0))
rotrect = cv2.minAreaRect(coords)
box = np.int0(cv2.boxPoints(rotrect))
print("rotate_box_corners:\n",box)
result = rotated.copy()
cv2.polylines(result, [box], True, (0,0,255), 1)
cv2.imwrite("berry_thresh.png", thresh)
cv2.imwrite("berry_rotated.png", rotated)
cv2.imwrite("berry_thresh_rotated.png", thresh_rotated)
cv2.imwrite("berry_mask.png", mask)
cv2.imwrite("berry_rotated_box.png", result)
cv2.imshow("THRESH", thresh)
cv2.imshow("ROTATED", rotated)
cv2.imshow("THRESH_ROT", thresh_rotated)
cv2.imshow("MASK", mask)
cv2.imshow("RESULT", result)
cv2.waitKey(0)
cv2.destroyAllWindows()
输入绿线阈值:

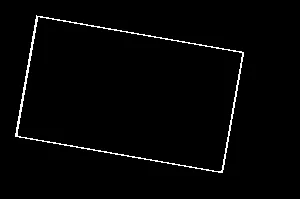
旋转后的输入图像:

旋转图像中的绿线阈值:
填充阈值:

在旋转图像上显示旋转矩形的结果:

输入边界框:
bounding_box(x,y,w,h): 12 13 212 124
输出顶点:
rotate_box_corners:
 [[222 172]
 [ 14 136]
 [ 35  14]
 [243  51]]