去除水平下划线

29
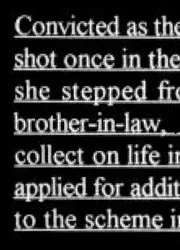
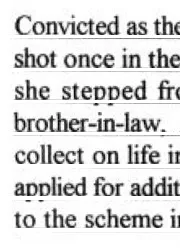
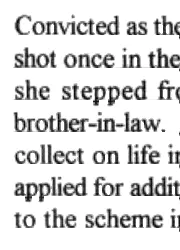
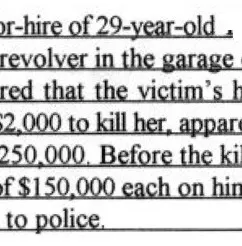
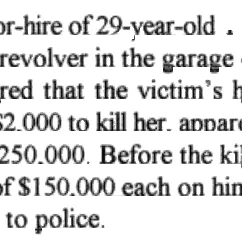
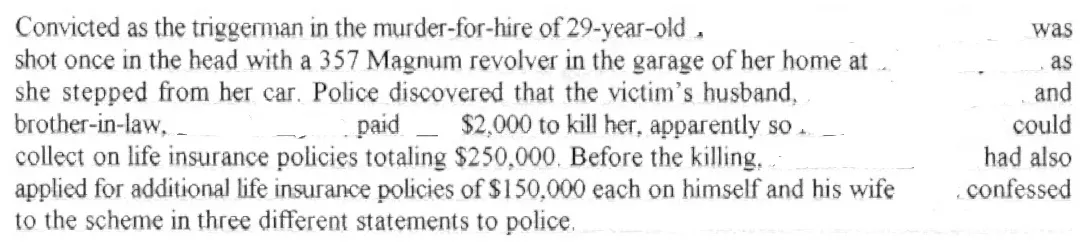
我正在尝试从几百个包含死刑记录信息的JPG文件中提取文本;这些JPG文件由德克萨斯州刑事司法部门(TDCJ)托管。以下是一个示例片段,已删除个人身份信息。

enter image description here

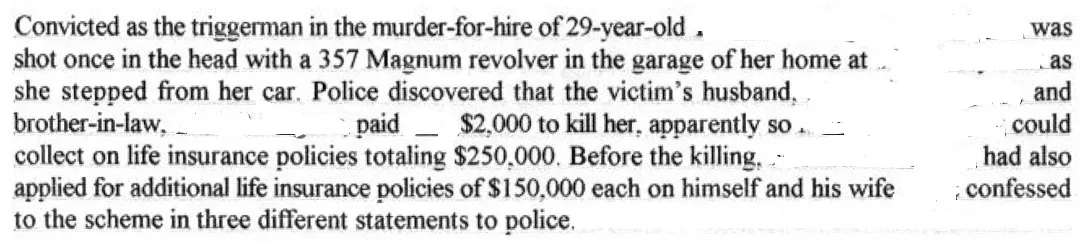
我已经确定下划线是正确OCR的障碍——如果我进入截取子片段并手动涂白线条,则通过 pytesseract获得的OCR非常好。 但是在有下划线的情况下,它非常差。

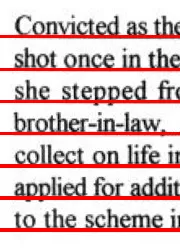
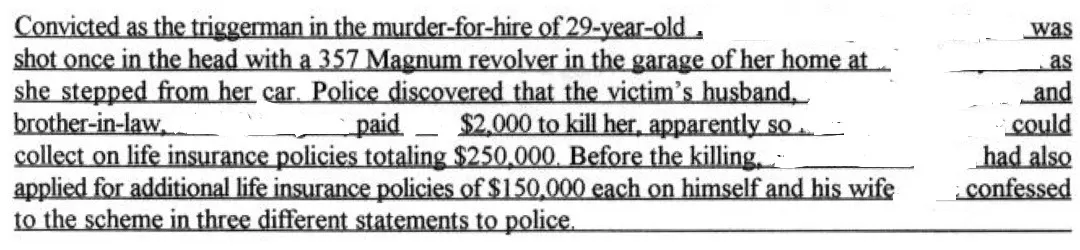
我该如何最好地去除这些水平线?我尝试过:

我希望能够通过在问题上打上标签来寻求帮助,以便有人能够将文档演练的第5步翻译成Python。我尝试了许多转换,如Hugh Line变换,但我对该库和领域没有任何先前的经验,感觉像是在黑暗中摸索。

import cv2

# Inverted grayscale
img = cv2.imread('rsnippet.jpg', cv2.IMREAD_GRAYSCALE)
img = cv2.bitwise_not(img)

# Transform inverted grayscale to binary
th = cv2.adaptiveThreshold(img, 255, cv2.ADAPTIVE_THRESH_MEAN_C,
                            cv2.THRESH_BINARY, 15, -2)

# An alternative; Not sure if `th` or `th2` is optimal here
th2 = cv2.threshold(img, 170, 255, cv2.THRESH_BINARY)[1]

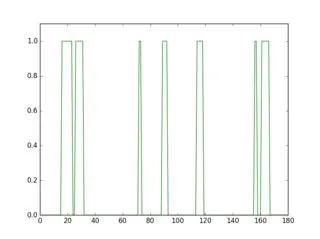
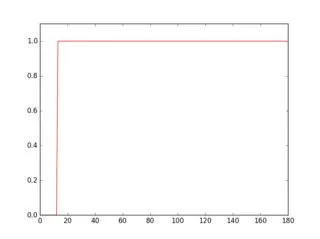
# Create corresponding structure element for horizontal lines.
# Start by cloning th/th2.
horiz = th.copy()
r, c = horiz.shape

# Lost after here - not understanding intuition behind sizing/partitioning

1
请看这个链接是否有帮助?https://raw.githubusercontent.com/FaxOCRTeam/MVP/a96b555cb8cf25b98cf3913eb9c30af3e1cbedc1/src/main/java/processor/ULremover.java。它是用Java编写的,但应该很容易移植到Python。 - Tarun Lalwani
4个回答

14

到目前为止,所有的答案似乎都在使用形态学运算。这里有一些稍微不同的方法。如果线是水平的,这应该会给出相当不错的结果。

为此,我使用下面显示的样本图像的一部分。

sample

加载图像,将其转换为灰度并反转。

import cv2
import numpy as np
import matplotlib.pyplot as plt

im = cv2.imread('sample.jpg')
gray = 255 - cv2.cvtColor(im, cv2.COLOR_BGR2GRAY)

反相灰度图像:

inverted-gray

如果您扫描此反相图像中的一行,您会发现其轮廓根据线条的存在或缺失而有所不同。

plt.figure(1)
plt.plot(gray[18, :] > 16, 'g-')
plt.axis([0, gray.shape[1], 0, 1.1])
plt.figure(2)
plt.plot(gray[36, :] > 16, 'r-')
plt.axis([0, gray.shape[1], 0, 1.1])

绿色的个人资料行没有下划线,红色表示有下划线。如果你计算每个资料行的平均值,你会发现红色资料行的平均值更高。

no-lineline

因此,使用这种方法,您可以检测下划线并将其删除。

for row in range(gray.shape[0]):
    avg = np.average(gray[row, :] > 16)
    if avg > 0.9:
        cv2.line(im, (0, row), (gray.shape[1]-1, row), (0, 0, 255))
        cv2.line(gray, (0, row), (gray.shape[1]-1, row), (0, 0, 0), 1)

cv2.imshow("gray", 255 - gray)
cv2.imshow("im", im)

以下为检测到的红色下划线和清晰图片:

detectedcleaned

清晰图片的Tesseract输出结果:

Convthed as th(
shot once in the
she stepped fr<
brother-in-lawii
collect on life in
applied for man
to the scheme i|

现在应该清楚为什么只使用图像的一部分了。因为原始图像中已经删除了个人身份信息,所以阈值不起作用。但是当您应用它进行处理时,这应该不是问题。有时候您可能需要调整阈值(16,0.9)。

结果看起来不太好,字母的一些部分被移除,一些淡线仍然存在。如果我能进一步改善它,我会更新的。

更新:

做了一些改进;清理并链接字母的缺失部分。我已经对代码进行了注释,因此我相信过程很清晰。您还可以检查生成的中间图像以了解它的工作原理。结果稍微好些了。

11-clean

清理图像后的tesseract输出:

Convicted as th(
shot once in the
she stepped fr<
brother-in-law. ‘
collect on life ix
applied for man
to the scheme i|

22-clean

清理后的图像的tesseract输出:

)r-hire of 29-year-old .
revolver in the garage ‘
red that the victim‘s h
{2000 to kill her. mum
250.000. Before the kil
If$| 50.000 each on bin
to police.

Python 代码:

import cv2
import numpy as np
import matplotlib.pyplot as plt

im = cv2.imread('sample2.jpg')
gray = 255 - cv2.cvtColor(im, cv2.COLOR_BGR2GRAY)
# prepare a mask using Otsu threshold, then copy from original. this removes some noise
__, bw = cv2.threshold(cv2.dilate(gray, None), 128, 255, cv2.THRESH_BINARY or cv2.THRESH_OTSU)
gray = cv2.bitwise_and(gray, bw)
# make copy of the low-noise underlined image
grayu = gray.copy()
imcpy = im.copy()
# scan each row and remove lines
for row in range(gray.shape[0]):
    avg = np.average(gray[row, :] > 16)
    if avg > 0.9:
        cv2.line(im, (0, row), (gray.shape[1]-1, row), (0, 0, 255))
        cv2.line(gray, (0, row), (gray.shape[1]-1, row), (0, 0, 0), 1)

cont = gray.copy()
graycpy = gray.copy()
# after contour processing, the residual will contain small contours
residual = gray.copy()
# find contours
contours, hierarchy = cv2.findContours(cont, cv2.RETR_CCOMP, cv2.CHAIN_APPROX_SIMPLE)
for i in range(len(contours)):
    # find the boundingbox of the contour
    x, y, w, h = cv2.boundingRect(contours[i])
    if 10 < h:
        cv2.drawContours(im, contours, i, (0, 255, 0), -1)
        # if boundingbox height is higher than threshold, remove the contour from residual image
        cv2.drawContours(residual, contours, i, (0, 0, 0), -1)
    else:
        cv2.drawContours(im, contours, i, (255, 0, 0), -1)
        # if boundingbox height is less than or equal to threshold, remove the contour gray image
        cv2.drawContours(gray, contours, i, (0, 0, 0), -1)

# now the residual only contains small contours. open it to remove thin lines
st = cv2.getStructuringElement(cv2.MORPH_ELLIPSE, (3, 3))
residual = cv2.morphologyEx(residual, cv2.MORPH_OPEN, st, iterations=1)
# prepare a mask for residual components
__, residual = cv2.threshold(residual, 0, 255, cv2.THRESH_BINARY)

cv2.imshow("gray", gray)
cv2.imshow("residual", residual)   

# combine the residuals. we still need to link the residuals
combined = cv2.bitwise_or(cv2.bitwise_and(graycpy, residual), gray)
# link the residuals
st = cv2.getStructuringElement(cv2.MORPH_ELLIPSE, (1, 7))
linked = cv2.morphologyEx(combined, cv2.MORPH_CLOSE, st, iterations=1)
cv2.imshow("linked", linked)
# prepare a msak from linked image
__, mask = cv2.threshold(linked, 0, 255, cv2.THRESH_BINARY)
# copy region from low-noise underlined image
clean = 255 - cv2.bitwise_and(grayu, mask)
cv2.imshow("clean", clean)
cv2.imshow("im", im)

哇,这很令人印象深刻。小问题——img = cv2.imread('sample.jpg', cv2.IMREAD_GRAYSCALE)不是可以一步完成cv2.imread('sample.jpg') + cv2.cvtColor(im, cv2.COLOR_BGR2GRAY)的操作吗? - Brad Solomon
@BradSolomon 是的,它可以。我将图像读取为RGB格式以绘制红色下划线,如图所示。 - dhanushka

12

可以尝试这个。

img = cv2.imread('img_provided_by_op.jpg', 0)
img = cv2.bitwise_not(img)  

# (1) clean up noises
kernel_clean = np.ones((2,2),np.uint8)
cleaned = cv2.erode(img, kernel_clean, iterations=1)

# (2) Extract lines
kernel_line = np.ones((1, 5), np.uint8)  
clean_lines = cv2.erode(cleaned, kernel_line, iterations=6)
clean_lines = cv2.dilate(clean_lines, kernel_line, iterations=6)

# (3) Subtract lines
cleaned_img_without_lines = cleaned - clean_lines
cleaned_img_without_lines = cv2.bitwise_not(cleaned_img_without_lines)

plt.imshow(cleaned_img_without_lines)
plt.show()
cv2.imwrite('img_wanted.jpg', cleaned_img_without_lines)

演示

enter image description here

这种方法基于Zaw Lin的answer。他/她在图像中识别出线条,然后进行减法处理以去除它们。然而,我们不能仅仅减去这些线条,因为我们还有包含线条的字母etET-!如果我们只是从图像中减去水平线条,e将与c几乎相同。-就会消失...

Q:如何找到这些线条?

要找到线条,我们可以利用腐蚀(erode)函数。要使用腐蚀,我们需要定义一个核(kernel)。 (您可以将核想象成函数操作的窗口/形状。)

沿着图像滑动(就像2D卷积一样)。原始图像中的像素(1或0)只有在核下所有像素都是1时才被认为是1,否则就会被侵蚀(变为零)。--来源

为了提取行,我们定义一个核 kernel_linenp.ones((1, 5))[1, 1, 1, 1, 1]。这个核将在图像上滑动,并侵蚀掉在核下方为0的像素。
更具体地说,在将核应用于一个像素时,它将捕获其左侧和右侧的两个像素。
 [X X Y X X]
      ^
      |
Applied to Y, `kernel_line` captures Y's neighbors. If any of them is not
0, Y will be set to 0.

在这个内核下,水平线将被保留,而没有水平邻居的像素将消失。这就是我们如何使用以下行捕获线条。

clean_lines = cv2.erode(cleaned, kernel_line, iterations=6)

问:我们如何避免提取e、E、t、T和-之间的行?

我们将使用迭代参数结合腐蚀膨胀

clean_lines = cv2.erode(cleaned, kernel_line, iterations=6)

你可能注意到了iterations=6这一部分。这个参数的作用是使得e,E,t,T,-中的平坦部分消失。这是因为当我们多次应用同样的操作时,这些线条的边界部分会缩小。(只有边界部分会遇到0并变成0作为结果。) 我们使用这个技巧来使这些字符中的线条消失。
然而,这也带来了一个副作用,就是我们想要摆脱的长下划线部分也会缩小。我们可以用dilate来扩展它!
clean_lines = cv2.dilate(clean_lines, kernel_line, iterations=6)

与缩小图像的腐蚀不同,膨胀可以使图像变大。当我们仍然使用相同的核"kernel_line"时,如果核下的任何部分为1,则目标像素将为1。应用此方法,边界将会重新增长。(如果我们选择参数使其在腐蚀部分消失,则e、E、t、T、- 中的部分不会重新增长。)
通过这个额外的技巧,我们可以成功地去除线条,而不会损坏e、E、t、T、和-。

什么因素影响了在“kernel”中行数的确定?(这里是5。)即,选择它而不是随意使用5需要考虑哪些因素? - Brad Solomon
如果核下的所有像素都是1,则原始图像中的像素(1或0)将被视为1,否则它将被侵蚀(变为零)。因此,在这里,我们的窗口是一列(垂直),任何没有垂直邻居为1的像素都将被侵蚀。@BradSolomon请查看我的更新。 - Tai

4
作为源中要检测的大部分线条都是水平长线,与我的另一个答案类似,即“在图像中查找单色水平空间”,请参考此处
这是源图像: 以下是我去除长水平线的两个主要步骤:
1. 在灰度图像上使用长线核进行形态闭合操作。
kernel = np.ones((1,40), np.uint8)
morphed = cv2.morphologyEx(gray, cv2.MORPH_CLOSE, kernel)

然后,获取包含长线的变形图像:

enter image description here

  1. 反转变形图像,并添加到原始图像中:
dst = cv2.add(gray, (255-morphed))

然后获取删除长线的图像:

enter image description here


很简单,对吧?还有存在 小线段,但我认为对OCR影响不大。注意,几乎所有字符保持原样,除了gjpqyQ可能略有不同。但现代OCR工具(如带有LSTM技术的Tesseract)有能力处理这种简单的混淆。

0123456789abcdefghijklmnopqrstuvwxyzABCDEFGHIJKLMNOPQRSTUVWXYZ


保存已删除行的图像的完整代码为line_removed.png

#!/usr/bin/python3
# 2018.01.21 16:33:42 CST

import cv2
import numpy as np

## Read
img = cv2.imread("img04.jpg")
gray = cv2.cvtColor(img, cv2.COLOR_BGR2GRAY)

## (1) Create long line kernel, and do morph-close-op
kernel = np.ones((1,40), np.uint8)
morphed = cv2.morphologyEx(gray, cv2.MORPH_CLOSE, kernel)
cv2.imwrite("line_detected.png", morphed)


## (2) Invert the morphed image, and add to the source image:
dst = cv2.add(gray, (255-morphed))
cv2.imwrite("line_removed.png", dst)

更新 @ 2018.01.23 13:15:15 CST:

Tesseract 是一款强大的 OCR 工具。今天我安装了 tesseract-4.0 和 pytesseract,并使用 pytesseract 在我的结果 line_removed.png 上进行 OCR。

line_removed.png

import cv2       
import pytesseract
img = cv2.imread("line_removed.png")
print(pytesseract.image_to_string(img, lang="eng"))

这是结果,对我来说很好。

Convicted as the triggerman in the murder—for—hire of 29—year—old .

shot once in the head with a 357 Magnum revolver in the garage of her home at ..
she stepped from her car. Police discovered that the victim‘s husband,
brother—in—law, _ ______ paid _ $2,000 to kill her, apparently so .. _
collect on life insurance policies totaling $250,000. Before the killing, .

applied for additional life insurance policies of $150,000 each on himself and his wife
to the scheme in three different statements to police.

was

and
could
had also

. confessed

3

几点建议:

  • 鉴于您的起点是JPEG,请勿加剧损失。将中间文件保存为PNG格式。Tesseract可以很好地处理它们。
  • 使用cv2.resize将图像缩放2倍,然后交给Tesseract。
  • 尝试检测和删除黑色下划线。(这个问题可能会有所帮助)。在保留下降符的同时做到这一点可能有些棘手。
  • 探索Tesseract命令行选项,其中有许多选项(文档十分糟糕,有些需要深入C++源代码才能理解)。看起来字体连字造成了一些困扰。如果我没记错的话(已经过了一段时间),有一两个设置可能会有所帮助。

简单来说,“保留下行字符”是什么意思? - Brad Solomon
2
当你还在编辑问题时,我已经开始回复了。现在更清楚了。所谓“下降部分”,是指像“g”底部这样的部分。请考虑在“triggerman”下面加下划线。 - Dave W. Smith
3
去掉下划线可能会使那个“gg”看起来像“oo”(或更糟,变成Unicode空间中的其他字符)。 - Dave W. Smith

网页内容由stack overflow 提供, 点击上面的
可以查看英文原文,
原文链接